
Installation Guide


Visit jameshardiepros.com for the most recent version.
TR1509_P8/9 09/19
HardieTrim
®
Boards
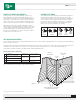
Fasten 2 in. x 4 in.
timber blocks
to a work bench
Corner Tabs
Fasten 2 in. x 8 in. stud
to the timber blocks
HardieTrim
®
Use 4 staples per piece
of trim to fasten the
L-shaped tab to the
pre-built corner. Use
the nail line on the
tabs as a guide.
Corner studs
Siding nail
Corner Tab
Corner Tab
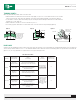
Trim Tab Fastener Table
Figure 25 Figure 26 Figure 27
Application
Framing Material
Tab is nailed into
Flat Tab
Wood Stud
(minimum G=0.42)
Minimum APA rated
7/16 in. OSB
Corner Tab
Minimum APA rated
7/16 in. OSB
Minimum 20
gauge steel
Minimum 20
gauge steel
Wood Stud
(minimum G=0.42)
Fastener
(tab to trim)
Max Tab Spacing
(inches on center)
Four 18 ga. X 1/2 in.
long X 1/4 in. wide
corrosion resistant
crown staples, equally
spaced in one row
16
For each piece of trim,
install Four 18 ga. X
1/2 in. long X 1/4 in.
wide corrosion
resistant crown staples,
equally space in two
rows
20
Fastener
(tab to framing)
One 6d corrosion resistant siding nail
installed through center of tab into framing
Two 4d ring shank corrosion resistant
siding nails equally spaced installed
through tab into framing
One No. 8 X 1 in. long X 0.323 in. head
diameter screw (corrosion resistant)
installed through flange into framing
On each flange, Install one 6d
corrosion resistant siding nail through
tab into framing
On each flange, Install two 4d ring
shank corrosion resistant siding nails
through tab into framing
On each flange, Install one No. 8 X 1 in.
long X 0.323 in. head diameter screw
(corrosion resistant) through tab
into framing
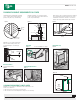
TRIMMING CORNERS
When using HardieTrim tabs prebuild outside corners off the wall.
• Attach HardieTrim Corner Tabs to the back side of the trim using eight(8) - 18 ga. 1/2 in. L x 1/4 in. W narrow crown corrosion resistant
staples using a pneumatic stapler. Ensure the HardieTrim Corner Tabs are fastened tight and straight to the trim boards. (figure 25)
• For wood frame construction, attach trim to building using min. 6d siding nails fastened through the HardieTrim Corner Tabs attached to
minimum 7/16 in. OSB *. (figure 26)
• Attach a HardieTrim Corner Tab 1 in. from each ends and every 20 in. O.C.
• TIP: Creating a jig for the work station is recommended to ensure corners are fastened securely and straight. (figure 27)
BAND BOARD
Terminate ends of the Band Board into Trim or Siding or miter cut the edges of the trim at the corners of the building. Place a HardieTrim Flat Tab at the end of each trim board
and one tab every stud at a maximum of 16 in. O.C. The HardieTrim Flat Tabs should be attached to the trim in an alternating pattern to the top and bottom of the band board
(figures 21, 22). Use 16 ga. galvanized 2 in. long finish nails to ensure proper fastening if needed.