
Installation Guide


73
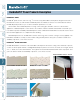
Installation of HardieSoffit
®
Panels
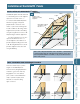
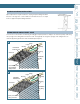
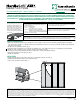
Batten
strip
1
/8-in. gap
with caulk
Moderate
contact
H-Molding
All edges of the
soft panels must be
supported
Blocking
Subfascia
Rafter
Intermediate supports
should be no more
than 24 in. o.c
Ledger
Soft panel
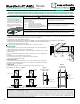
INSTALLATION OF HARDIESOFFIT
®
PANELS
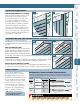
HardieSoffit
®
panels must be attached
to solid framing such as 2x4 supports
spaced no more than 24 in. o.c.
For eaves install HardieSoffit panels
with the long edge of the panel
perpendicular to the ends of the
rafters or joists. Eaves framing must
include a subfascia, blocking, and/or
ledger board to provide solid nailing
along the long dimension of the soffit.
All panel edges must be supported.
For rake overhangs 2x “look outs”
spaced a maximum of 24 in. o.c.
should support a rake subfascia to
provide adequate nailing for the rake
soffit. Blocking between the lookouts
provides support for the rake soffit
along the building.
There are several ways to join the
lengths of HardieSoffit panels.
Panel ends may be lightly butted in
moderate contact, the ends may
be gapped
1
/8 in. and caulked,
joints can be covered with batten
strips, or panels may be joined
with PVC or metal H molding
type connectors.
JOINT TREATMENT FOR HARDIESOFFIT PANELS
Soffit Framing
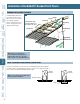
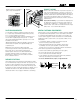
TIP: To aid in soffit panel installation, make a “deadman” or “third hand” post
to help hold and position the soffit panel. Factory built tools such as those
made for drywall installation are available, or they can be fabricated from
lumber on the job-site.
General
Product
Information
Working
Safely
Tools for
Cutting and
Fastening
General
Installation
Requirements
General
Fastener
Requirements
Finishing and
Maintenance
HardieTrim
®
Boards/Battens
HardieWrap®
Weather Barrier
HardieSoffit®
Panels
HardiePlank
®
Lap Siding
HardieShingle
®
Siding
HardiePanel
®
Vertical Siding
Appendix/
Glossary
ESR-1844 &
2290 Report
9.1
9.2