
Installation Guide


75
In addition to the frieze board treatments
described above, there are several other options
for finishing the juncture where the siding meets
the soffit.
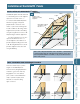
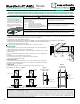
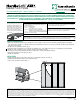
CAULK THE SIDING/SOFFIT JOINT
A fast and economical method of finishing the
siding/soffit juncture is simply to run a bead of
quality caulk along the top edge of the siding
where it meets the soffit. A straight rip cut along
Engineered for Climate
™
Engineered for Climate
™
Caulk joint
between siding
and frieze board.
Siding butts
to frieze
boards
Frieze installed
over siding
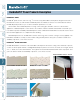
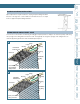
INSTALLING FRIEZE BOARDS
FRIEZE MADE FROM HARDIETRIM
®
5/4, 4/4 BOARDS
When using lap and shingle sidings, install
HardieTrim 5/4, 4/4 boards as a frieze
board before putting in the siding. Then
run courses of siding up to the frieze
board and caulk the junction of the frieze
board and siding. In a building sided with
HardiePanel
siding, the frieze board is
commonly over the panel siding. If joints in
the HardieTrim 5/4, 4/4 boards frieze are
necessary for longer runs, join boards with
a bevel cut. Nail the frieze board every 16
in. using finish or siding nails.
Caulk joint
between siding
and soft.
Crown molding
covers the
joint between
siding
and
soft.
J-Channel covers
the top edge of
the siding
at the
soft.
TREATMENT OPTIONS FOR THE SIDING/SOFFIT JUNCTURE
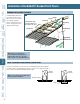
In areas where additional insect
protection is desired, a screen may
be applied to the back side of the
panel prior to soffit installation. After
the screen type and size is selected,
cut the screen to fit so that it covers
the vent holes and overlaps the
non-vented area of the soffit by 1
in. to 2 in. Secure the screen to the
backside of the soffit panel using a
bead of construction adhesive.
INSECT SCREEN
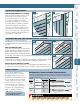
wood
studs
16 in. o.c
22.5 in. o.c.
24 in. o.c.
steel
studs
16 in. o.c.
HARDIESOFFIT
®
PANEL FASTENER SPECIFICATIONS
The Fastener Specifications table shows fastener options for a variety of different nailing substrates.
Please refer to the applicable ESR report online (see back page) to determine which fastener meets
your wind load design criteria.
1
.113 in. x .267 in. x 1.5 in.
7
Ribbed Bugle-Head No. 8
.323 in. x 1 in.
6
.083 in. x .187 in. x 1.5 in.
4d
common
ring shank
siding nail
1 6
6
1
7
screw
Fastening
Substrate
Fastening Types
Approved Fastener
TIP: Stainless steel fasteners are
recommended when installing
James Hardie
®
products.
the top edge of the siding ensures an aesthetically pleasing fit where it meets the soffit.
INSTALL CROWN MOLDING
Crown molding is another way of finishing and sealing the soffit/siding juncture. Install
and finish the crown molding according to the manufacturer’s specifications.
OVER THE TOP OF THE SIDING WITH ‘J’ CHANNEL
Once the soffit is in place, install a vinyl “J” channel upside down with the base of the
“J” against the soffit. Then rip the final course of siding so that it fits inside the channel.
General
Product
Information
Working
Safely
Tools for
Cutting and
Fastening
General
Installation
Requirements
General
Fastener
Requirements
Finishing and
Maintenance
HardieTrim
®
Boards/Battens
HardieWrap®
Weather Barrier
HardieSoffit®
Panels
HardiePlank
®
Lap Siding
HardieShingle
®
Siding
HardiePanel
®
Vertical Siding
Appendix/
Glossary
ESR-1844 &
2290 Report
9.7 9.8
9.9
9.10
9.11
WARNING
Please note that the addition of an insect screen reduces the total
amount of vent area of the soffit depending on the size screen used.
!