
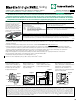
Installation Guide


101
HS11121_P3/5 6/13
Panels for sidewall applications are available in 48" lengths. Pieces needed for one square (100sq.ft.) of product coverage = approximately 43, based on maximum 7" exposure.
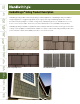
HARDIESHINGLE
®
STRAIGHT EDGE PANEL COVERAGE
7" EXPOSURE HARDIESHINGLE
®
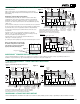
STRAIGHT EDGE PANELS INSTALLATION
Maximum Exposure of 7"
Steps 1 - 4
REFER TO STAGGERED EDGE INSTRUCTIONS ABOVE
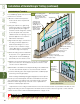
Figure 16
Steps 5 & 6
second
course
8¼"
HardiePlank
®
lap siding
trim first panel
to hit center of
furthest stud
1¼"
starter
strip
15-1/4"
panels
sheathing
water-resistive
barrier
Trim 1/8” min.
gap for
caulk
DO NOT NAIL THROUGH
THIS AREA
16" or 24"
o.c.
3/8"
7"
position nails on nail line and secure into framing. Only when application
is to minimum 7/16" thick APA rated sheathing, position nails on nail line
spaced a maximum of 13 3/4" o.c. Allow 3/8" from panel edges.
15-1/4"
panels
1/8” min.
gap for
caulk
7"
7"
first
course
second
course
third
course
Fastener Requirements
0.083" x 0.187" HD x 1 1/2" long ringshank nails are used for fastening
HardieShingle
®
Staggered Edge Panels to both framing and to 7/16" thick APA
rated sheathing.
HARDIESHINGLE
®
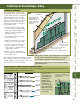
STAGGERED EDGE PANELS INSTALLATION
Steps 1- 4
Steps 5 & 6
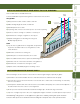
Panels for sidewall applications are available in 48" lengths. Pieces needed for one square (100sq.ft.) of product coverage = approximately 50, based on a
maximum 6" exposure from the top edge of HardieShingle panels in subsequent courses (refer to Figure 15).
HARDIESHINGLE
®
STAGGERED EDGE PANEL COVERAGE
1/4" gap. Do not caulk.
band board
Figure 16
Figure 15
HardieShingle
®
Staggered Edge Panel Installation
Install HardieShingle
®
panels with joints butted in moderate contact. Due to
overlapping of the joints, caulk is not required except where panels abut trim
boards. (figs 15 & 17). Ensure keyways do not line up on subsequent courses.
1) Install a 1-1/4" starter strip, then install a 8-1/4" wide HardiePlank
®
lap siding
starter course.
2) Place first panel so that panel end centers over stud. Trim panel as needed. Butt
the cut end into trim as shown (figs 15 & 17). When installing over a band board or
any horizontal surface, leave 1/4" gap between bottom of siding and flashing.
3) Secure panel, leaving 1/8" gap for caulk at trim and continue the course
along the wall.
4) Start the second course, by removing the equivalent of one full stud
cavity (16" or 24" OC), again abutting the cut end into the trim (figs 15 & 17).
This is to prevent pattern repetition. Repeat step 3.
5) Start the third course, by removing the equivalent of two full stud
cavities (figs 15 & 17) and repeat step 3.
6) Continue up the wall repeating steps 2 through 6 until desired height is reached.
second
course
8 1/4"
HardiePlank
®
lap siding
trim first panel
to hit center of
furthest stud
1¼"
starter
strip
15 7/8"
panels
sheathing
water-resistive
barrier
Trim
1/8” min.
gap for
caulk
DO NOT NAIL THROUGH
THIS AREA
16" or 24"
o.c.
3/8"
6"
position nails on nail line and secure into framing.
Only when application is to minimum 7/16" thick APA
rated sheathing, position nails on nail line spaced a
maximum of 13 3/4" o.c. Allow 3/8" from panel edges.
6"
6"
second
course
third
course
first
course
Note: For aesthetic purposes you may trim
the bottom of the panel to create a straight
edge. If doing so, ensure all cuts ends are
properly sealed and painted (fig 14)
1/8” min. gap for caulk