
Installation Guide


HardieShingle
®
Siding
HS1067 P6/8 04/18
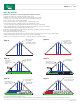
Figure 28
CORNER DETAILS
A. Panels butted against corner boards.
B. Panels butted against square wood
strip on inside corner, flashing behind.
C. Laced outside corner.
D. Laced inside corner.
minimum (1 in) thick trim
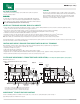
WINDOWS AND DOORS
Building wall components such as windows, doors and other exterior wall penetrations shall be installed in accordance with the component manufacturer’s written
installation instructions and local building codes. Where windows or doors are installed, continue the application of siding as if the wall is complete. Triming for the
opening and using the resulting piece may throw off the spacing above the break.
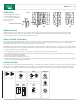
PNEUMATIC FASTENING
GENERAL FASTENING REQUIREMENTS
James Hardie products can be hand nailed or fastened with a pneumatic tool. Pneumatic fastening is highly recommended. Set air pressure so that the fastener is driven snug
with the surface of the siding. A flush mount attachment on the pneumatic tool is recommended. This will help control the depth the nail is driven. If setting the nail depth
proves difficult, choose a setting that under drives the nail. (Drive under driven nails snug with a smooth faced hammer - Does not apply for installation to steel framing).
Fasteners must be corrosion resistant, galvanized, or stainless steel. Electro-galvanized are acceptable but may exhibit premature corrosion. James Hardie recommends the
use of quality, hot-dipped galvanized nails. James Hardie is not responsible for the corrosion resistance of fasteners. Stainless steel fasteners are recommended when
installing James Hardie
®
products near the ocean, large bodies of water, or in very humid climates.
Manufacturers of ACQ and CA preservative-treated wood recommend spacer materials or other physical barriers to prevent direct contact of ACQ or CA preservative-treated
wood and aluminum products. Fasteners used to attach HardieTrim Tabs to preservative-treated wood shall be of hot dipped zinc-coated galvanized steel or stainless steel and
in accordance to 2009 IRC R317.3 or 2009 IBC 2304.9.5
• Consult applicable product evaluation or listing for correct fasteners type and placement to achieve specified design wind loads.
• NOTE: Published wind loads may not be applicable to all areas where Local Building Codes have specific jurisdiction. Consult James Hardie Technical Services if you are
unsure of applicable compliance documentation.
• Drive fasteners perpendicular to siding and framing.
• Fastener heads should fit snug against siding (no air space).
• NOTE: Whenever a structural member is present, HardiePlank should be fastened with even spacing to the structural member. The tables allowing direct to OSB or plywood
should only be used when traditional framing is not available.
ALUMINUM
CLIPPED
STAPLES
HEAD NAILS
FASTENERS
UNDER
DRIVE
OVER
DRIVE
SLANT
IF, THEN IF, THEN ADDITIONAL NAIL
WOOD
FRAME
HAMMER
FLUSH
REMOVE &
REPLACE
COUNTERSINK
& FILL
STEEL
FRAME
FACE
NAIL
DO NOT DO NOT
DO NOT USE
AL
SNUG FLUSH