
Installation Guide
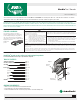
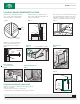

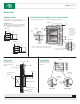


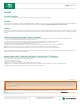

Figure 16
Butt-to Siding
HardieTrim
frieze board
Trim Over Siding
HardieTrim
frieze board
blocking/support
if required
sheathing
water resistive barrier
lap siding
1/4 in. gap
flashing
HardieTrim board
caulk if required
HardiePlank
lap siding
Figure 15
Butt to Siding
Horizontal
Flashing
leave a minimum 1/8 in. gap between
siding and trim, then caulk.
Figure 14
flashing
over trim
do not
caulk along
top edge
HardieTrim
board
water-
resistive
barrier
siding
16 in. max.
NOTE: Follow your window/door manufacturer’s installation
instructions for caulking guidance between window and trim.
Butt to Siding
Trim the opening prior
to the installation of the
siding. Position trim
boards on the wall and
secure. Allow proper
fastener spacing at
edges and ends.
corner
studs
Figure 12
Figure 13
2 in. Finish nail
2 in. Finish nail
corner
studs
TRIMMING CORNERS
When installing corners or other vertical trim,
position boards on the wall and attach (figure 12).
Pre-Built Corners
Alternatively, corners can be pre-built off the wall
using 2 in. finishing nails. Each side of the pre-built
corner must be secured to the wall (figure 13).
BAND BOARD
For band board
applications, a flashing is
required over the trim.
(figure 15)
FRIEZE BOARDS
HardieTrim boards can
be used as frieze board.
(figure 16)
TRIM APPLICATION FOR WINDOWS, DOORS & OTHER OPENINGS
Flashing over trim is required per code for all installation methods. (figure 14)
Visit jameshardiepros.com for the most recent version.
TR1502_P4/9 09/19
INSTALLATION
HardieTrim
®
Boards
Shim
behind
trim