
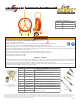
Operating Guide
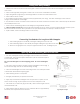


1. Identify both ends of conduit. Ensure switch gear or other components in area will not be damaged by rod entering
vault or box.
2. Insert rod through safety feed guide. Failure to do so can cause a hazardous condition.
3. Adjust drag brake by tightening or loosening handle so rod does not feed itself from reel.
4. Insert rodder end into conduit.
5. Push rodder through conduit using short thrusts (approximately 6-12” long). This takes advantage of rod’s column
strength and minimizes risk of breakage.
6. Pay attention to feel of rod. When rod end enters box at end of conduit and contacts vault or box wall, impact vibrations
can normally be felt in rod.
7. Attach wire or cable being pulled to the Pulling Eye using standard methods.
8. When recoiling rod onto reel, loosen drag brake, allowing reel to turn freely. Use short, straight pulls from conduit to push
back onto reel. Do not bend, twist or jerk rod. Do not spin reel manually in an attempt to recoil rod on reel.
9. If pull is halted, check for kinking in cable or wire at entry.
Connecting Two Rodders For Long Runs With Grapples
1. Attach male grapple to one Buddy and begin rodding duct from one end.
2. Attach female grapple to other Buddy and begin rodding from opposite end of duct.
3. When the two grapples meet, they lock together inside the duct, enabling the pull.
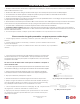
Fig. 2B Splice Repair
Fig. 2A End Ferrule Repair
Fig. 1
1. Cut away damaged section(s) of berglass rod with a ne-tooth hacksaw
or sharp knife. Strip protective jacket back about 7/8” for end ferrule repair or
3/4” for rod splice repair.
Do not cut into berglass core when stripping jacket. Do not crush berglass
core.
2. Use emery cloth provided to roughen surface of berglass core end (Fig. 1).
Do not remove large amounts of material during sanding.
3. Clean ends of berglass core with a cleaning solvent such as lacquer thinner
or denatured alcohol before applying glue.
4. Allow cleaning solvent to evaporate.
5. Throughly mix adhesive per product instructions.
6. Apply drop of adhesive to berglass core end (in case of a splice, do one
end at a time as in Fig. 2A) and spread over core with toothpick or nail.
7. Twist ferrule as you insert rod (Fig. 2A and 2B). Clean off excess glue. Return
unused materials to kit.
8. Allow sufcient time for adhesive to cure. Adhesive will set in approximately
20 minutes, but requires 24 hours for full cure.
Splicing Rod Or Attaching New End Ferrule
Using The Easy Buddy®
www.SpartacoGroup.com
Clover, SC