Instruction Book Manual de Instrucciones Manuale d’Instructions 1 2 3 4 5 6 7 8 4 N 3 2 1 4 N 3 2 1 4 N 3 2 1 4 N 3 2 1 9 10 11 NO. 0.5 1 1.5 5 4 3 2 1 0.
IMPORTANT SAFETY INSTRUCTIONS This sewing machine is not a toy. Do not allow children to play with this machine. The machine is not intended for use by children or mentally infirm persons without proper supervision. This sewing machine is designed and manufactured for household use only. Read all instructions before using this sewing machine. DANGER - To reduce the risk of electrical shock: 1. Your overlock machine should never be left unattended when plugged in. 2.
INSTRUCCIONES IMPORTANTES DE SEGURIDAD Esta máquina de coser no es un juguete. No permita que los niños la utilicen para jugar. La máquina no debe ser utilizada por niños ni personas con retardo mental sin una supervisión adecuada. Esta máquina de coser ha sido diseñada y fabricada para uso doméstico exclusivamente. Lea todas las instrucciones antes de utilizar esta máquina de coser. PELIGRO –Para reducir el riesgo de descarga eléctrica: 1.
IMPORTANTES RECOMMANDATIONS DE SÉCURITÉ Votre surjeteuse a été conçue et fabriquée pour un usage DOMESTIQUE uniquement. Lire attentivement toutes les instructions avant de l’utiliser. DANGER - Pour éviter tout risque de choc électrique: 1. Ne jamais laisser la machine sans surveillance quand elle est raccordée au secteur. 2. Retirer toujours la prise murale après l’utilisation et avant le nettoyage. 3. Débrancher systématiquement avant de changer l’ampoule.
TABLE OF CONTENTS SECTION I SECTION IV Machine Parts Test Sewing Front View .................................................................. 8 Side Cover ............................................................... 10 Front Cover .............................................................. 10 Standard Accessories .............................................. 12 Setting Foot Pressure .............................................. 74 Controlling Sewing Speed ......................................
ÍNDICE SECCIÓN IV SECCIÓN I Cosido de prueba Ajuste de la presión del prensatelas ....................... 75 Control de la velocidad de costura .......................... 75 Bandeja de restos .................................................... 75 Empezando a coser ................................................. 77 Dispositivo para costura de presilla ......................... 79 Fijación del extremo de la costura ........................... 81 Partes de la máquina Vista frontal .......................
TABLE DES MATIÈRES SECTION I Composants de la machine Vue de face ................................................................. 9 Couvercle latéral ....................................................... 11 Couvercle avant ........................................................ 11 Accessoires standard ............................................... 13 SECTION IV Essai de couture Réglage de la pression du pied ................................ 75 Contrôle de la vitesse de couture .......................
7
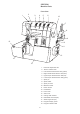
SECTION I Machine Parts Front View 1 2 3 4 5 6 19 7 8 18 16 17 9 15 10 11 12 14 13 1. 2. 3. 4. 5. 6. 7. 8. 9. 10. 11. 12. 13. 14. 15. 16. 17. 18. 19.
SECCIÓN I Partes de la máquina SECTION I Composants de la machine Vista frontal Vue de face 1. Control de ajuste de presión 2. Palanca de liberación de tensión 3. Control de tensión del hilo de la aguja izquierda (amarillo) 4. Control de tensión del hilo de la aguja derecha (azul) 5. Control de tensión del hilo del áncora superior (rojo) 6. Control de tensión del hilo del áncora inferior (verde) 7. Pasador de carrete 8. Portacarretes 9. Base del pasador del carrete 10.
Side Cover 2 1 Grasp the cover and open it to the left. 3 4 9 5 6 1. 2. 3. 4. 5. 6. 7. 8. 9. Presser foot lever and thread cutter Needle clamp Needle(s) Presser foot Needle plate Needle plate release lever Cutting width dial Upper knife release knob Spreader holder 7 8 Front Cover 10 Pull the cover to the right and open it towards you. 15 10. 11. 12. 13. 14. 15. 16. 17. 18.
Cubierta lateral Couvercle latéral Tome la cubierta y ábrala hacia la izquierda. Saisir le couvercle et l’ouvrir sur la gauche. 1. 2. 3. 4. 5. 6. 7. 8. 9. 10. 1. 2. 3. 4. 5. 6. 7. 8. 9. 10.
Standard Accessories In the Accessory Box 3 4 2 1. 2. 3. 4. 5. 6. 7. 8. 9. 10. 11. 5 1 6 7 8 9 11 10 13 Spool caps Cleaning brush Oil tube Snap-on thread guide Tension release clip Spare upper knife Wrench for replacing upper knife Needle threader Tweezers Allen screwdriver 1.5 mm Assortment of needles EL x 705 Top Cover Accessories (In the accessory box) 12. Spreader Device (top cover hook) 13. Round Top Cover Guide (insert into R2 needle position) 14.
Accesorios Estándar Accessoires Standard En la caja de accesorios Dans la boîte d’accessoires 1. 2. 3. 4. 5. 6. 7. 8. 9. 10. 11. 1. 2. 3. 4. 5. 6. 7. 8. 9. 10. 11.
SECTION II Machine Set-up Attaching the Thread Guide Pole 1. Insert the thread guide pole into the spool pin base located at the back of the machine. Make sure the slot of the thread guide pole grips the rib in the base hole. 2. Pull the thread guide pole to its highest position. Align the thread guide portion with the spool pins. Placing the Foam Pads and Spool Holders Remove the spool holders. Place the foam pads and the spool holders. The foam pads help stabilizing the spools of thread.
SECCIÓN II Instalación de la Máquina SECTION II Mise en Place de la Machine Fijación del Brazo Guía del Hilo Fixation du Montant de Guide-fil 1. Inserte el brazo guía del hilo en la base del pasador del carrete situada en la parte posterior de la máquina. Compruebe que la ranura del brazo guía del hilo agarre la lengüeta del orificio de la base. 1. Insérer le montant de guide-fil dans l’embase des broches porte-bobine située à l’arrière de la machine.
Connecting Machine to Power Supply The power switch should be off. Before connecting the power cord/foot control, make sure the voltage and frequency shown on the machine are identical to your electrical power. Insert the machine/foot control plug into the machine socket and the power supply plug into the wall outlet. For Your Safety 1. While the machine is in operation, always keep your eye on the sewing area and do not touch any moving parts – needle(s), handwheel, upper knife, loopers, etc. 2.
Conexión de la máquina a la alimentación Branchement de la machine sur l’alimentation électrique El interruptor de encendido debe estar apagado. Antes de conectar el cable de alimentación/pedal, cerciórese de que la tensión y la frecuencia que muestra la máquina sean idénticas a las de la red eléctrica de su hogar. Enchufe el conector de la máquina/pedal en la toma de la máquina y conéctelo al enchufe de la pared. L’interrupteur d’alimentation doit être en position d’arrêt.
How To Set Up Machine Using the Program Display Panel Turn the program selection dial and select the desired program number. NOTE: Machine should not be threaded before setting the machine up for the selected program. Cut and remove all threads. HINT: Cut threads at looper and needle eyes and hand pull threads away. IMPORTANT: Never press on foot control to sew out threads. A C B D F K E I H G L M J A. B. C. D. E. F. G. H. I. J. K. L. M.
Configuración de la máquina utilizando el panel del visor de programas Configuration de la machine à l’aide du panneau d’affichage des programmes Gire el control de selección de programas y elija el programa deseada. Tourner le sélecteur de programmes et sélectionner le programme désiré. NOTA: No debe enhebrarse la máquina antes de configurar la máquina con el programa seleccionado. Corte y retire todos los hilos.
A. Stitch type Select the program number corresponding to the stitch type you wish to sew. There are 20 stitch types to select. Refer to the stitch diagrams indicated on the machine and inside the front cover. NOTE: Some program numbers correspond to more than one stitch type. 1 2 3 4 5 6 7 8 9 Example: • Program 2 corresponds to three stitches – 5-Thread, 3-Thread Wide and Overlock-3. 10 10 • R NO.
A. Tipo de puntada Seleccione el número de programa que corresponda al tipo de puntada que desea emplear. Hay 20 tipos de puntada que puede seleccionar. Consulte los diagramas de puntadas indicados en la máquina y en el interior de la cubierta frontal. A. Type de point Sélectionner le numéro de programme correspondant au type de point que vous souhaitez coudre. La machine propose un choix de 20 types de point. Consulter les schémas des points figurant sur la machine et à l’intérieur du couvercle avant.
C. Program Number The thread tension dials will be automatically set to “N” when selecting the program. The tensions are automatically adjusted to the proper values for the selected program. The instructions for machine set-up are also displayed using easy to read symbols. NOTE: It is very important to select the correct program number corresponding to the desired stitch. Make sure to set the machine up before attempting to thread.
C. Número del programa El control de tensión del hilo se ajusta automáticamente a “N” al seleccionar el programa. La tensión se ajusta automáticamente en el valor apropiado para el programa seleccionado. También se muestran las instrucciones para configurar la máquina utilizando símbolos de fácil lectura. C. Numéro de programme Les molettes de tension des fils se règlent automatiquement en position “N” lorsque l’on choisit ce programme.
F. Needle Position There are 5 needle positions available to sew the 20 stitches. The needles to be used for the specific stitch are indicated by color dots above the needle position marks. The color of the dot corresponds to the color of stitch type. Insert the needle into the proper needle position. L2 L1 Example: • Yellow dots = 5-Thread Insert the needles into positions L2 and R1. • Blue dot = 3-Thread Wide Insert the needle into position R1. • Red dot = Overlock 3 Insert the needle into position R1.
F. Posición de la aguja Hay cinco posiciones de la aguja disponibles para coser las 20 puntadas. Las agujas que deben utilizarse para las puntadas determinadas se indican mediante puntos de color sobre las marcas de posición de la aguja. El color del punto se corresponde con el color del tipo de puntada. Inserte la aguja en la posición correcta. F. Position d’aiguille Il existe 5 positions d’aiguille, qui vont permettre de coudre les 20 points.
H. Upper Knife To disengage the upper knife (down) Hand turn the handwheel to bring the needle bar to its highest position. Open the front and side covers. Push the upper knife release knob to the right and turn it towards you. NOTE: Do not allow the fabric edge to extend beyond the right side of the needle plate when sewing with the upper knife disengaged. (Example: any stitch that uses either R1 or R2 needle position.
H. Cuchilla superior H. Couteau supérieur Para desenganchar la cuchilla superior (abajo) Pour désengager le couteau supérieur Gire el volante para elevar la barra de la aguja hasta (position basse) su posición más alta. Abra las cubiertas frontal y laterales. Tire de la perilla de liberación de la cuchilla superior hacia la derecha y gírela hacia usted. Tourner le volant à la main de façon à amener la barre à aiguille dans sa position la plus haute. Ouvrir le couvercle avant et le couvercle latéral.
J. Overlock Cover or Sewing Table For program numbers 1-9, always attach the overlock cover to the front cover. To attach the overlock cover The overlock cover protects the loopers. To attach the overlock cover, open the front cover and place the overlock cover on the outside of the front cover. Insert the end of the overlock cover into the slot of the front cover. Push the overlock cover firmly until the tab snaps into place.
J. Cubierta de sobrehilado o mesa de coser J. Couvercle de surjeteuse ou table à coudre Para los programas del 1 al 9, fije siempre la cubierta de sobrehilado a la cubierta frontal. Pour les programmes numéro 1 à 9, toujours fixer le couvercle de surjeteuse sur le couvercle avant. Para fijar la cubierta de sobrehilado Fixation du couvercle de surjeteuse La cubierta de sobrehilado protege las áncoras.
K. Presser Foot (A or B) B Switch the lever on the presser foot to A or B. The lever controls the spring action that occurs on the underside of the foot. A The tip of the foot has markings that line up with the insertion point of the needles - a great guide for accurate sewing. Example: • Yellow A - 5 Thread: position A • Blue B - 3 Thread Wide and Overlock 3: position B. NOTE: Replace the presser foot with the Top Cover foot R (blue transparent) when sewing Top Cover Stitch (see page 56). L.
K. Pie prensatelas (A o B) K. Pied presseur (A ou B) Coloque la palanca del pie prensatelas en la posición A o B. La palanca controla la acción del resorte que tiene lugar bajo el pie prensatelas. Pousser le levier du pied presseur en position A ou B. Le levier commande le ressort qui agit en dessous du pied. La punta del pie tiene unas marcas que coinciden con el punto de inserción de las agujas: una estupenda guía para coser de manera precisa.
M. Chain Looper Tension (Brown) Thread the chain looper tension for either 5-Thread stitch or after selecting any stitch in program 10. Example: • 5-Thread stitch (Yellow): Thread the chain looper tension and set it to N. • 3-Thread Wide and Overlock 3 (Blank): Do not thread chain looper. Needles The machine is supplied with Schmetz brand EL x 705 needles. This is an industrial type needle that ensures proper stitch formation at high speeds.
M. Tensión del áncora de cadeneta (marrón) M. Tension du boucleur de point de chaînette (marron) Enhebre el áncora de cadeneta y la tensión del áncora de cadeneta para puntada de 5 hilos o después de seleccionar cualquier puntada en el programa 10. Enfiler le boucleur de point de chaînette et le dispositif de tension du boucleur de point de chaînette soit pour le point 5 fils, soit après avoir sélectionné un point quelconque du programme 10.
SECTION III Threading The threading routes will change according to the selected program. As you learn to thread your machine, we recommend using the threads of the same colors as that of the tension dials. This will help you understand the function of each thread. Tension settings of programs are based on sewer using polyester or a polyester/cotton blend threads for all threading positions. Choose good quality threads of even and consistent thickness.
SECCIÓN III Enhebrado SECTION III Enfilage Los trayectos de enhebrado cambiarán en función del programa seleccionado. Les trajets d’enfilage changent en fonction du programme sélectionné. Para aprender a enhebrar la aguja, le recomendamos que utilice hilos del mismo color que los controles de tensión. Eso le ayudará a comprender la función de cada hilo. Pour apprendre à enfiler votre machine, nous vous recommandons d’utiliser des fils de la même couleur que les molettes de tension.
After threading the thread guide bar, slip the thread into the first guide on the machine as shown. Accessories For Decorative Threads There are many decorative threads available for overlock use. Make sure you choose threads and yarns that smoothly pass through the looper or needle. Never use a thread that breaks easily if you pull on it. Do not use fuzzy (ex. mohair yarn) or uneven threads that can catch on thread guides.
Después de enhebrar la barra guía del hilo, deslice el hilo en la primera guía de la máquina como se indica. Après avoir enfilé la barre guide-fil, glisser le fil dans le premier guide de la machine, comme illustré. Accesorios para Hilos Decorativos Accessoires pour Fils Décoratifs Hay muchos hilos decorativos disponibles para sobrehilado. Asegúrese de utilizar hilos y lana que pasen suavemente a través del áncora o la aguja. No utilice un hilo que se rompa fácilmente al tirar de él.
Quick Reference Threading Charts Refer to the detailed threading charts for each threading path corresponding to code letter; (A), (B3) etc. (page 62-72). For the best results, sew on light to medium weight fabrics. SAFETY 4-THREAD STITCH Select 1 and set up the machine. An overlock stitch that employs two needles. The stitch stretches without breaking. The second needle thread reinforces the durability and strength of the stitch, but the stitch retains its elasticity.
Tablas de Referencia Rápida para el Enhebrado Tableaux d’Enfilage Abrégés Consulte las tablas de enhebrado para obtener información acerca de los trayectos de enhebrado correspondientes a cada letra del código: (A), (B3), etc. (páginas 62-73). Consulter les tableaux d’enfilage détaillés correspondant à la lettre de code de chaque trajet d’enfilage’– (A), (B3), etc. (pages 62 à 73). Para los mejores resultados, cosa en los tejidos de peso ligero a medio.
STRETCH KNIT STITCH Select 1 and set up the machine. The same characteristics as the Safety 4-Thread stitch. The Stretch Knit Stitch program uses the differential feed and stitch length settings to prevent knitwear from stretching while sewing. Common Uses • Apply ribbing to knit necklines, cuffs or waistbands. • Garment construction on sweater knits.
PUNTADA EN PRENDAS DE PUNTO ELÁSTICO Seleccione 1 y configure la máquina. POINT TRICOT EXTENSIBLE Sélectionner 1 et configurer la machine. Las mismas características que la puntada de seguridad de 4 hilos. El programa de puntada elástica en punto utiliza los ajustes de arrastre diferencial y de longitud de la puntada para evitar que la prenda de punto se estire mientras cose. Caractéristiques identiques au point de sécurité 4 fils.
3-THREAD STITCH WIDE Select 2 and set up the machine. Three threads lock together on the fabric edge forming a balanced stitch. The overlock stitch is suitable for medium to heavyweight fabrics. Common Uses • Garment construction on knitwear. • Edge finish on single layer of fabric. Thread in the following sequence: 1 Red (F) thread path for upper looper (page 67) 2 Green (G) thread path for lower looper (page 68) 3 Blue (D2) thread path for R1 needle (page 65) OVERLOCK 3 Select 2 and set up the machine.
3 HILOS ANCHA Seleccione 2 y configure la máquina. 3 FILS LARGE Sélectionner 2 et configurer la machine. Tres hilos combinados entre sí en el borde del tejido para formar una puntada equilibrada. La puntada de sobrehilado se adapta a su uso con tejidos de peso medio a pesado. Trois fils se nouent ensemble sur le bord du tissu pour former un point équilibré. Le point de surjet convient aux tissus moyennement épais à épais. Utilisations courantes • Confection des tricots.
FLATLOCK 3 Select 3 and set up the machine. Three threads form an unbalanced stitch that can be pulled open into a flat seam. The seam resembles the top stitch seen on ready-to-wear sweatshirts and knit sportswear. Common Uses • Garment construction on bulky knitwear.
COSTURA PLANA 3 Seleccione 3 y configure la máquina. FLATLOCK 3 Sélectionner 3 et configurer la machine. Se forma una puntada no equilibrada con tres hilos que puede abrirse en una costura plana. La costura se parece a la puntada superior utilizada en sudaderas y prendas de punto listas para usar. Trois fils forment un point non équilibré que l’on peut ouvrir pour avoir une couture à plat. La couture ressemble à la surpiqûre que l’on trouve sur les sweatshirts et les vêtements de sport tricotés.
FLATLOCK 2 Select 5 and set up the machine. The needle and lower looper threads form a stitch that can be pulled flat. Common Uses • Garment construction on undergarments. • Hemming technique. Thread in the following sequence: 1 Green (G) thread path for lower looper (page 68) 2 Yellow (B2) thread path for R1 needle (page 63) OVERCAST 2 Select 5 and set up the machine. The needle and lower looper threads form an edge finish that is lightweight and flat.
COSTURA PLANA 2 Seleccione 5 y configure la máquina. FLATLOCK 2 Sélectionner 5 et configurer la machine. Los hilos de la aguja y el áncora inferior forman una puntada que puede abrirse en una costura plana. Le fil d’aiguille et le fil du boucleur inférieur forment un point que l’on peut étendre à plat. Usos habituales • Confección de prendas de ropa interior. • Técnicas de dobladillo. Utilisations courantes • Confection des sous-vêtements. • Technique d’ourlage.
NARROW HEM 3 Select 6 and set up the machine. Three threads form a balanced stitch that is a great narrow edge finish. Common Uses • Hemming on scarves, napkins and ruffles. • Garment construction on undergarments made of lightweight knit fabrics. Thread in the following sequence: 1 Red (F) thread path for upper looper (page 67) 2 Green (G) thread path for lower looper (page 68) 3 Yellow (B2) thread path for R1 needle (page 63) ROLLED HEM 3 Select 7 and set up the machine.
DOBLADILLO ESTRECHO 3 Seleccione 6 y configure la máquina. OURLET ÉTROIT 3 Sélectionner 6 et configurer la machine. Tres hilos forman una costura equilibrada que es un excelente remate de bordes estrechos. Trois fils forment un point équilibré qui donne une finition de bord étroite et de qualité. Usos habituales • Dobladillo de bufandas, servilletas y volantes. • Confección de prendas de ropa interior con tejidos ligeros de punto.
ROLLED HEM 2 Select 8 and set up the machine. The needle and lower looper threads form a stitch that rolls the fabric before encasing the edge. Common Uses • Since there are only 2 threads, the result is lighter and finer than Rolled Hem 3. This is suitable for lightweight fabrics like chiffon and bridal veiling edging. Thread in the following sequence: 1 Green (G) thread path for lower looper (page 68) 2 Yellow (B2) thread path for R1 needle (page 63) STRETCH WRAPPED Select 9 and set up the machine.
DOBLADILLO ENROLLADO 2 Seleccione 8 y configure la máquina. OURLET ROULEAUTÉ 2 Sélectionner 8 et configurer la machine. Los hilos de la aguja y el áncora inferior forman una puntada que rodea el tejido antes de recubrir el borde. Le fil d’aiguille et le fil de boucleur inférieur forment un point qui roule le tissu avant de nouer le bord. Usos habituales • Dado que solo hay dos hilos, el resultado es más ligero y fino que el del dobladillo enrollado 3.
TRIPLE COVER HEM Select 10 and set up the machine. The Triple Cover Hem measures 5.0 mm in width. It uses three needles and the chain looper to form 3 lines of what looks like parallel straight stitches. Common Uses • Hem finish. • Topstitching. • Belt loops.
DOBLADILLO TRIPLE Seleccione 10 y configure la máquina. OURLET COUVERT TRIPLE Sélectionner 10 et configurer la machine. El dobladillo triple tiene una anchura de 5 mm. Utiliza tres agujas y el áncora de cadeneta para formar tres líneas de lo que parecen puntadas rectas en paralelo. L’ourlet couvert triple mesure 5,0 mm en largeur. Il utilise trois aiguilles et le boucleur de point de chaînette pour former 3 lignes semblables à des points droits parallèles. Usos habituales • Remate de dobladillos.
COVER HEM NARROW Select 10 and set up the machine. The cover hem measures 2.5 mm in width. It uses two needles and the chain looper to form what look like parallel straight stitches. Common Uses • Hem finish on knit fabrics. • Topstitching. • Pintucks.
DOBLADILLO ESTRECHO Seleccione 10 y configure la máquina. OURLET COUVERT ÉTROIT Sélectionner 10 et configurer la machine. Este dobladillo tiene una anchura de 2,5 mm. Utiliza dos agujas y el áncora de cadeneta para formar lo que parecen puntadas rectas en paralelo. L’ourlet couvert mesure 2,5 mm en largeur. Il utilise deux aiguilles et le boucleur de point de chaînette pour former ce qui ressemble à des points droits parallèles. Usos habituales “ Dobladillo en tejidos de punto. “ Contornos. “ Ribetes.
TOP COVER STITCHES (Triple, Wide and Narrow) A decorative industrial type topstitch, the Top Cover measures 5.0 mm or 2.5 mm in width. It uses two or three needles, top cover “hook” and the chain looper to form a cover hem with loops on both the top and bottom side of the fabric. 㻵 10 Common Uses • Hem finish on light to medium weight fabrics. • Topstitching light to medium weight fabrics. R Preparing Machine for Top Cover Stitch 1. Select 10. 2. Turn off machine. 3.
PUNTADA DE CUBIERTA SUPERIOR (triple, ancha y estrecha) POINT DE RECOUVREMENT (triple, large et étroit) La puntada de cubierta superior, una puntada decorativa de tipo industrial, mide 2,5 ó 5 mm de ancho. Utiliza dos o tres agujas, el enhebrador de cubierta superior y el áncora de cadeneta para formar un dobladillo con bucles tanto en la parte superior como en la inferior del tejido. Surpiqûre décorative de type industriel, le recouvrement mesure 5,0 mm ou 2,5 mm en largeur.
10. Hand turn handwheel towards you to check movement of the spreader device. Thread in the following sequence: 1. Brown (I) thread for chain looper (page 72) 2. Yellow (B1) thread for L0 needle (page 63) 3. Blue (D1) thread for L1 needle (page 65) 4. Red (E) thread for L2 needle (page 66) 5. Green thread for spreader device (see below) NOTE: The needle threads should be separated in the last two guides with the yellow to the far left, then blue and finally red.
10. Gire el volante con la mano hacia usted para comprobar el movimiento del extensor. 10. Tourner le volant à la main vers soi pour vérifier le mouvement du dispositif étendeur. Enhebre en la siguiente secuencia: 1. Trayecto marrón (I) para el áncora de cadeneta (página 72) 2. Trayecto amarillo (B1) para la aguja L0 (página 63) 3. Trayecto azul (D1) para la aguja L1 (página 65) 4. Trayecto rojo (E) para la aguja L2 (página 66) 5.
Threading the Needle with the Needle Threader Hold the needle threader with a triangle mark facing up. Insert the thread into the Y-notch of the threader from the right. q Triangle mark w Y-notch q w e Slide the threader down along the needle while pushing it gently until the threader pin goes into the needle eye. Place the V-notch over the needle just above the needle eye. e V-notch Push the threader until the threader pin comes out through the needle eye with a loop of thread.
Enhebrado de la Aguja con el Enhebrador Enfilage de l’Aiguille avec l’Enfile-aiguille Sujete el enhebrador con la marca triangular hacia arriba. Inserte el hilo en la muesca en forma de Y del enhebrador desde la derecha. q Marca triangular w Muesca en forma de Y Tenir l’enfile-aiguille avec le repère en forme de triangle tourné vers le haut. Introduire le fil dans l’encoche en Y de l’enfile-aiguille par le côté droit.
DETAILED THREAD ROUTE CHARTS THREAD ROUTE YELLOW (A) TABLEAUX D’ENFILAGE DÉTAILLÉS TABLAS DETALLADAS DE TRAYECTO DE ENHEBRADO TRAJET DU FIL JAUNE (A) TRAYECTO DE ENHEBRADO AMARILLO (A) (a) 0 1 2 L 1 R 2 Important: Make sure to pass the thread into the opening (a) of the thread take-up lever. Importante: Asegúrese de pasar el hilo en la abertura (a) de la palanca tilahilos. Important: Veiller à passer le fil à ouverture (a) du levier releveur.
DETAILED THREAD ROUTE CHARTS THREAD ROUTE YELLOW (B1), (B2) TABLAS DETALLADAS DE TRAYECTO DE ENHEBRADO TABLEAUX D’ENFILAGE DÉTAILLÉS TRAJET DU FIL JAUNE (B1), (B2) TRAYECTO DE ENHEBRADO AMARILLO (B1), (B2) (B1) 0 1 2 L (B2) 1 R 2 0 1 2 L 1 R 2 63
DETAILED THREAD ROUTE CHARTS THREAD ROUTE YELLOW (C) TABLEAUX D’ENFILAGE DÉTAILLÉS TABLAS DETALLADAS DE TRAYECTO DE ENHEBRADO TRAJET DU FIL JAUNE (C) TRAYECTO DE ENHEBRADO AMARILLO (C) 0 1 2 L 1 R 2 64
DETAILED THREAD ROUTE CHARTS THREAD ROUTE BLUE (D1), (D2), (D3) TABLEAUX D’ENFILAGE DÉTAILLÉS TABLAS DETALLADAS DE TRAYECTO DE ENHEBRADO TRAJET DU FIL BLEU (D1), (D2), (D3) TRAYECTO DE ENHEBRADO AZUL (D1), (D2), (D3) D2 D1 0 1 2 L 1 R 2 0 1 2 L D3 1 R 2 0 1 2 L 1 R 2 65
DETAILED THREAD ROUTE CHARTS THREAD ROUTE RED (E) TABLAS DETALLADAS DE TRAYECTO DE ENHEBRADO TABLEAUX D’ENFILAGE DÉTAILLÉS TRAJET DU FIL ROUGE (E) TRAYECTO DE ENHEBRADO ROJO (E) 0 1 2 L 1 R 2 66
DETAILED THREAD ROUTE CHARTS THREAD ROUTE RED (F) TABLAS DETALLADAS DE TRAYECTO DE ENHEBRADO TABLEAUX D’ENFILAGE DÉTAILLÉS TRAJET DU FIL ROUGE (F) TRAYECTO DE ENHEBRADO ROJO (F) 67
DETAILED THREAD ROUTE CHARTS THREAD ROUTE GREEN (G) (b) (c) (a) Lower looper thread guide Push lever (a) down and hook the thread on the guide (b). Pass the thread from front to back through the hole (c) on far right end of the looper. Draw the thread back to the left under the presser foot, leaving a10 cm (4") tail.
TABLAS DETALLADAS DE TRAYECTO DE ENHEBRADO TABLEAUX D’ENFILAGE DÉTAILLÉS TRAJET DU FIL VERT (G) TRAYECTO DE ENHEBRADO VERDE (G) Guía del hilo del áncora inferior Guide-fil de boucleur inférieur Empuje la palanca (a) hacia abajo y enganche el hilo a la guía (b). Pase el hilo de delante atrás a través del orificio (c) en el extremo derecho del áncora. Tire del hilo hacia la izquierda bajo el pie prensatelas dejando un segmento de 10 cm.
THREAD ROUTE BROWN (H) (for 5-thread and chain stitch) (b) (c) (a) d To thread the Chain Looper Hand turn the handwheel to bring the needle bar to its lowest position. Lift up the lever (a) to disengage the chain looper. Hook the thread into the slit (b) from back to front. Pull the thread along the looper and pass the thread from front to back through the hole (c) on far left end of looper. Leave about 5 cm (2") of thread hanging down.
TRAYECTO DE ENHEBRADO TRAJET DU FIL MARRÓN (H) (para puntada de 5 hilos y cadeneta) MARRON (H) (pour 5 fils et point de chaînette) Para enhebrar el áncora de cadeneta Enfilage du boucleur de point de chaînette Gire el volante hasta llevar la barra de la aguja a su posición inferior. Levante la palanca (a) para desenganchar el áncora de cadeneta. Enhebre el hilo en la ranura (b) de atrás adelante.
THREAD ROUTE BROWN (I) (for cover hems and top cover stitches) d To thread the Chain Looper Hand turn the handwheel to bring the needle bar to its lowest position. Lift up the lever (a) to disengage the chain looper. Hook the thread into the slit (b) from back to front. Pull the thread along the looper and pass the thread from front to back through the hole (c) on far left end of looper. Leave about 5 cm (2") of thread hanging down.
TRAYECTO DE ENHEBRADO TRAJET DU FIL MARRÓN (I) (para dobladillos y puntadas de cubierta superior) MARRON (I) (pour ourlets couverts et les points de recouvrement) Enfilage du boucleur de point de chaînette Para enhebrar el áncora de cadeneta Tourner le volant à la main de façon à amener la barre à aiguille dans sa position la plus basse. Soulever le levier (a) de façon à désengager le boucleur de point de chaînette. Accrocher le fil dans la fente (b), de l’arrière vers l’avant.
SECTION IV Test Sewing Setting Foot Pressure The standard setting is position 5. The dial may be changed to increase or decrease the foot pressure depending on the type of fabric. There are six positions. Controlling Sewing Speed Sewing speed varies with the foot control. The harder you press on the foot control, the faster the machine runs. Waste Tray Attach the waste tray to the front cover. The tray will catch fabric scraps that are cut off.
SECCIÓN IV SECTION IV Cosido de Prueba Essai de Couture Ajuste de la Presión del Prensatelas Réglage de la Pression du Pied El valor predeterminado es la posición n.º 5. Es posible modificar el control para incrementar o disminuir la presión del prensatelas en función del tipo de tejido. Existen seis posiciones. Le réglage standard est la position 5. On pourra changer la position de la molette pour augmenter ou diminuer la pression du pied en fonction du type de tissu.
Starting to Sew Always test sew on scraps of the same fabric that you will be using. Place the fabric scrap under the presser foot and needles. For the best results, sew on light to medium weight fabrics. Swing up the presser foot lever to lower the presser foot. NOTE: The machine does not run if the presser foot is raised. Hand turn the handwheel to form the first few stitches. Start sewing slowly and gradually increase sewing speed. Hand guide the fabric gently while sewing. Check the stitch formation.
Empezando a Coser Lancement du Travail de Couture Antes de coser, haga siempre una prueba en un trozo sobrante de la misma tela que vaya a utilizar. Coloque el trozo de tela bajo el prensatelas y las agujas. Toujours faire un essai de couture sur une chute du même tissu que l’ouvrage à réaliser. Placer la chute de tissu sous le pied presseur et les aiguilles. Para los mejores resultados, cosa en los tejidos de peso ligero a medio.
Back-Tack Device The back-tack device allows you to secure a seam at the beginning by encasing a thread chain into the seam. The device may be used when sewing these stitches: Safety 4-Thread, Stretch Knit, Overlock 3, 3-Thread Wide, Overcast 2, Overcast 2 Wide and Stretch Wrapped. Raise the presser foot and gently remove the thread chain from the chaining finger. Pull the thread chain to the back and then around to the front. Secure the threads into the back-tack device.
Dispositivo para pespuntes Dispositif pour points d’arrêt El dispositivo para pespuntes le permite fijar una costura al principio sujetando una cadeneta a la misma. Es posible utilizar el dispositivo para coser las siguientes puntadas: puntada de seguridad de 4 hilos, puntada elástica en tejidos de punto, sobrehilado 3, 3 hilos ancha, sobrehilado 2, sobrehilado 2 ancho y punto envuelto elástico.
Securing the End of Seam Sew to the edge of the fabric and stop. Raise the needles and presser foot. While pushing the tension release lever up, gently pull the fabric to the back to remove the thread chain from the chaining finger. Turn fabric upside down (top side of seam will be next to the feed dog). Gently pull the threads above the tension discs to remove any slack. Align the edge of the fabric with the needle plate and lower the presser foot.
Fijación del Extremo de la Costura Arrêt de l’Extrémité de la Couture Cosa hasta llegar al borde de la pieza y deténgase. Eleve las agujas y el prensatelas. Coudre jusqu’au bord du tissu et arrêter. Relever les aiguilles et le pied presseur. Mientras levanta la palanca de liberación de tensión, tire suavemente de la tela hacia atrás y retire la cadeneta del dedo de cadeneta. De la vuelta al tejido (el lado superior de la costura quedará junto a los dientes de arrastre).
SECTION V Adjustments Thread Tension The thread tension may need to be adjusted depending on the type of threads or fabrics you use. Before changing tensions, make sure the thread is properly inserted in the tension discs. (HINT: Press and hold the tension release lever while pulling up on the threads above the tension discs.) Thread tensions can be adjusted by turning the color coded dials - yellow, blue, red, green and brown. Turn the dial that corresponds to the thread that needs adjusting.
SECCIÓN V Ajustes SECTION V Tensión del Hilo Tension du Fil Tal vez sea necesario ajustar la tensión del hilo en función del tipo de hilos o tejidos que utilice. Il peut être nécessaire d’ajuster la tension du fil en fonction du type de fil ou du tissu utilisé. Antes de modificar las tensiones, asegúrese de que el hilo esté insertado apropiadamente en los discos de tensión. (CONSEJO: empuje y mantenga la palanca de liberación de presión mientras pasa los hilos sobre los discos de tensión).
3-Thread Overlock Balanced tension a. The needle thread should resemble straight stitches to the left of the fabric edge on the topside (1) of the fabric. The needle thread is barely visible in the lower looper thread on the underside (2) of the fabric. b. The upper looper thread should lie flat on the topside of the fabric and lock with the lower looper thread on the edge of the fabric. c.
Sobrehilado de 3 hilos Equilibrado de la tensión Surjet 3 fils Tension équilibrée a. El hilo de la aguja debería verse como puntadas rectas a la izquierda del borde en el lado superior (1) de la tela. El hilo de la aguja apenas se ve en el hilo del áncora inferior en el lado inferior (2) de la tela. a. Le fil d’aiguille doit ressembler à des points droits sur la gauche du bord du tissu, sur l’endroit (1) du tissu.
2-Thread Overcast Balanced Tension The needle thread should resemble a straight stitch on the topside (1) of the fabric. It will lock with the lower looper thread on the fabric edge. The needle thread should lie flat in a V-shape on the fabric underside (2). The lower looper thread should lie flat on the topside of the fabric and lock with the needle thread on the fabric edge. The needle thread is too loose.
Sobrehilado de 2 hilos Equilibrado de la tensión Surfil à 2 fils Tension équilibrée El hilo de la aguja debería parecer una puntada recta en el lado superior (1) de la tela. Se fijará con el hilo del áncora inferior en el borde de la pieza. El hilo de la aguja debe quedar plano y en forma de V en el lado inferior (2) de la tela. Le fil d’aiguille doit ressembler à un point droit sur l’endroit (1) du tissu. Il se noue avec le fil de boucleur inférieur sur le bord du tissu.
Differential Feed Differential feed on an overlock is a two-part feed dog which feeds the fabric at different ratios. The front part of the feed dog feeds more or less fabric under the foot than the rear part of the feed dog does. This feature is useful when sewing knits which have a tendency to stretch and result in waves when sewn on an overlock machine. Differential feed is also good on sheer fabrics which tend to pucker when sewn. Use the 0.5 setting for eliminating puckers.
Arrastre Diferencial Entraînement Différentiel El arrastre diferencial de un sobrehilado consiste en que las dos partes de los dientes de arrastre tiran del tejido a velocidades diferentes. La parte anterior de los dientes introduce más o menos tejido bajo el prensatelas que la parte posterior de los dientes de arrastre. Esta prestación resulta útil para coser tejidos de punto, que tienen tendencia a estirarse y provocan ondas al coserlos con una máquina de sobrehilado.
Stitch Length SL The stitch length (SL) may be adjusted depending on the fabric weight and fiber content. Stitch length may be set between 0.5 and 5. Set a shorter stitch length for lightweight or sheer fabrics. Set a longer stitch length for heavyweight or bulky fabrics. NOTE: Always set the SL dial at 2.5 or higher when sewing a chainstitch or cover hem. NOTE: The stitch length readout for the Cover Hem stitches is 3.0. This is the correct setting for two-three layers of light to medium weight fabric.
Longitud de la Puntada Longueur de Point Es posible ajustar la longitud de la puntada en función del peso y del material del tejido. La longitud de la puntada puede ajustarse entre 0,5 y 5. Utilice una longitud de puntada inferior para tejidos más ligeros o delicados. Utilice una longitud de puntada superior para tejidos pesados o voluminosos. Il est possible d’ajuster la longueur de point (SL) en fonction de l’épaisseur du tissu et de la densité des fibres.
Sewing Overlock Stitches on Extra Heavyweight Fabrics Lock the upper knife to provide maximum cutting capability. 1. Hand turn the handwheel to lower the needle bar to its lowest position. 2. Open the side cover. 3. Use the Allen screwdriver to turn the screw clockwise until the upper knife cannot be disengaged. 4. Close the side cover. Sew. NOTE: After sewing extra heavyweight fabric, always turn the screw counterclockwise to unlock upper knife for normal operation.
Puntada de sobrehilado en tejidos extra gruesos Couture de points de surjet sur les tissus très épais Fije la cuchilla inferior para obtener la máxima capacidad de corte. Bloquer le couteau supérieur de façon à disposer de la capacité de coupe maximale. 1. Gire el volante con la mano para bajar la barra de la aguja hasta su posición inferior. 2. Abra la cubierta lateral. 3.
SECTION VI Sewing Techniques Overlocking Outside Corners Stop sewing when you reach the end of the fabric, and raise the needle to its highest position. Raise the presser foot. Push the tension release lever while gently removing the thread chain from the chaining finger. Turn fabric. Align the sewn stitches with the needle. Lower the presser foot and pull up on the needle thread to remove any slack. Sew.
SECCIÓN VI Técnicas de Costura SECTION VI Techniques de couture Sobrehilado en el Exterior de las Esquinas Surjetage des Angles Extérieurs Deje de coser al llegar al final de la tela y levante la aguja hasta la posición superior. Eleve el prensatelas. Empuje la palanca de liberación de tensión mientras retira suavemente la cadeneta del dedo de cadeneta. Gire la tela. Haga coincidir las puntadas cosidas con la aguja.
Removing Stitches from Fabric Snip the needle thread(s) at intervals. Gently pull the looper thread(s) and the stitch will unravel. Chainstitch – Turning Corners Sew last stitch before turning point by hand turning the handwheel. Complete the stitch. Raise the needle slightly out of the fabric. (The needle eye will be out while the needle tip remains in fabric.) Raise presser foot and gently turn fabric. Lower presser foot and continue sewing.
Retirada de puntadas del tejido Démontage de points sur le tissu Corte con tijeras el hilo de la(s) aguja(s) a intervalos. Tire suavemente del/los hilo(s) del áncora y la puntada se deshará. Couper le ou les fils d’aiguille par endroits. Tirer doucement sur les fils de boucleur. Le point va se défaire. Costura de cadeneta: giro de esquinas Point de chaînette - changement de direction dans les angles Cosa la última puntada antes del punto de giro girando el volante con la mano. Finalice la puntada.
Cover Hem A majority of ready-to-wear garments are made by a flat construction method for hems with the side seam sewn last. Many home sewers prefer sewing “in the round” (tubular sewing). Sewing the Cover Hem “In the Round” Method 1 Fold and press the hem allowance and place fabric under the presser foot. Use markings on the sewing table as a sewing guide. Stitch around the hem and, upon reaching the original start point, overlap the stitches approximately 13 mm (1/2”) and stop.
Dobladillo Ourlet couvert La mayor parte de las prendas listas para vestir emplean un método plano para coser los dobladillos con la costura lateral en último lugar. Muchos costureros prefieren coser el dobladillo en círculo (costura tubular). La majorité des vêtements prêt-à-porter sont assemblés par des ourlets confectionnés à plat, tandis que la couture latérale est réalisée en dernier. Bon nombre de couturières à domicile préfèrent faire une couture “en rond” (couture tubulaire).
Turning Corners Sew to the turning point and stop with needles up. Hand turn the handwheel towards you to bring needles to the lowest position into the fabric. Carefully turn the handwheel in reverse bringing needles to the highest position. (This releases the needle threads off the looper.) Raise the presser foot, turn the fabric, lower the needles into the fabric, lower the presser foot and continue sewing. The looper thread will drop at the corner.
Giro de Esquinas Changement de Direction dans les Angles Cosa hasta el punto de giro y deténgase con las agujas elevadas. Gire el volante con la mano hacia usted para llevar las agujas a su posición inferior en el tejido. Gire cuidadosamente el volante en sentido inverso hasta llevar las agujas a su posición superior. (De este modo los hilos de la aguja se sueltan del áncora). Eleve el prensatelas, gire la tela, baje las agujas al tejido, baje el prensatelas y continúe cosiendo.
Triple Cover Hem – Topstitching an Overlock Seam The Triple Cover Hem flattens the overlock seam eliminating excess bulk and allows maximum stretch and comfort. The topstitching is quick and attractive. Sew ribbing to the fabric using a 3 Thread Wide or Safety 4 Thread stitch. Set up the machine for the Triple Cover Hem. The seam may be positioned either towards the ribbing or towards the garment fabric. Topstitch by allowing the center needle to “stitch in the ditch”.
Dobladillo Triple: Sobrehilado de una Costura de Contorno Ourlet Couvert Triple - Surpiqûre d’une Couture en Surjet El dobladillo triple aplana la costura de sobrehilado, elimina el exceso de volumen y ofrece la máxima elasticidad y comodidad. El contorno resulta rápido y atractivo. L’ourlet couvert triple aplatit la couture en surjet, ce qui élimine l’excès de volume et permet une élasticité et un confort maximum. La surpiqûre est rapide et donne un joli résultat.
SECTION VII Maintenance Proper machine cleaning and oiling are essential to ensure maximum machine performance. Cleaning and Oiling Unplug the machine from the electrical outlet. Open the front and side covers. Remove the presser foot by pushing the lever on the back of the foot holder. Remove the needle plate by pushing down its release lever (a). Disengage the upper knife. (a) Use the brush to remove all lint and fiber accumulation. Apply a drop of oil above and below the oiling arrows.
SECCIÓN VII Mantenimiento SECTION VII Entretien Es esencial limpiar y engrasar adecuadamente la máquina para garantizar el máximo rendimiento. Un bon nettoyage et une bonne lubrification sont indispensables pour assurer le rendement maximum de la machine. Limpieza y Engrasado Nettoyage et Lubrification Desenchufe la máquina de la corriente eléctrica. Abra las cubiertas frontal y laterales. Retire el prensatelas accionando la palanca al dorso del soporte.
Replacing the Upper Knife A spare upper knife is located in the accessory box. Replace the upper knife when it becomes dull or nicked. (a) (b) 0.5-1.0 mm (c) 1. Unplug the machine. 2. Open both front and side covers. 3. Set the upper knife (a) in its engaged position and lock the upper knife. (See page 92.) Remove the upper knife by loosening the bolt (b) with the wrench (c) found in the accessory box. 4. Brush the lower knife and the surrounding area to clean out any accumulation of lint, etc.
Sustitución de la Cuchilla Superior Remplacement du Couteau Supérieur La caja de accesorios contiene una cuchilla superior de repuesto. Sustituya la cuchilla superior cuando esté roma o presente muescas. Un couteau supérieur de rechange est fourni dans la boîte d’accessoires. Remplacer le couteau supérieur lorsqu’il s’émousse ou présente des entailles. 1. Desenchufe la máquina. 2. Abra las cubiertas frontal y laterales. 3. Ajuste la cuchilla superior (a) en la posición enganchada y bloquéela.
TROUBLESHOOTING SKIPPING OR IRREGULAR STITCHES Incorrect threading ............................................................ 34-72 Incorrect thread tensions ................................................... 82-86 Needle problems ––poor quality, bent or dull ........................ 32 Needles not inserted correctly ................................................ 24 Do not pull on fabric, guide it gently ....................................... 76 Incorrect presser foot ................................
DETECCIÓN Y RESOLUCIÓN DE PROBLEMAS PUNTADAS IRREGULARES O SALTADAS ATASCOS DE LA MÁQUINA Enhebrado incorrecto .......................................................... 35-73 Enhebrado incorrecto .......................................................... 35-73 Tensión del hilo incorrecta ................................................... 83-87 Placa de la aguja mal fijada ...................................................
RÉSOLUTION DES PROBLÈMES POINTS SAUTÉS OU IRRÉGULIERS Enfilage incorrect ................................................................. 35-73 Tension des fils incorrecte ................................................... 83-87 Problèmes d’aiguille - aiguille de mauvaise qualité, tordue ou ém oussée .......................................................... 33 Aiguilles mal insérées ............................................................... 25 Ne pas tirer sur le tissu, le guider en douceur ........
INDEX A Accessories .............................................. 12, 38 Adjustments ........................................ 58, 82-90 B Back-tack device ...................................... 10, 78 Balanced tensions .................................... 82-86 BLANKET STITCH ......................................... 44 C Chain looper ................................ 10, 32, 70, 72 CHAINSTITCH ................................... 58, 82, 96 COVER HEM NARROW ................... 58, 86, 98 COVER HEM WIDE ...
ÍNDICE A Abrazadera de aguja basculante ............................... 37 Accesorios ........................................................... 13, 39 Agujas ............................................................ 13, 27, 35 Ajustes ................................................................ 91-101 Almohadillas ......................................................... 15, 17 Áncora de cadeneta ........................................ 11, 69-71 Áncora inferior ...................................
INDEX 3 FILS LARGE ..................................................... 47, 85 5 FILS ........................................................................ 45 A Accessoires .......................................................... 13, 39 Aiguilles .......................................................... 13, 27, 35 Ampoule ................................................................... 107 Angles extérieurs ....................................................... 95 Angles intérieurs ..............
770-800-XXX Printed in Japan