INSTRUCTION BOOK
TABLE OF CONTENTS SECTION I NAMES OF PARTS Name of Parts ............................................................. 3 Screen Sharpness Adjusting Dial ............................... 4 Extension Table ........................................................... 4 Standard Accessories ................................................. 5 SECTION II GETTING READY TO SEW Connecting Machine to Power Supply ........................ 6 For Your Safety ...........................................................
Zipper Sewing, contÕd ............................................. 42 Darning ..................................................................... 43 To sew .................................................................. 43 For darning less than 2 cm ............................... 43 To memorize darning stitches ........................... 43 Adjusting the shape of darning stitches ............ 43 Bartacking .................................................................
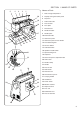
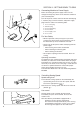
SECTION I NAME OF PARTS Names of Parts 5 4 3 2 1 1 Foot storage compartment 20 2 Flip-top sewing instruction panel 3 Top cover 19 6 18 4 Auto-tension dial 5 Pressure dial 6 Face plate 7 Thread cutter 7 8 Needle threader 8 17 9 Needle plate 10 Extension table 9 14 10 11 12 15 11 Hook cover plate 16 12 Hook cover plate release button 13 13 Feed balancing dial 14 Reverse button 15 Auto-lock button 16 Up/down needle button 21 17 Speed setting lever 18 Keyboard 19 Screen sharpness adjus
Screen Sharpness Adjusting Dial Use this to adjust the sharpness of the liquid crystal display. If no indication is shown on the screen after you switch on the power, adjust the screen brightness with this dial. Extension Table The extension table provides added sewing surface and can be easily removed for free arm sewing. Detaching the table: Pull the table away from the machine, as illustrated.
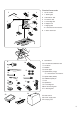
Standard Accessories 3 2 L 4 G 5 D 1 C F E A 6 1 2 3 4 5 6 7 Set of needles L: Quilting bar G: Blind hem foot D: Hemmer foot C: Overedge foot E: Zipper foot A: Zigzag foot * It is attached on the machine. 8 F: Satin stitch foot 7 8 9 o !0 !1 !2 !3 !4 10 11 12 13 18 R: Automatic buttonhole foot Lint brush Bobbins Seam ripper Spool holder (Large) * It is attached on the machine.
SECTION II GETTING READY TO SEW Connecting Machine to Power Supply Before connecting the power supply, make sure the voltage and frequency shown on the machine conform to your electrical power. 4 Turn off the power switch, and insert the foot control plug 1, machine plug 2, into the machine and power supply plug 3 into the outlet in the following order.
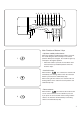
4 5 6 7 8 9 10 11 12 15 1 2 3 14 13 Main Function of Buttons / Keys • Up/down needle position button 1 When the Up/down needle position button is pressed, the needle bar goes down and stops in the lowest position. When pressed again, the needle bar goes up and stops in the highest position. * When this button is pressed, the needle bar alternates between up and down positions when the machine stops.
Direct Mode A Mode B Mode C Mode • Mode selection key By pressing the key, LED light will move step by step to select the stitch mode, as shown. Direct Mode: Direct mode pattern selection A Mode: Pattern selection using number keys utility and decorative stitches) B Mode: Character selection using number keys (block type) C Mode: Character selection using number keys (script type) 4 • Twin needle key 5 A Just press this button and “A” mark will appear on the display screen.
• Message key 9 When Message key is pressed, a detailed message will display suitable stitches, patterns and machine settings. , , • Turn-over memory key (To memorize the pattern in mirror image) 10 Select a desired pattern and press TOM key so the selected pattern’s mirror image will be shown on the screen. Use this key to memorize and sew patterns in a mirror image. Programmed letters or numbers will be reduced to 2/3 of their actual size when you press the TOM key.
• Clear key If an incorrect pattern is memorized, pressing this key will immediately clear it (like a backspace key). 13 • Memory key 14 When this key is pressed after selecting a pattern, the pattern will be memorized as many times as the key is pressed. When the key is pressed after selecting another pattern, that pattern will be memorized after the previously memorized pattern. (The maximum number of memory patterns is 50) * The following patterns cannot be memorized.
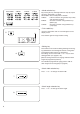
• Pattern selection and screen indication [1] Select the Direct mode pattern selection. [2] Press the pattern key on the keyboard. [1] Example: Pattern 05, as shown. [3] The display screens shows from left to right: 6 [3] \ 1 [2] 2 3 4 5 1 Stitch pattern: 05 2 Thread tension: AUTO 3 Presser foot: A 4 Stitch width: 5.0 5 Stitch length: 2.0 6 Buzzer sound on: (see page 12 to mute the buzzer sound) • Number key selection You can select the patterns by pressing number keys.
Memory Mode/Buzzer Sound/Multiple Language Settings [1] NORMAL / RESUMPTION Mode [1] Turn on the power switch while pressing the memory 2 1 \ \ [2] key. 1 Memory key 2 Power switch [2] Select “1” on the number key to access the NORMAL/RESUMPTION mode. You can select the mode by pressing the stitch width key “+” or “-”. * NORMAL mode - The last selected pattern setting will not be recalled when you turn on your machine. Machine turns on in straight stitch 01, Direct mode.
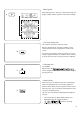
To Raise or Drop the Feed Dogs 1 • For button sewing etc., drop the feed dogs. • When finished sewing, raise the feed dogs. 2 1 The feed dogs must always be up for normal sewing. 1 Lowered position 2 Raised position 2 Pressure Dial 1 The pressure dial should be set at “3“ for regular sewing. Reduce the pressure to “2” for applique, cutwork, drawn work, basting and embroidery. Set the pressure to “1” when sewing chiffon, lace, organdy and other fine fabrics.
Changing Needles [1] [2] [1] Raise the needle by pressing the Up/down needle 2 1 position key and lower the presser foot. Turn off the power switch. Loosen the needle clamp screw by turning it counterclockwise. Remove the needle from the clamp. 3 [2] Insert the new needle into the needle clamp with the flat side to the rear. When inserting the needle into the clamp, push it up as far as it will go. Tighten the clamp screw firmly by turning it clockwise.
Selecting Needle and Thread FABRICS LIGHT WEIGHT MEDIUM WEIGHT HEAVY WEIGHT THREADS Crepe de Chine, Voile, Lawn, Organdy, Georgette,Tricot Fine Silk Fine Cotton Fine Synthetic Fine Cotton-covered Polyester Linens, Cotton, Pique, Serge, Double Knits, Percale 50 Silk 50 to 80 Cotton 50 to 60 Synthetic Cotton-covered Polyester Denim, tweed, Gabardine, Coating, Drapery, and Upholstery Fabric 50 Silk 40 to 50 Cotton 40 to 50 Synthetic Cotton-covered Polyester NEEDLE SIZE 9 or 11 11 or 14 14 or 16
Winding the Bobbin 3 2 1 • Set the spool Lift up the spool pin and place the spool of thread on it with the thread coming off the spool as shown. Press the large spool holder firmly against the spool of thread. 4 5 * The small spool holder is used with a small or narrow spool of thread. 1 2 3 4 5 Spool pin Ordinary spool Large spool holder Small spool holder Small spool • Removing the bobbin 1 Gently slide the hook cover plate release button to the right and remove the cover plate.
[4] “C” [5] [2] “A” 3 1 [3] “B” 5 4 7 6 [1] 6 • Winding the bobbin [6] For the bobbin winding, set the speed control lever at the medium to high speed position. 2 [1] Hold the end of thread. [2] Guide the thread through the thread guide “A”. [3] Thread the thread guide “B”. [4] Thread the thread guide “C”. [5] Thread through the hole in the bobbin from the inside to the outside. 1 Bobbin winder spindle [7] [6] Put the bobbin on the bobbin winder spindle, and push it to the right.
• [1] Inserting the bobbin [1] Place the bobbin in the bobbin holder with the thread running off counterclockwise. 1 End of thread 1 [2] [2] Guide the thread into the notchA on the front side of the bobbin holder. 2 Notch A A 2 [3] [3] Continue to draw the thread lightly. The thread slips into notch . Pull out about 15 cm (6”) of thread. 3 Notch 3 B 4 [4] [4] Attach the hook cover plate. Check the threading by referring to the chart shown on the hook cover plate.
Threading the Machine [1] [3] • Threading the machine * Raise the presser foot lever. * Turn the power switch “ON”, press the needle Up/down button twice to raise the needle, then turn the power switch “OFF”. 1 [4] [2] 1 Presser bar lifter 2 Needle Up/down button [5] 2 [1] Raise the presser foot lifter. [1] Draw the thread from the spool and thread around the upper thread guide “A” and “B”. 4 “B” 3 “A” [2] 3 Thread guide “A”. 4 Thread guide “B” [2] Then, down around the check spring holder.
• Needle threader [1] [1] Raise the needle to its highest position. Pull down the needle threader knob as far as it will go. [2] [2] Push the knob in the direction of the arrow in the illustration, inserting hook q into the needle eye. Lead the thread around guide w and under the hook.
• Drawing up the bobbin thread [1] [1] Raise the presser bar lifter, hold the end of the thread as shown. [2] Press the Up/down needle position button twice to [2] pick up the bobbin thread. Draw up the needle thread together with a loop of bobbin thread. 1 Up / down needle position button 1 [3] Pull both threads under the presser foot and to the [3] 2 back of the presser foot leaving clear 10 to 15 cm (4” to 6”) of the threads.
Balanced Thread Tension 1 • Auto-thread tension When the thread tension dial is set at “AUTO” for automatic thread tension, the green light will be on. The balanced thread tension is set automatically. 2 1 Set “AUTO” mark of thread tension dial with the 3 indication line. 2 Green light on or off. 3 Display screen shows “AUTO”. 5 For straight stitch sewing, both needle and bobbin threads will join at the middle of the fabric.
SECTION III BASIC SEWING Straight Stitch Sewing 2 1 1 Stitch pattern: 01 2 Presser foot: Foot A or foot H • Starting to sew Raise the presser foot and position the fabric next to a seam guide line on the needle plate (see page 24). Lower the needle to the point where you want to start. Lower the presser foot and pull the threads toward the back. Depress the foot control. Gently guide the fabric along a seam guide line letting the fabric feed naturally.
Practice Common Stitching Skills Using the Seam Guides on the Needle Plate 1 2 3 The seam guides on the needle plate are engraved to help you measure seam width. The lines are marked as follows. Numbers on needle plate 15 20 4/8” 5/8” 6/8” Seam width center needle position guide line (cm) 1.5 2.0 1.3 1.6 1.9 * The numbers indicate the width from the center needle position to the edge of the fabric.
• Manual stitch length Press “-” or “+” to adjust the stitch length. To decrease length, press “-”. To increase length, press “+”. The pre-programmed stitch length setting is suitable for most of your sewing needs. However, you can change these settings to accommodate different fabric characteristics or achieve a desired effect. Hold down “-” or “+” until you reach the desired setting. * The reverse stitch length cannot be set longer than 2.5 mm (1/8”).
Various Utility Stitches 3 1 • Basting 2 1 2 3 4 4 Stitch pattern : Presser foot: Thread tension dial : Feed dogs : 24 Basting foot P 1 to 4 Down * Set the manual thread tension at “1 to 4”. Attaching the basting foot: [1] 1 [1] Raise the needle. [2] Remove the foot holder by loosening the thumb screw. [3] Attach the basting foot on the presser bar putting the [2] pin on the needle clamp. Tighten the thumb screw firmly with a large screwdriver.
1 2 3 • Straight stitch The common uses for the straight stitch are: Regular seams and zippers: 1 Stitch pattern : 01 2 Presser foot : Foot A or zipper foot E Edge sewing: 1 2 1 Stitch pattern : 2 Presser foot : 02 Foot A You can also use your basic straight stitch for pintucking and rolled hems. • Automatic reverse stitch 1 2 1 Select stitch pattern : 2 Presser foot : 03 Foot A This reverse stitch can be used for securing, mending and reinforcement stitches.
• Stretch stitch 1 1 Stitch pattern : 2 Presser foot : 2 17 Foot A This stitch is a narrow stretch stitch designed to eliminate puckering on knit fabrics and bias seam, while permitting the seam to be pressed completely flat. The stitch can also be used to simultaneously seam and overcast when sewing on tricot and chiffon for a narrow, almost invisible seam finish.
Zigzag Stitch 1 2 1 Stitch pattern: 2 Presser foot: 05 Foot A • Interfacing You can get better sewing results using interfacing or stabilizer on delicate or stretch fabric such as knit, jersey, tricot etc. • To change the width and length Zigzag stitch is useful for overcasting, applique, mending etc. When you change the stitch width, make sure the needle position is above the fabric. 1. Pre-programmed stitch settings will be displayed. 2.
Variation of Zigzag Stitches 1 2 • Overcasting 1 Stitch pattern: 2 Presser foot: 05 Overedge foot C This zigzag variation is very useful in garment construction and in finishing raw edges of any sewing project. 1. The black ridge and the guide wires on the overedge foot keep the edge neat and the fabric straight. 2. Place your fabric so that the double guide wires come to the edge. The machine will stitch over these wires.
1 2 • Knit stitch 1 Stitch pattern: 2 Presser foot: 12 Foot A Keep an extra space allowance from the fabric edge and after finishing the sewing, cut the extra seam allowance edge as shown. • Overedge sewing (1) 1 2 1 Stitch pattern: 2 Presser foot: 07 Overedge foot C This stitch pattern combines the straight and the zigzag stitches, using the overedge foot, to stitch and overcast seams in one step. It is also a stretch stitch to provide elasticity for knits and extra strength for woven fabrics.
SECTION IV DECORATIVE STITCHING TECHNIQUES Overedge Sewing (2) 1 2 1 Stitch pattern: 2 Presser foot: 13 Overedge foot C This stitch can be used for sewing heavier fabrics that tend to fray extensively such as linens and gabardines. Two rows of zigzag stitches are simultaneously sewn over the edge to insure that your seams will not ravel. Adjust the thread tension so both needle thread and bobbin thread meet at the edge of the fabric.
Sewing Buttons 1 2 1 Stitch pattern: 2 Presser foot: 3 Feed dogs: 05 Satin stitch foot F Down 3 [1] Turn the handwheel by hand five times and raise the needle to the highest point. Match the holes on the button to the horizontal slot on the presser foot. Lower the foot to hold the button in place. Lower the feed dogs. Press the stitch width button “+” or “-” so the needle will enter the left hole of the button. Turn the handwheel so the needle will enter the right hole of the button.
Sensor Buttonhole • Automatic buttonholing Note: * The size of the buttonhole is automatically set by placing the button in the buttonhole foot, as shown. * The button holder of the foot takes a maximum button size of up to 2.5 cm (1”) in diameter. * Before you sew the actual buttonholes on the actual garment, make several practice buttonholes on a scrap of the same fabric. * Use interfacing on stretch fabrics and set the pressure dial at 1 or 2 and sew.
• Sewing preparation 1 Stitch pattern: 2 Presser foot: , 1 08 Automatic buttonhole foot R * When you select the buttonhole stitch, the screen indicates the message: “PULL DOWN BH (Button hole) LEVER” for a few seconds. 2 [1] Attach the automatic buttonhole foot R. [1] Make sure the groove on the holder catches the pin on the foot, when lowering the presser foot. 1 1 Groove 2 Pin 2 [2] Pull the button holder to the back, and place the [2] button in it. Push it together tightly on the button.
[4] After attaching sensor buttonhole foot, raise the foot [4] 8 9 10 6 11 7 lever once to assure spring is in proper position to avoid any gap. Insert corner of fabric under the foot. Press the Up/down needle button twice. Remove the fabric to the left to draw both threads under the foot. Insert the garment under the foot, and lower the needle at the starting point. Then lower the automatic buttonhole foot. If there is a gap, it may cause an uneven buttonhole stitch length as shown.
[6] After sewing the buttonhole stitch, raise the button- [6] holelever until it stops. 12 Buttonhole lever 12 [7] Place a pin on the rear side of the bartack position [7] 15 13 14 so that you donÕt need to worry about cutting the end of the buttonhole stitch. Cut the opening with the seam ripper in your accessorybox.
• Sensor buttonhole 09 and 10 2 1 1 Stitch pattern: 2 Presser foot: 4 09 or 10 Automatic buttonhole R * Sewing procedure is the same as 08. [1] Sewing steps [1] 3 Starting point 4 Bartacking 5 Stitch pattern 10 3 5 4 3 • Adjusting the stitch width and density in buttonholes 09 and 10 [To change the stitch density] The adjustment of the stitch density is between 0.2 to 0.8 the same as buttonhole 08.
Corded Buttonholes 2 1 1 Stitch pattern: 2 Presser foot: 08 Automatic buttonhole foot R Use this procedure when you want to achieve a tailored, more attractive raised buttonhole. Use at least 40 cm (15”) of havy thread as filler cord. Try a practice buttonhole first. [1] Set the automatic buttonhole foot R on the foot [1] 4 3 5 4 holder. With the buttonhole foot raised, hook the filler cord on the spur at the back of the buttonhole foot.
Free Size Automatic Buttonhole 20 20 Automatic buttonhole R , 1 Stitch pattern: 2 Presser foot: 1 2 [1] Pull the button holder to the back (direction of A). [2] Insert the fabric under the foot. Press the Up/down [1] [2] [3] A 1 2 3 4 needle button twice. Remove the fabric to the left to draw both threads under the foot. [3] Insert the garment under the foot, and lower the needle at the starting point. Then lower the automatic buttonhole foot.
Zipper Sewing 1 2 • Put in a zipper 1 Stitch pattern: 2 Presser foot: • 3 1 4 Attaching the zipper foot To sew on the left side of the zipper, attach the foot holder to the right pin on the zipper foot. To sew on the right side of the zipper, attach the foot holder to the left pin on the zipper foot. 1 2 3 4 2 • 4 6 8 13 Pin To sew left side To sew right side Fabric preparation 1 2 3 4 7 5 Groove Add 1 cm to the zipper size. This is the overall opening size.
Zipper Sewing, cont’d [2] [2] Sew through all layers next to fold. Stop 5 cm before the top of the zipper just before the zipper foot reaches the slider on the zipper tape. Lower the needle slightly into the fabric. Raise the zipper foot and open the zipper. Lower the foot and stitch the remainder of the seam. 1 1 Slider 2 Stop sewing 5 cm (2”) before the top of the zipper. 2 [3] Close the zipper and spread the fabric flat with the [3] right side facing up.
Darning 2 1 1 2 3 3 Stitch pattern: Presser foot: Darning shape: 22 Automatic buttonhole foot R (See below for settings.) • To sew: [1] Pull the button holder to the rear. [2] Place the garment under the foot. Press the Up/down 3 1 4 2 2 [1][2][3] [4] needle button twice. Raise the foot. Remove the fabric to the left to draw both threads under the foot and put the fabric back under the foot. [3] Lower the foot. Press down the foot control.
Bartacking 2 1 1 Stitch pattern: 2 Presser foot: 23 Satin stitch foot F Switch to “Low” speed setting. Four lock stitches will be sewn first. Then sew to the desired length and press the reverse button. The desired length has been now determined. Continue sewing until the machine stops automatically. 2 * This stitch is used for reinforcement of the heavily strengthened part of a garment. The maximum bartack length is 1.5 cm (5/8”) dependent on fabric.
1 Rolled Hem 2 1 Stitch pattern: 2 Presser foot: [1] Make a double 0.3 cm (1/8”) fold approximately 6 2 [1] * 3 4 [2] 01 Hemmer foot D 1 cm (2”) in length. Use iron on the folded edge so that you can guide the fabric easily. 1 Wrong side of fabric 2 Right side of fabric 3 6 cm(2”) 4 0.3 cm(1/8”) [2] Trim about 0.7 cm(1/4”) from corners to reduce bulk. 5 6 5 Edge of fabric 6 Approximately 0.
Blind Stitch Hemming 2 1 1 Stitch pattern: 2 Presser foot: 16 or 15 Blind hem foot G • How to fold the fabric 2 1 Wrong side of fabric 2 0.4 to 0.7 cm (1/8” to 3/8”) 3 Overedge stitch 1 3 • How to sew [1] [1] When the needle comes to the left hand side, position the fabric so that the folded edge comes to the left side of the guide. Lower the presser foot.
1 Pintucking 2 1 Stitch pattern: 2 Presser foot: 02 Blind hem stitch foot G [1] Attach the blind hem stitch foot. [1] Place the folded fabric under the presser foot. Position the needle 0.1 to 0.2 cm (1/16”) inside from the folded edge by turning the handwheel and lower the presser foot. Feed the folded edge smoothly against the sliding guide. [2] After sewing is finished, use an iron to make [2] pleats.
1 Shell Tack 2 1 Stitch pattern: 2 Presser foot: 25 Satin stitch foot F * Use a light weight fabric such as tricot. Fold and stitch on the bias. When the needle swings to the right, allow the needle to just clear the folded edge of the fabric. Open the fabric and iron on one side of the fabric. * For the shell stitch, be aware that thread tension may have to be adjusted depending on the fabric for the best sewing results.
1 2 Smocking 1 Stitch pattern: 2 Presser foot: 38 Satin stitch foot F * Stitch patterns (41, 65, 66, 88) can also be used. For a delicate, decorative treatment, smocking can be applied whenever gathers are used. Turn a child's dress into something very special or smock a yoke on a blouse. Choose a soft, lightweight fabric such as batiste, gingham or challis. Cut the fabric three times the finished width. (Straight stitch) With the manual stitch length at 0.3 to 0.
Scallop Stitch ( A ) 2 1 1 Stitch pattern: 2 Presser foot: 33 Foot A [1] Fold hem with right sides together. Sew scallops 1 [1] cm (3/8”) from folded edge. 1 [2] Trim close to stitching leaving 0.3 cm (1/8”) seam allowance. Clip seams as shown or trim with pinking shears. Turn the hem to right side and press. 2 [2] 2 1 Scallop Stitch ( B ) 1 Stitch pattern: 2 Presser foot: 34 Foot A * Stitch pattern 47 can also be used.
1 Patchwork 2 1 Stitch pattern: 2 Presser foot: 31 Satin stitch foot F Sew seam with straight stitch and press seam allowance to open. Sew pattern stitch 31 on right side of garment centering over the seam line. 1 1 1 1 Right side of fabric Satin Stitch Sewing 2 1 Stitch pattern: 2 Presser foot: 52 Satin stitch foot F * Stitch patterns (45 to 64) can also be used. To get fine sewing results, interfacing should be used on the wrong side of fabric when you use stretch or elastic garments.
1 2 Cross Stitch 1 Stitch pattern: 2 Presser foot: 72 Satin stitch foot F * These stitch patterns (74 to 76) can also be used. You will love the beautiful designs you can sew with this craft stitch pattern, and in half the time it would take if embroidered by hand. Cross stitches can be effectively combined with the other craft patterns for attractive samplers and other sewing projects. A plain close weave such as linen or wool flannel make the best background fabric.
1 2 Cording 1 Stitch pattern: 2 Presser foot: 46 Cording foot H Sew over one strand of cording to create a pretty swirled design on a jacket or vest or sew over three strands of cording for border trims. Pearl cotton, knitting yarn, embroidery floss, lace thread, fine wool or lily yarn can be used for cording. (Triple cording) [1] [1] Mark the design on the right side of the fabric.
1 2 Twin Needle Stitching 1 Stitch pattern: 2 Presser foot: 95 Satin stitch foot F This machine is equipped with a twin needle that can be used to sew parallel rows straight on decorative stitches adding an exquisite touch to table linens and clothing. * Stitch patterns (01,05,31,33,34,41,45,47,56,57,59,86,95) can also be used. Turn off and unplug the machine before changing the needle to the twin needle.
Adjusting Pattern Balance If the decorative stitch patterns, letters, numbers or manual buttonhole stitch are uneven when you sew on a particular fabric, adjust them with the feed balancing dial. * The machine is set with the feed balancing dial position with the setting mark as shown.
Programming Decorative Stitch Patterns 61, 58 [1] To repeat or continue the same combination of stitches, just press the foot control. [1] Press the Mode key and select A Mode. [2] Select stitch pattern 61. [2] [3] Press memory key. [3] [4] Select stitch pattern 58. [4] [5] Press memory key. [5] • A programmed stitch sewing pattern finishing with auto-lock, stitches 61, 58, 98 [1] Stitch patterns: 61, 58, 98 The memorized patterns will be sewn and stop automatically.
Cycle Stitching with Mirror Image Patterns After selecting a pattern, press the Turn-over memory key. Press the Mode key and select A Mode. [1] [1] Press Mode key and select A Mode. [2] [2] Press stitch pattern 50. [3] [3] Press memory key. [4] [4] Press Turn-over memory (TOM) key 3 1 Restarting Programmed Patterns After stopping in the middle of your sewing, press memory key to return to the starting position of your programmed stitch pattern. 1 Contents of program.
Elongation 2 1 1 Stitch pattern: 2 Presser foot: 51 Satin stitch foot F The stitch can be elongated up to five times its normal length by pressing the “ “ key. When the width or length or stitch is changed, a greater variety of patterns are available. Stitch patterns (45 to 60) can also be used. X2 X3 X4 1 Elongated stitch patterns (Drawings) X5 1 1 [1] 2 3 • Sewing sample, stitch pattern 51 1 A Mode 2 LCD screen 3 Stitch patterns [1] Press the Mode key to select A Mode.
1 2 3 Sewing Letters in Block Style 1 B Mode 2 LCD screen 3 Stitch patterns [1] [1] Press the Mode key and select B Mode. [2] [2] Select stitch pattern 29. [3] [3] Press memory key. [4] [4] Select stitch pattern 57. [5] [5] Press memory key. [6] [6] Select stitch pattern 50. [7] [7] Press memory key. , , Select stitch pattern 40. . . Press memory key. [8] [8] Select stitch pattern 37. [9] [9] Press memory key. [10] [10] Select stitch pattern 61. [1] [11] Press memory key.
1 [1] 2 3 Combining Letters in Script Style 1 C Mode 2 LCD screen 3 Stitch patterns [1] Press the Mode key and select C Mode. [2] [2] Select stitch pattern 11. [3] [3] Press memory key. [4] [4] Select stitch pattern 63. [5] [5] Press memory key. [6] [6] Select stitch pattern 12. [7] [7] Press memory key. * * Select stitch pattern 63. * * Press memory key. [8] [8] Select stitch pattern 13. [9] [9] Press memory key. [10] [10] Select stitch pattern 63. [11] [11] Press memory key.
1 2 Editing Function (1) • Check and correct pattern combination before sewing 1 Editing key 2 LCD screen [1] , Example: ABCDEFGH have been memorized. Confirmation of programming. [1] Press “EDIT” key. The cursor will flash under the first letter selection. ○ [2] ○ ○ [2] Shift the cursor by pressing the stitch width key “+” ○ ○ or “-”. ○ * The arrow to the right means there are some more letters after “G”, the arrow to the left means there are some letters before “B”.
1 2 • Adding letters or space between letters 1 Editing key 2 LCD screen [1] [1] Press “EDIT” key. [2] [2] Press the stitch width key “+” and shift the cursor [3] past the last letter where you would like to add letters orspace. 67 [3] Input the stitch pattern 67 (space key). [4] [4] Press memory key to input stitch pattern 67. [5] [5] Press “EDIT” key.
Editing Function (2) 2 1 3 • Uniform width, length adjustment 1 Stitch width key 2 LCD screen 3 Stitch patterns 4 Pre-set stitch width before change 5 Stitch width at 5.0 after selection The entire programmed stitch pattern is memorized as one stitch. The stitch length, stitch width and the length of the patterns can be adjusted manually as shown. Example: To adjust the zigzag width: [2] [3] [4] 4 5 [1] Press the Mode key and select A Mode [2] Input stitch patterns 53, 51 ,53.
SECTION V CARE OF YOUR MACHINE Care of Your Machine 1 [1] 1 3 5 7 3 2 Screw driver Needle plate Lint brush Hook race 2 4 6 8 Set screw Bobbin holder Feed dogs Soft, dry cloth Press the needle Up/down button to raise the needle and unplug the machine before cleaning. Do not dismantle the machine other than explained on this page. Do not store the machine in a high-humidity area, near a heat radiator or in direct sunlight. Clean the outside of the machine with a soft cloth and neutral soap.
Replacing the Light Bulb [1] 1 2 3 4 5 * * 1 Face cover plate Lamp socket Holder Lamp Pins Turn the power switch off. Wait until the lamp has cooled down before touching it. • Removing the light bulb 3 [1] Open face cover plate. 2 [2] Remove the black rubber lamp socket from the lamp holder and pull out the light bulb. 5 • 4 [2] [3] [4] Attaching the light bulb [3] To insert the lamp in the lamp socket, match the pins on the lamp with the lamp socket holes.
Troubleshooting Condition The needle thread breaks. Cause The needle thread is not threaded properly. The needle thread tension is too tight. The needle is bent or blunt. The needle is incorrectly inserted. The needle thread and the bobbin thread are not drawn to the rear when sewing is started. 6. The fabric is not drawn to the rear when sewing is finished. 7. The thread is too heavy or too fine for the needle. Page 19 Page 22 Page 14 Page 14 The bobbin thread breaks. 1.
Troubleshooting, cont’d Cause Condition Reference The machine doesn’t work. 1. The machine is not plugged in. 2. A thread is caught in the hook race. 3. The bobbin winder spindle is still in the winding position. Page 6 Page 64 Page 17 Patterns are distorted. 1. The correct presser foot is not used. 2. The needle thread tension is too tight. 3. The stitch length is not suitable for the fabric being sewn. 4. Feed balancing dial is not set properly. 5.