INSTRUCTION BOOK MANUAL DE INSTRUCCIONES LIVRE D'INSTRUCTIONS Model/ Modelo/Modèle 625E
IMPORTANT SAFETY INSTRUCTIONS This sewing machine is not a toy. Do not allow children to play with this machine. The machine is not intended for use by children or mentally infirm persons without proper supervision. This sewing machine is designed and manufactured for household use only. Read all instructions before using this sewing machine. DANGER— To reduce the risk of electric shock: 1. 2. An appliance should never be left unattended when plugged in.
INSTRUCCIONES IMPORTANTES DE SEGURIDAD Cuando se utiliza un aparato eléctrico es necesario tomar ciertas precauciones básicas de seguridad, como las siguientes: Lea todas las instrucciones antes de utilizar este aparato. PELIGRO — Para reducir el riesgo de choque eléctrico: 1. No deje nunca el aparato sin vigilancia mientras esté enchufado. Desenchufe siempre la máquina de la toma eléctrica inmediatamente después de utilizarla y antes de limpiarla. 2.
CONSIGNES IMPORTANTES DE SECURITE Pour utiliser un appareil électrique, il faut toujours respecter les consignes de sécurité fondamentales, notamment les consignes suivantes : Avant d’utiliser cet appareil, lisez toutes ces instructions. DANGER : Pour réduire les risques d’électrocution. 1. 2. Il ne faut jamais laisser un appareil sans surveillance lorsqu’il est branché. Il faut toujours débrancher cette machine à coudre de la prise électrique murale, après son utilisation ou avant de la nettoyer.
TABLE OF CONTENTS SECTION 1. KNOW YOUR MACHINE SECTION 4. UTILITY STITCHES Names of Parts .............................................................. Standard Accessories .................................................... Accessory storage .......................................................... Extension Table ............................................................. Free-arm sewing ............................................................ 4 6 6 8 8 Basic Zigzag ............................
ÍNDICE SECCIÓN 1: DESCRIPCIÓN DE LA MÁQUINA Nombre de las partes .................................................... Accesorios estándar ...................................................... Compartimento de accesorios ....................................... Tabla de ampliación ....................................................... Costura con el brazo libre .............................................. SECCIÓN 4. PUNTADAS PRÁCTICAS 5 7 7 9 9 Zigzag básico .............................................
TABLE DES MATIÈRES SECTION 1. CONNAISSEZ VOTRE MACHINE Dénomination des composants ..................................... 5 Accessoires standard .................................................... 7 Rangement des accessoires ......................................... 7 Table d’extension ........................................................... 9 Couture avec le bras libre ............................................... 9 SECTION 4. POINTS ULITAIRES Point zigzag ............................................
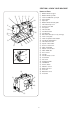
SECTION 1.
SECCIÓN 1: DESCRIPCIÓN DE LA MÁQUINA SECTION 1.
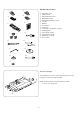
Standard Accessories w q q w e r t y u i o !0 !1 !2 !3 !4 !5 r e y t i u Overedge foot C Zipper foot E Blind hemming foot G Buttonhole foot B Automatic buttonhole foot R Needles Bobbins Screwdriver Lint brush Seam ripper (buttonhole opener) Quilting guide Spool holder (large) Spool holder (small) Additional spool pin Felt cushion !0 o !2 !1 !4 !3 !5 Accessory storage The standard accessories can be stored in the accessory storage box under the extension table.
Accessoires standard Accesorios estándar q w e r t y u i o !0 !1 !2 !3 !4 !5 q w e r t y u i o !0 !1 !2 !3 !4 !5 Pie para sobrehilados (C) Pie para cremalleras (E) Pie para dobladillo invisible (G) Pie para ojales (B) Pie para ojales automátios (R) Agujas Bobinas Destornillador Cepillo para pelusa Descosedor (abridor de ojales) Guía de acolchados Portacarretes (grande) Portacarretes (pequeño) Segundo pasador de carrete Cojín de fieltro Compartimento de accesorios Los accesorios estándar se pueden guarda
Extension Table To detach: Pull the extension table to the left. To attach: Insert the pin into the hole and push the extension table to snap it in place. q Pin w Hole w q Free-arm sewing Free-arm sewing is used for stitching sleeves, waistbands, pant legs or any other tubular garments. It is also useful for darning socks or mending knees or elbows.
Tabla de ampliación Table d’extension Desmontaje: Extraiga la tabla de ampliación hacia la izquierda. Retrait : Tirez la table d’extension vers la gauche. Montaje: Introduzca el pasador por el orificio y empuje la tabla de ampliación para colocarla en su sitio. q Pasador w Orificio Installation : Insérez la broche dans le trou et poussez la table d’extension jusqu’à ce qu’elle s’encastre avec un claquement.
SECTION 2. GETTING READY TO SEW Connecting the Power Supply q t w y z Turn the power switch off. x Insert the controller plug and machine plug into the machine socket. c Insert the power supply plug into the wall outlet. v Turn the power switch on. q Power switch w Machine plug e Controller plug r Machine socket t Power supply plug y Wall outlet e r NOTE: Before connecting to the power supply, make sure the voltage shown on the machine conforms to your electrical power.
SECCIÓN 2. PREPARATIVOS ANTES DE COSER SECTION 2. SE PRÉPARER À COUDRE Conexión a la alimentación z Ponga el interruptor en la posición OFF. x Introduzca el enchufe del pedal y de la máquina en la toma de corriente. c Introduzca el enchufe de alimentación en la toma de la pared. v Ponga el interruptor en la posición ON.
Reverse Stitch Lever Push the reverse stitch lever down to sew in reverse. The machine will sew in reverse while the lever is pushed. Needle Up/Down Button Press this button to bring the needle bar up or down. The machine will stop with the needle up or down depending on the needle position determined by this button. q Needle up/down button q Foot Pressure Dial Turn the foot pressure dial to adjust the foot pressure. The foot pressure dial should be set at “3” for regular sewing.
Palanca de retroceso Levier de point arrière Baje la palanca de retroceso para coser hacia atrás. Mientras presione la palanca, la máquina coserá en sentido contrario. Abaisser le levier de point arrière pour coudre en marche arrière. La machine coud en marche arrière lorsque le levier est abaissé. Botón de subia y bajada de la aguja Bouton d’aiguille haute/basse Pulse este botón para subir y bajar la aguja.
Raising and Lowering the Presser Foot The presser foot lifter raises and lowers the presser foot. e You can raise the foot about 1/4" (0.6 cm) higher than the normal up position for easy removal of the presser foot, or to help you place heavy fabric under the foot. q Lowered position w Normal up position e Extra up position e w w q Changing the Presser Foot To remove: Raise the needle to its highest position by turning the handwheel counterclockwise.
Subida y bajada del prensatelas Relevage et abaissement du pied-de-biche El alzador del prensatelas sube y baja el prensatelas Puede subirlo hasta unos 0,6 cm por encima de la posición normal para facilitar el desmontaje del prensatelas o para colocar tejidos pesados bajo él. q Posición bajada w Posición normal elevada de la aguja e Posición de elevación adicional Le releveur de pied permet de relever et d’abaisser le piedde-biche. Vous pouvez le relever à environ 0.
Changing Needles CAUTION: w q q Always make sure to turn the power switch off and disconnect the machine from power supply before changing the needle. Raise the needle by turning the handwheel and lower the presser foot. Turn off the power switch. e z Loosen the needle clamp screw by turning it counterclockwise. Remove the needle from the clamp. q Needle clamp screw x Insert a new needle into the needle clamp with the flat side of the needle to the rear.
Cambio de agujas PRECAUCIÓN: Asegúrese de que ha apagado y ha desenchufado la máquina de la red eléctrica antes de cambiar la aguja. Levante la aguja girando el volante hacia usted y baje el pie prensatelas. Ponga el interruptor en OFF. z Afloje el tornillo de fijación de la aguja, girándolo hacia la izquierda. Saque la aguja de su sujeción. q Tornillo de fijación de la aguja Introduzca una nueva aguja en la fijación, con el lado plano de la aguja hacia atrás.
Changement d’aiguille ATTENTION : Veillez à toujours mettre la machine hors tension et à débrancher le cordon d’alimentation de la prise secteur avant de changer l’aiguille. Levez l’aiguille en tournant le volant vers vous et abaissez le pied-de-biche. Mettez l’interrupteur d’alimentation en position d’arrêt. z Desserrez la vis du pince-aiguille en la tournant dans le sens contraire des aiguilles d’une montre. Déposez l’aiguille du pince-aiguille.
19
Winding the Bobbin (A) Setting the spool Place a spool of thread on the spool pin with the thread coming off the spool as illustrated. A: Press the large spool holder firmly against the spool of thread. q Large spool holder q (B) B: For a small spool, use the small spool holder. w Small spool holder w Additional spool pin The additional spool pin is for bobbin winding without unthreading the machine. Insert the additional spool pin into the hole. Place the felt and a spool on the pin.
Bobinado de la bobina Remplissage de la canette Fijación del carrete Coloque el carrete de hilo en el pasador del carrete, haciendo que el hilo salga del carrete como se muestra. Réglage de la bobine de fil Placez une bobine de fil sur le porte-bobine, avec le fil positionné comme illustré. A : Appuyez fermement le disque fixe-bobine grand modèle contre la bobine de fil. q Disque fixe-bobine grand modèle B : Pour une petite bobine, utilisez le disque fixe-bobine petit modèle.
w Winding the bobbin e z q z Pull out the handwheel to disengage the clutch. q Handwheel w x x Draw the thread from the spool. Guide the thread around the bobbin winder thread guide. w Bobbin winder thread guide c Thread through the hole in the bobbin from the inside to the outside. Put the bobbin on the bobbin winder spindle with the free end of the thread coming out at the top. e Bobbin winder spindle c e v Push the bobbin to the right.
Bobinado de la bobina Remplissage de la canette z Tire del volante para soltar el acoplamiento. q Volante z Tirez le volant vers l’extérieur pour dégager l’embrayage. q Volant x Tire del hilo del carrete. Guíe el hilo alrededor del guía x Tirez le fil de la bobine. Guidez le fil autour du guide-fil hilos de la bobinadora. du dévidoir.
Inserting the bobbin q z z Place the bobbin in the bobbin holder with the thread running off as illustrated. q Thread x x Guide the thread into the front notch on the front side of the bobbin holder. Draw the thread to the left, sliding it between the tension spring blades. w Front notch e Tension spring blade w e c Continue to draw the thread lightly until the thread slips into the side notch. r Side notch c r v Pull out about 4” (10 cm) of thread. Attach the hook cover plate.
Colocación de la bobina Introduction de la canette z Coloque la bobina en el portabobinas con el hilo saliendo por donde muestra la ilustración. q Hilo z Placez la canette dans le support de canette en laissant le fil se dérouler comme illustré. q Fil x Guidez le fil dans l’encoche frontale, du côté avant du support de canette. Tirez le fil vers la gauche, en le faisant glisser entre les lames de tension.
c Threading the Machine z To set the needle thread: Raise the thread take-up lever to the highest position by turning the handwheel. Raise the presser foot. x v b q z z Draw the thread from the spool and pass it under the thread guide. Then draw it down along the right channel. q Thread guide w Right channel w x x Draw the thread up around the bottom of the thread guide plate.
Enhebrado de la máquina Enfilage de la machine Para colocar el hilo de la aguja: Levante la palanca tira hilos hasta su posición más elevada, girando el volante. Eleve el prensatelas. Pour régler le fil d’aiguille : Relevez le levier releveur de fil à son point le plus élevé en tournant le volant. Relevez le pied-de-biche. z Tire el hilo del carrete y páselo por debajo del guiahilos. Después, hágalo pasar por el canal derecho, hacia abajo.
Needle threader z Raise the needle to its highest position and lower the presser foot. Push down the needle threader knob as far as it will go. The hook comes out through the needle eye from behind. q Threader knob z q x x Draw the thread from the left around the guide and under the hook. w Guide e Hook w e c c Release the knob slowly while holding the thread end with your hand. A loop of the thread is pulled up through the needle eye. v v Pull out the end of the thread through the needle eye.
Enhebrador de la aguja Enfile-aiguille z Levante la aguja a la posición más elevada y baje el pie prensatelas. Presione a fondo el saliente del enhebrador de agujas. El enhebrador sale por el ojo de la aguja desde atrás. q Saliente del enhebrador z Levez l’aiguille à sa position la plus élevée et abaissez le pied-de-biche. Appuyez à fond sur le bouton d’enfilage de l’aiguille. Le crochet sort de l’aiguille par l’arrière.
Drawing up the Bobbin Thread z Raise the presser foot and hold the needle thread lightly with your left hand. q Needle thread z q x Turn the handwheel slowly toward you one complete turn. Bring the bobbin thread up by pulling the needle thread as illustrated. q Needle thread w Bobbin thread x w q c Pull 4” (10 cm) of both threads back and under the presser foot.
Extracción del hilo de la bobina Remonter le fil de la canette z Suba el prensatelas y sujete el hilo de la aguja suavemente con la mano izquierda. q Hilo de la aguja z Relevez le pied-de-biche et maintenez légèrement le fil d’aiguille entre les doigts de votre main gauche. q Fil d’aiguille x Gire el volante hacia usted un giro completo. Lleve el hilo de la bobina hacia arriba, tirando del hilo de la aguja como se muestra.
Selecting the Stitch Pattern Raise the needle to its highest position. e Pattern selector dial w Turn the pattern selector dial to set the symbol of the desired stitch pattern at the setting mark. q Pattern selector dial w Setting mark CAUTION: Do not turn the pattern selector dial while the needle is in the fabric, otherwise the needle may bend or break. q To select the stretch stitch patterns, set the stitch length dial at S.S.
Selección del patrón de la puntada Sélection du motif de point Levante la aguja hasta la posición más alta. Relevez l’aiguille à sa position la plus haute. Selector de patrones Gire el selector de patrones para fijar el símbolo del patrón de puntada deseado en la marca de referencia. q Selector de patrones w Marca de referencia Sélecteur de motif Tournez le sélecteur de motif de façon à ce que le repère de réglage se trouve en face du symbole du motif de point désiré.
Adjusting stretch stitch balance If the stretch stitch patterns are uneven when you sew on a particular fabric, correct them by turning the stitch length dial. “–” If the patterns are drawn out, correct them by setting the dial to the “–” side. “+” If the patterns are compressed, correct them by setting the dial to the “+” side. Stitch Width Dial q Turn the stitch width dial to set the desired stitch width number at the setting mark.
Equilibrado de puntadas elásticas Pour ajuster l’équilibre des points élastiques Si los patrones de las puntadas elásticas son irregulares cuando trabaja sobre una tela concreta, puede corregir el problema girando el regulador de la longitud de la puntada. Si les motifs de points élastiques sont inégaux lorsque vous cousez sur un tissu particulier, modifiez-les en tournant le sélecteur de longueur de point. Si los patrones quedan sueltos, corríjalos poniendo el regulador en el lado “ – ”.
Balancing Needle Thread Tension Auto-thread tension This machine is equipped wih the auo-thread tension control, which covers a wide range of sewing conditions. For general sewing, set the tension dial at “A” q w t q Tension dial r Balanced tension: The ideal straight stitch has threads locked between two layers of fabric, as illustrated.
Equilibrado de la tensión del hilo de la aguja Équilibrage de la tension du fil d’aiguille Ajuste automático de la tensión Esta máquina incluye la función automática de la tensión, que abarca una amplia de condiciones de costura. Ponga el regulador de la tensión en “A” para costura general. q Regulador de tensión Tension automatique Cette machine comporte la réglage de la tension automatique, qui couvre toute la plage eds conditions de couture.
SECTION 3. BASIC SEWING q w r Straight Stitch Sewing e Machine setting: q Stitch pattern: A w Stitch width: 0 or 5 e Stitch length: 1.5 – 4 r Thread tension: A t Presser foot: Zigzag foot A t Starting to sew Raise the presser foot and place the fabric under the foot. Lower the needle into the fabric. Lower the presser foot and smooth the threads toward the back. Depress the foot control. NOTES: Draw the threads to the left when sewing with the buttonhole foot.
SECTION 3. COUTURE STANDARD SECCIÓN 3. COSTURA BÁSICA Couture à point droit Puntada recta Réglage de la machine : A q Motif de point : 0 ou 5 w Largeur de point : e Longueur de point : 1.5 – 4 A r Tension du fil : Pied de point zigzag A t Pied-de-biche : Configuración de la máquina: q Patrón de puntadas: A w Anchura de la puntada: 0 ó 5 e Longitud de la puntada: 1.
Seam guides on the needle plate The seam guides on the needle plate help you to measure seam allowance. The numbers indicate the distance between the center needle position and the seam guide. q Seam guides Number Spacing (cm) q Spacing (inch) 15 20 4/8 5/8 6/8 1.5 2.0 1.3 1.6 1.9 1/2 5/8 3/4 Turning a square corner The cornering guide helps you maintain a 5/8” (1.6 cm) seam allowance when sewing a corner.
Guías de costura en la placa de agujas Guides de couture de la plaque à aiguilles Las guías de costuras en la placa de agujas ayudan a medir el margen entre el borde de la tela y la costura. Los números indican la distancia entre la posición central de la aguja y la guía de costura. q Guías de costura Les guides de couture tracés sur la plaque à aiguille vous facilitent la tâche pour mesurer les rentrés de couture.
SECTION 4. UTILITY STITCHES w q r e Basic Zigzag Machine setting q Stitch pattern: C w Stitch width: 1–5 e Stitch length: 0.5 – 3 r Thread tension: A t Presser foot: Zigzag foot A t Simple zigzag stitching is widely used for overcasting, sewing on buttons etc. Adjust the stitch length to suit your sewing needs. NOTE: Use a stabilizer for stretch fabrics such as tricot and knits to prevent puckering.
SECCIÓN 4. PUNTADAS PRÁCTICAS SECTION 4. POINTS ULITAIRES Zigzag básico Point zigzag de base Configuración de la máquina q Patrón de puntadas: C Réglage de la machine q Motif de point : w Largeur de point : e Longueur de point : r Tension du fil : t Pied-de-biche : w Anchura de la puntada: 1–5 e Longitud de la puntada: r Tensión del hilo: 0.5 – 3 A t Pie prensatelas: Pie para zigzag (A) Le point zigzag simple est utilisé fréquemment pour le surfilage, pour coudre des boutons etc.
Knit Stitch q w r e Machine setting q Stitch pattern: G w Stitch width: 5 e Stitch length: S.S. r Thread tension: A t Presser foot: Overedge foot C t This stitch is ideal for finishing edges of stretch fabrics. It seams and finishes the fabric edges simultaneously. Place the edge of the fabric next to the guide of foot and sew while guiding the fabric edge along the guide.
Puntada en tejidos de punto Point tricot Configuración de la máquina G q Patrón de puntadas: Réglage de la machine q Motif de point : w Largeur de point : e Longueur de point : r Tension du fil : t Pied-de-biche : w Anchura de la puntada: 5 e Longitud de la puntada: S.S. (telas elásticas) r Tensión del hilo: t Pie prensatelas: A Pie para sobrehilado (C) G 5 S.S.
q r w Straight Stretch Stitch e Machine setting q Stitch pattern: A w Stitch width: 0 or 5 e Stitch length: S.S. r Thread tension: A t Presser foot: Zigzag foot A t The pattern is sewn with two stitches forward and one stitch backward, forming a seam that does not rip easily. Use it to reinforce areas such as crotch and armhole seams. Also use it when constructing items such as backpacks for extra strength. Carefully guide the fabric while sewing as the fabric moves back and forth.
Puntada recta elástica Point droit élastique Configuración de la máquina q Patrón de puntadas: w Anchura de la puntada: e Longitud de la puntada: r Tensión del hilo: t Pie prensatelas: Réglage de la machine q Motif de point : w Largeur de point : e Longueur de point : r Tension du fil : t Pied-de-biche : A 0ó5 S.S. (telas elásticas) A Pie para zigzag (A) A 0 ou 5 S.S.
q Button Sewing w e r Machine setting q Stitch pattern: C w Stitch width: Adjust as necessary e Stitch length: Any r Thread tension:A t Presser foot: Buttonhole foot B y Feed dog: Lowered t y Unthread the needle. Adjust the stitch width to match it with the span of the holes in the button. Turn the handwheel to check if the needle enters into each hole in the button. Lower the foot to hold the button in place. The holes in the button should align with the slot of the foot.
Costura de botones Couture des boutons Configuración de la máquina C q Patrón de puntadas: Según las necesidades w Anchura de la puntada: e Longitud de la puntada: Cualquiera Réglage de la machine q Motif de point : w Largeur de point : e Longueur de point : r Tension du fil : t Pied-de-biche : y Griffes d’entraînement : r Tensión del hilo: A t Pie prensatelas: y Dientes de arrastre: Pie para ojales (B) bajados C Ajustez selon le besoin Tous A Pied de boutonnière B Abaissées Retirez le fil de l’aig
q Automatic Buttonhole w r e Machine setting q Stitch pattern: BH w Stitch width: 4–5 e Stitch length: 0.5 – 1 r Thread tension: A t Presser foot: Automatic buttonhole foot R t NOTES: The size of buttonhole is automatically determined by placing the button in the automatic buttonhole foot. The button holder of the foot takes a button size up to 1" (2.5 cm) in diameter. Make a test buttonhole on a sample duplicating the fabric, interfacing and seams of the actual garment to check the settings.
Ojal automático Boutonnière automatique Configuración de la máquina Réglage de la machine q Motif de point : w Largeur de point : e Longueur de point : r Tension du fil : t Pied-de-biche : q Patrón de puntadas: BH (ojal) w Anchura de la puntada: 4–5 e Longitud de la puntada: 0.5 – 1 r Tensión del hilo: A t Pie prensatelas: Pie de ojales automáticos (R) BH 4–5 0.
c Pull the buttonhole lever down as far as it will go. r Buttonhole lever c r v Raise the foot and pass the needle thread through the opening in the foot. Draw both needle and bobbin threads to the left. Insert the fabric under the foot and lower the needle into the fabric at the starting point. Lower the foot. t Needle thread y Bobbin thread u Opening i Starting point v u t i y NOTE: Make sure there is no gap between the slider and front stopper.
c Abaissez à fond le levier de boutonnière. r Levier de boutonnière c Baje la palanca de ojal tanto como sea posible. r Palanca de ojales v Levante el pie y pase el hilo de la aguja por la abertura del pie. Lleve los hilos de la aguja y la bobina hacia la izquierda. Ponga la tela bajo el pie y baje la aguja hasta la tela; sitúela en el punto inicial. Haga descender el pie prensatelas.
To sew another buttonhole, turn the stitch selector to “RESET”, then back to “ ” again, as shown. Now, simply step on the foot control to sew an identical buttonhole. m When buttonhole sewing is finished, push the buttonhole lever up as far as it will go. m Adjusting the buttonhole stitch density Turn the stitch length dial within the range of “ to adjust the buttonhole stitch density.
Para coser otro ojal, ponga el selector de puntada en “RESTABLECER”. Después, vuelva a ponerlo en “ ” otra vez, como se indica en la figura. Ahora, pise el pedal para coser otro ojal idéntico. Pour coudre une autre boutonnière, placez le cadran de sélection de motif sur “ RESET ”, puis à nouveau sur m Después de coser el ojal, empuje hacia arriba la palanca de ojales tanto como sea posible. m Lorsque la boutonnière est terminée, relevez à fond le levier de boutonnière.
Corded Buttonhole w q r e Machine setting q Stitch pattern: BH w Stitch width: 4–5 e Stitch length: 0.5 – 1 r Thread tension: A t Presser foot: Automatic buttonhole foot R t z With the buttonhole foot raised, hook the filler cord on the spur at the back of the foot. Bring the ends toward you under the foot, clearing the front end. Hook the filler cord into the forks on the front of the foot to hold them tight. q Spur w Forks e Cord z w q e x x Draw both needle and bobbin thread to the left.
Ojal acordonado Boutonnière cordonnet Configuración de la máquina Réglage de la machine q Motif de point : w Largeur de point : e Longueur de point : r Tension du fil : t Pied-de-biche : q Patrón de puntadas: BH (ojal) w Anchura de la puntada: 4–5 e Longitud de la puntada: 0.5 – 1 r Tensión del hilo: t Pie prensatelas: A Pie de ojales automáticos (R) z Con el prensatelas para ojales levantado, enganche el cordón de relleno en el puntal de la parte posterior del pie.
Manual Buttonhole w q e Machine setting q Stitch pattern: BH w Stitch width: 4–5 e Stitch length: 0.5 – 1 r Thread tension: A t Presser foot: Buttonhole foot B t r If the diameter of the button is more than 1" (2.5 cm), a buttonhole must be made manually as follows: z Replace the foot with the buttonhole foot B. z x Pull the buttonhole lever down as far as it will go. Draw both needle and bobbin thread to the left. Lower the needle into the fabric at the starting point, and lower the foot.
Ojal manual Boutonnière manuelle Configuración de la máquina Réglage de la machine q Motif de point : w Largeur de point : e Longueur de point : r Tension du fil : t Pied-de-biche : q Patrón de puntadas: BH (ojal) w Anchura de la puntada: 4–5 e Longitud de la puntada: r Tensión del hilo: 0.5 – 1 A t Pie prensatelas: Pie para ojales (B) BH 4–5 0.
b Restart the machine to sew the back bartack and right row, and then stop the machine at the starting point. b n When buttonhole sewing is finished, push the buttonhole lever up as far as it will go.
v Vuelva a poner la máquina en marcha para coser el remate trasero y la fila derecha. Después, detenga la máquina en el punto inicial. v Redémarrez la machine pour coudre le bord arrière et la rangée de droite, puis arrêtez la machine au point de départ. b Después de coser el ojal, empuje hacia arriba la palanca de ojales tanto como sea posible. b Lorsque la boutonnière est terminée, relevez à fond le levier de boutonnière.
Zipper Application w q e Machine setting q Stitch pattern: A w Stitch width: 5 e Stitch length: 1.5 – 4 r Thread tension: A t Presser foot: Zipper foot E t r Attaching the zipper foot A: To sew the left side of the zipper, attach zipper foot with the right side pin. w q (A) B: To sew the right side of zipper, attach the zipper foot with the left side pin. q Groove w Pin (B) o Fabric preparation u z Add 3/8” (1 cm) to the zipper size. This is the overall opening size.
Costura de cremalleras Pose de fermeture à glissière Configuración de la máquina A q Patrón de puntadas: Réglage de la machine q Motif de point : w Largeur de point : e Longueur de point : r Tension du fil : t Pied-de-biche : w Anchura de la puntada: 5 e Longitud de la puntada: r Tensión del hilo: 1.5 – 4 A t Pie prensatelas: Pie para cremalleras (E) A 5 1.
To sew q z z Attach zipper foot with the right side pin. Fold back the upper layer seam allowance. Fold back the lower layer seam allowance to leave a 1/8" (0.3 cm) margin of fabric. q Lower layer w End of the opening e Zipper teeth r 1/8” (0.3 cm) margin t Upper layer y Opening size u Folded edge i Basting e w r y t u i x Place zipper teeth next to margin edge and baste the zipper tape to the lower fabric layer. Align zipper foot with margin edge.
Para coser Pour coudre z Fije el pie para cremalleras con el pasador derecho. Doble hacia atrás el margen de la costura de la capa superior. Doble hacia atrás el margen de la costura de la capa inferior para dejar un margen de 0,3 cm de tela. q Capa inferior w Final de la abertura e Dientes de la cremallera r Margen de 0,3 cm t Capa superior y Tamaño de la abertura u Borde doblado i Hilvanado z Installez le pied à semelle étroite avec la broche à droite.
b Raise and release the foot, and re-attach it with the left side pin. Starting just below zipper bottom stop, sew across fabric to about 3/8" (1 cm) distance from the basting line. Turn fabric 90 degrees and sew a seam the entire length of the zipper tape. Before reaching the slider, stop the machine with needle in fabric and raise the foot. Use seam ripper to open a few inches of basting stitch. !3 Unstitch basting !4 3/8" (1 cm) b !4 !3 n Unzip a few inches to clear a path for stitching.
v Levante y suelte el pie y vuelva a fijarlo con el pasador izquierdo. Empiece justo debajo del tope inferior de la cremallera a coser la tela hasta una distancia de aproximadamente 1 cm desde la línea de hilván. Gire la tela 90º y cosa el resto de la longitud de la cinta de la cremallera. Antes de llegar a la corredera, detenga la máquina con la aguja en la tela y levante el pie. Utilice un descosedor para abrir unos centímetros de las puntadas de hilván.
q Blind Hemming w r e Machine setting q Stitch pattern: E or F w Stitch width: 2–3 e Stitch length: 2 – 3 r Thread tension:A t Presser foot: Blind hemming foot G t z z On heavy weight fabrics that ravel, the raw edge should be overcast first. Fold the hem under the fabric as illustrated for fine or medium fabrics. Fold a hem with the wrong side up forming a 1/8” (0.5 cm) allowance. q Wrong side of the fabric w 1/4” (0.
Dobladillo invisible Ourlet invisible Configuración de la máquina q Patrón de puntadas: EoF Réglage de la machine q Motif de point : w Largeur de point : e Longueur de point : r Tension du fil : t Pied-de-biche : w Anchura de la puntada: 2–3 e Longitud de la puntada: r Tensión del hilo: 2–3 t Pie prensatelas: A Pie para dobladillo invisible (G) E ou F 2–3 2–3 A Pied pour ourlet invisible G z Sur les tissus épais qui s’effilochent, il faut tout d’abord surfiler le bord brut.
SECTION 5. DECORATIVE STITCHES Decorative Satin Stitches w q Machine setting q Stitch pattern: I – L w Stitch width: 3–5 e Stitch length: 0.5 – 1 r Thread tension:A t Presser foot: Zigzag foot A or Buttonhole foot B e r t Determine the appropriate stitch density by test sewing. For a delicate appearance on fabric such as chiffon, use a single layer with a tear-away backing, if necessary. Reduce the needle thread tension slightly to achieve the better result.
SECCIÓN 5. PUNTADAS DECORATIVAS SECTION 5. POINTS DÉCORATIFS Bordado de realces decorativos Point passé décoratif Configuración de la máquina q Patrón de puntadas: I–L w Anchura de la puntada: 3–5 e Longitud de la puntada: r Tensión del hilo: 0.5 – 1 t Pie prensatelas: Réglage de la machine q Motif de point : w Largeur de point : e Longueur de point : r Tension du fil : t Pied-de-biche : A Pie para zigzag (A) o pie para ojales B I–L 3–5 0.
q Smocking w e r Machine setting q Stitch pattern: D w Stitch width: 3–5 e Stitch length: S.S. r Thread tension:A t Presser foot: Zigzag foot A t Step 1: Choose a soft and lightweight fabric such as batiste, gingham or challis. Cut the fabric three times wider than the project width. Increase the stitch length to “4” and loosen thread tension to “1”. Sew rows of straight stitches 3/8" (1 cm) apart across the area to be smocked. q 3/8” (1 cm) q Step 2: Knot the threads along one end.
Fruncido Smocks Configuración de la máquina D q Patrón de puntadas: Réglage de la machine q Motif de point : w Largeur de point : e Longueur de point : r Tension du fil : t Pied-de-biche : w Anchura de la puntada: 3–5 e Longitud de la puntada: S.S. (telas elásticas) r Tensión del hilo: A t Pie prensatelas: Pie para zigzag (A) Paso 1: Elija una tela suave y ligera, como batista, guinga o chalí. Corte una pieza de tela que mida el triple que el ancho final.
q Quilting w e Machine setting q Stitch pattern: A w Stitch width: 0 or 5 e Stitch length: 1.5 – 4 r Thread tension:A t Presser foot: Zigzag foot A y Quilting guide t r y The quilting guide will help keep the seam spacing constant. w q Insert the quilting guide into the opening and set the quilting guide at the desired seam spacing. q Quilting guide w Opening for the quilting guide Sew, tracing the previous row of stitching with the quilting guide.
Acolchados Ouatinage Configuración de la máquina A q Patrón de puntadas: 0ó5 w Anchura de la puntada: y Guía de acolchados Réglage de la machine q Motif de point : w Largeur de point : e Longueur de point : r Tension du fil : t Pied-de-biche : y Guide de ouatinage La guía de acolchados ayudará a mantener una separación constante entre las costuras. Introduzca la guía de acolchados en la abertura y fije la separación entre costuras que desee.
q Pin Tucking w e Machine setting q Stitch pattern: A w Stitch width: 0 or 5 e Stitch length: 1.5 – 3 r Thread tension:A t Presser foot: Blind hemming foot G r t Fold a fabric wrong side together and Lower the needle into the fabric 0.1 – 0.2 cm inside the folded edge. Lower the foot and turn the screw to align the guide on the foot with the folded edge. Sew slowly while guiding the folded edge along the guide. Open the fabric and iron press the tucks.
Prendido con alfileres Nervures Configuración de la máquina A q Patrón de puntadas: 0ó5 w Anchura de la puntada: Réglage de la machine q Motif de point : w Largeur de point : e Longueur de point : r Tension du fil : t Pied-de-biche : e Longitud de la puntada: 1.5 – 3 r Tensión del hilo: t Pie prensatelas: 2–6 Pie para dobladillo invisible (G) A 0 ou 5 1.
Fagoting q w r e Machine setting q Stitch pattern: H w Stitch width: 3–5 e Stitch length: 1 – 3 r Thread tension:1 – A t Presser foot: Zigzag foot A t Use this stitch to join two pieces of fabric to create an open work appearance, and add design interest. Fold under each fabric edge 1/2" (1.3 cm) and press. Pin the two edges to a piece of paper or tear-away backing 1/8" (0.3 cm) apart. q Paper Sew slowly, guiding the fabric so the needle catches the folded edge on each side.
Uniones Entre-deux Configuración de la máquina q Patrón de puntadas: H Réglage de la machine q Motif de point : w Largeur de point : e Longueur de point : r Tension du fil : t Pied-de-biche : w Anchura de la puntada: 3–5 e Longitud de la puntada: 1–3 r Tensión del hilo: t Pie prensatelas: 1–A Pie para zigzag (A) H 3–5 1–3 1–A Pied de point zigzag A Utilice esta puntada para unir dos piezas de tela con un aspecto de trabajo abierto y darle un interés añadido al diseño.
Appliqué q w Machine setting q Stitch pattern: C w Stitch width: 3–5 e Stitch length: 0.5 – 1 r Thread tension:1 – A t Presser foot: Buttonhole foot B y Foot pressure: “2” r t e y Baste appliqué pieces on the fabric, or fuse the appliqué pieces with an iron-on fabric joiner. Stitch around the appliqué, making sure the needle at the right swing falls along the outer edge of the appliqué. Turning the corner: Stop the machine and lower the needle into the fabric at the outer edge of the appliqué.
Aplicación Appliqué Configuración de la máquina C q Patrón de puntadas: Réglage de la machine q Motif de point : w Largeur de point : e Longueur de point : r Tension du fil : t Pied-de-biche : y Pression du pied : w Anchura de la puntada: 3–5 e Longitud de la puntada: 0.5 – 1 r Tensión del hilo: t Pie prensatelas: 1–A Pie para ojales (B) y Presión del pie: “2” Cosa las piezas de aplicación en la tela o fíjelas con un adhesivo térmico para planchas.
SECTION 6. CARE AND MAINTENANCE WARNING: Turn the power switch off and unplug the machine before cleaning. NOTE: Do not dismantle the machine in any way other than what is explained in this section. Clean the outside of the machine with a soft cloth and mild soap. Cleaning the Hook Race and Feed Dogs z z Remove the presser foot and needle. Remove screw on the needle plate with the screwdriver. Remove the needle plate and take out the bobbin. q Screw q x Lift up the bobbin holder and remove it.
SECTION 6. SOINS ET ENTRETIEN SECCIÓN 6. CUIDADOS Y MANTENIMIENTO AVERTISSEMENT : ATENCIÓN: Coupez l’alimentation et débranchez la machine avant de procéder à son nettoyage. Apague y desenchufe la máquina antes de limpiarla. NOTA: La máquina sólo debe desmontarse como se indica en esta sección. REMARQUE : Ne démontez pas la machine en outrepassant les instructions de cette section. Limpie la máquina por fuera con un paño y jabón suaves.
Replacing the Bobbin Holder z z Insert the bobbin holder into the hook race. x x Make sure the knob of the bobbin holder fits next to the stopper on the race. q Knob w Stopper w c Replace the bobbin. Attach the needle plate, inserting the two guide pins into the holes in the needle plate. Tighten the screw firmly with the screwdriver. e Guide holes r Screw q c e r e Replacing the Light Bulb WARNING: When replacing the bulb, switch off and unplug the machine.
Cambio del portabobinas Remplacement du porte-canette z Introduzca el portabobinas en la carrera. z Insérez le porte-canette dans le logement de crochet. x Asegúrese de que la manilla del portabobinas encaja cerca del tope de la carrera. q Manilla w Tope x Assurez-vous que le bouton du porte-canette est bien placé près de la butée dans le logement de crochet. q Bouton w Butée c Cambie la bobina. Fije la placa de agujas, introduciendo los dos pasadores guía en los orificios de la placa.
Troubleshooting Cause Condition Reference The needle thread is not threaded properly. The needle thread tension is too tight. The needle is bent or blunt. The needle is incorrectly inserted. The needle thread and the bobbin thread are not drawn to the rear and set properly under the presser foot when starting sewing. 6. The fabric is not drawn to the rear when sewing is finished. 7. The thread is too heavy or too fine for the needle. 1. The bobbin thread is not threaded properly in the bobbin holder. 2.
Detección y solución de problemas Problema Causa Referencia 1. El hilo de la aguja no está correctamente enhebrado. 2. El hilo de la aguja está demasiado tenso. 3. La aguja está doblada o dañada. 4. La aguja no está insertada correctamente. 5. Los hilos de la aguja y de la bobina no se han llevado a la parte posterior y no se han colocado correctamente bajo el prensatelas al empezar a coser. 6. No se coloca la tela hacia atrás al acabar de coser. 7.
Dépistage des pannes Cause Anomalie Le fil d’aiguille casse. 1. Le fil d’aiguille n’est pas bien enfilé. 2. 3. 4. 5. Le fil d’aiguille est trop tendu. L’aiguille est déformée ou émoussée. L’aiguille est mal positionnée. Le fil de l’aiguille et le fil de la canette ne sont pas tirés vers l’arrière et correctement placés sous le pied-de-biche au début de la piqûre. 6. Le tissu n’est pas tiré vers l’arrière après la couture. 7. Le fil est trop épais ou trop fin pour l’aiguille.
507-800-347 (E/S/F) Printed in Taiwan Imprimé en Taiwan Impreso en Taiwán