
User's Manual
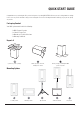
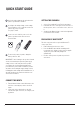
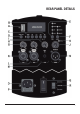
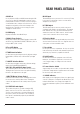

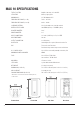
Table Of Contents
- CONTENT
- CONTENIDO
- INSTRUCCIONES DE SEGURIDAD
- GUÍA DE INICIO RÁPIDO
- DETALLES DEL PANEL TRASERO
- DESCRIPCIÓN GENERAL
- ESPECIFICACIONES DE MAX 10
- ESPECIFICACIONES DE MAX 12
- ESPECIFICACIONES DE MAX 15
- APLICACIONES Y CARACTERÍSTICAS
- CONECTIVIDAD BLUETOOTH
- COLOCACIÓN Y INSTALACIÓN
- CABLES Y CONECTORES
- EJEMPLOS DE APLICACIÓN
- SOLUCIÓN DE PROBLEMAS
- TÉRMINO DE GARANTÍA

6
Check the mains voltage at the outlet where the
powered speaker will be installed.
QUICK START GUIDE
SETTING THE CHANNELS
1. Select a Preset with the Preset EQ Selection button.
2. Determine the source of the Gain of CH1 and CH2. For
the microphone, set it to 3 h. For line source, set it to 9
h.
3. Slowly turn the Master Volume control to the right until
you reach the desired volume.
PAIR AUDIO BY BLUETOOTH
TM
This device supports audio reception via Bluetooth. To
connect your device:
1. Enable Bluetooth on the source device.
2. Press the MODE button until the streaming audio
reception mode is displayed on the product's graphic
display. The product will start pairing mode
automatically.
3. Find the desired powered speaker on your device
and select it.
According to the mains voltage, set the voltage
selection switch to 127 or 220 volts on the rear
panel of the powered speaker.
See page 7, item R.
Connect one end of the AC power cord to the
powered speaker and the other end to an
electrical outlet.
To turn on the powered speaker, change the
switch position to “ON”.
IMPORTANT: To avoid damage to the product’s internal
circuits, it is mandatory to adjust the power supply
voltage selector on the rear panel of the speaker,
according to the electrical network voltage of the
place where the product will be installed. If you have
any doubts about setting the supply voltage selector,
identifying the mains voltage at the installation site, or
any other questions, ask a trained technician or an
electrician for assistance.
CONNECT THE INPUTS
1. Turn the Master Volume control all the way to the
left before connecting any cables to the audio
inputs.
2. Connect the device signal cables to the CH1,
CH2 and CH3 input connectors, according to your
application.