
User's Manual
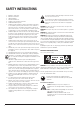
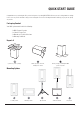
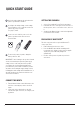
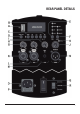

Table Of Contents
- CONTENT
- CONTENIDO
- INSTRUCCIONES DE SEGURIDAD
- GUÍA DE INICIO RÁPIDO
- DETALLES DEL PANEL TRASERO
- DESCRIPCIÓN GENERAL
- ESPECIFICACIONES DE MAX 10
- ESPECIFICACIONES DE MAX 12
- ESPECIFICACIONES DE MAX 15
- APLICACIONES Y CARACTERÍSTICAS
- CONECTIVIDAD BLUETOOTH
- COLOCACIÓN Y INSTALACIÓN
- CABLES Y CONECTORES
- EJEMPLOS DE APLICACIÓN
- SOLUCIÓN DE PROBLEMAS
- TÉRMINO DE GARANTÍA

8
M. AUX Input
This auxiliary input accepts a stereo P2 connector (3.5 mm).
It can connect a wide range of devices such as tablets,
smartphones, and laptops.
N. THRU Output
This XLR (male) output connector provides a means of
sending an audio signal to an external device. The signals
from channels CH1, CH2, CH3 and the Media Player are
summed and sent to the THRU connector, and the volume
control of each channel is reflected in the output.
O. Electrical Outlet
Connect the AC power cord supplied with the product to the
electrical outlet on the back of the case. Plug the other end
of the power cord into an available outlet.
P. Fuse holder
Product protection fuse compartment. Use fuse as specified
in the technical specifications of this manual. Replacement
should only be performed by a qualified technician.
Q. On/Off switch
Use this switch to turn the equipment on and off. Before
turning on, check that the equipment is connected to the
correct supply voltage, according to the local electrical
installation.
R. Power Selector Switch
Supply voltage selector switch, to adjust this switch, always
perform this change with the equipment turned off and with
the electrical power outlet removed.
S. SIGNAL Indicator
Audio signal presence light (green) if there is a signal in any
of the K, L, M inputs or coming from the Media Player. This
indicator will alternate color (orange) if the signal level
reaches the maximum required to provide maximum sound
output.
A. USB Port
Use to play music in MP3 and WAV formats through a USB
2.0 or 3.0 pen drive (5V/100mA) with a capacity of up to
64GB (formatted in FAT32 or exFAT). Do not use any types
of external hard drives, adapters or mobile devices, such as
smartphones and tablets, at the risk of damage to the
internal circuits. This USB port does not support power
charging for external devices.
B. LCD Display
Displays information about Media Player.
C. Media Player Controls
Media Player control buttons. MODE (toggles between USB
and BT modes), PLAY/PAUSE, REPEAT, PREVIOUS (-VOL on
hold) and NEXT (+VOL on hold).
D. Front LED Button
Use to turn on/off the front light.
E. TONE Selection Button
Use this button to switch between the five different settings.
Being: MUSIC, SPEECH, LIVE, CLUB and FLAT (all l ights
off).
F. LOCATE Selection Button
Use this button to toggle between three different settings,
namely: POLE, MONITOR and BRACKET.
G,H,I. CH1, CH2 and CH3 Volume Control
They control the gain of CH1, CH2 and CH3, respectively.
Turning the knob to the left reduces the gain and turning
the knob to the right increases the gain.
J. MASTER Master Volume Control
Controls the unit’s master volume. Turning the knob to the
left decreases the overall speaker volume. Turning the
control to the right increases the overall powered speaker
volume.
K,L. XLR/P10 Combo Inputs
These balanced inputs accept either a standard XLR
(male) connector or a 1/4”
P10 connector (TRS or TS).
You can connect various types of musical instruments,
microphones, mixers, and DJ mixers. The sensitivity of
these inputs is automatically adjusted by the MIC/LINE
volume controls.
REAR PANEL DETAILS