
Instructions / Assembly


INSTALLATION INSTRUCTIONS
for Aluminum Windows without Nailing Fin (JII031)
3
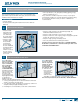
REMOVE PACKAGING
Remove shipping materials such as corner covers, shipping blocks or
pads. If there is a protective lm on the glass, do not remove it until
installation and construction are complete.
INSPECT WINDOW
Cosmetic damage•
Product squareness (diagonal measurements not more than 1/8" •
different)
1
2
3
REMOVE PACKAGING & INSPECT WINDOW
INSPECT ROUGH OPENING
PREPARE MASONRY/BLOCK WALL
Correct product (size, color, grid pattern, handing, glazing, energy-•
efciency requirements, etc.)
If any of the above conditions represent a concern, or if you expect
environmental conditions to exceed the window's performance rating,
do not install the window. Contact your dealer or distributor for
recommendations.
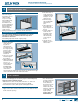
Verify the width •
and height of the
window are each
1/2" smaller than
the rough opening
width and height.
Verify the rough •
opening is square.
The (A) and (B)
measurements
above should be
the same. Maximum
allowable deviation
from square for
windows over 20 sq.
ft. is 1/4" and for
windows under 20
sq. ft. is 1/8".
Verify the rough opening is level and plumb (C) and (D). The •
maximum allowable deviation is 1/8".
Verify the rough opening sill is not crowned or sagged (D).•
Verify the exterior face of the rough opening is a single plane (E) with •
less than 1/8" twist from corner to corner.
Verify the rough opening is structurally sound.•
Correct any deviations before installing the window.•
Installation into masonry begins with section 3 “PREPARE MASONRY/
BLOCK WALL”; installation into a stud-framed wall begins with section
4 “PREPARE STUD-FRAMED WALL.”
Verify Square, Level, & Plumb
A
B
D
C
E
Note! This section
applies to installations
into a masonry wall
only. For installations
into a stud-framed
wall, begin with
section 4, “PREPARE
STUD-FRAMED WALL.”
If installing a window
into a masonry wall
without a buck, cover
the entire rough
opening surface with
liquid applied ashing
or self-adhesive
ashing in the same
manner as the following instructions for a buck.
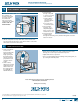
1. Seal any joint larger than 1/16" in the buck and between the buck
and the concrete/masonry with sealant.
2. Cover the buck and the surrounding concrete/masonry at the head
and jambs with liquid applied ashing as shown.
3. If installing into a four-sided buck, seal the sill in a similar manner.
Note! Shims must be
at least 1/2" shorter
than the depth of the
window sill, should
level the rough
opening sill and be no
more than 1/4" thick.
4. Shim the sill 4"
from each corner,
at 8" intervals,
and on both sides
of mull joints
with non water-
degradable or compressible shims. Secure shims with sealant.
End of masonry instructions, SKIP TO SECTION 5, “INSTALL WINDOW.”
Liquid
applied
ashing
Sealant joints
Shim