
Instructions / Assembly
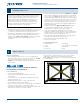
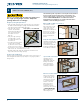
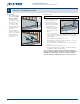
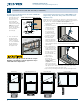
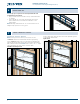
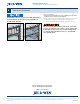
Table Of Contents

INSTALL SILL PAN FLASHING SYSTEM
3
Installation Instructions
for Vinyl Windows with Integral Nailing Fin (JII001)
5
Prepare Sill
1. A pan ashing system
(as dened in ASTM
E2112) is required
at the sill prior to
window/door product
installation. Always
allow water to drain
out of the pan and
onto the building wrap,
drainage plane or to
the exterior.
2. Apply a continuous
bead of sealant to the
interior of the upturned
leg and end dams of
the sill pan (if using a
rigid sillpan).
Shim the Sill
3/4" - 1"
2 1/2"
6"
24" O.C.
See Product Installation Tolerance Table for tolerances.
1. Unless installing into a sill
pan with a positive sloped
draining system, shims
should be aligned as dened
by the label on the window
or as statedbelow:
• Shims (1/4" maximum)
should be placed near
the exterior edge of the
sill pan.
• Place one shim 3/4" to
1" from each side of the rough opening (if the rough opening is
sized correctly, this should be approximately 1/2" from the corner
of the window).
• Shims should be no more than 24" on-center.
• For mulled units, ensure there is a shim located 1/2" on each side
of the mull joint (see comments below).
• There should always be a drainage path to the exterior out of the
sill pan.
• Shims can be held in place with sealant.
• Increased shim height may be needed or may interfere with bar/
grill alignment of adjacent windows/doors.
NOTE: For large (36" or wider), heavy or mulled units, shim at 8"
on-center and no more than 2" from each corner to maintain proper
sill alignment. This shimming schedule also pertains to regions
where the ambient air temperature reaches or exceeds 95°F (35°C).