
Instructions / Assembly

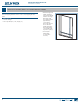

INSTALLATION INSTRUCTIONS
for Bi-Fold Doors (JII103)
5
INSTALLATION FOR TYPE B
4
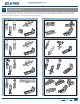
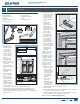
A. Upper pivot pin
B. Guide for track
C. Snugger
D. Knob
E. Lower pivot pin
F. Lower bracket
G. Aligner
H. Track
I. Adjustment wrench
Screws (not shown)
PARTS INCLUDED
1. Position the guide,
upper pivot pin and
lower pivot pin on
the door assembly
in the locations and
orientations shown.
2. Measure in 5/8"
from the end of
each panel and
center each pin on
the panel.
3. Secure with a 1" at
head screw through
each hole.
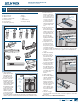
4. Position overhead
track in the opening
with the open
side down and
the bracket end
toward the jamb.
Allow 3/4" between
the front of the
opening and the
track and drive the
1 1/4" pan head
screws through the
pre-drilled holes
until snug. Position
the lower bracket
on the oor in line with overhead track. Fasten to the jamb with a
1 1/4" at head screw through only the middle of the top slotted
hole.
5. Unlock the track
pivot latch by
pulling the latch
away from the
jamb. With the door
assembly folded,
place the guide in
the track and then
position the upper
pivot pin next to
the track pivot.
Slide the pin away
from the jamb into
the track pivot.
Slide the latch
toward the jamb to
lock the pivot pin in
place. Verify the pin
is secure.
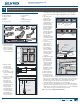
6. On the bottom,
depress the arm
on the lower
bracket and insert
the lower pivot
pin. If installing a
four door system,
repeat for the other
assembly. Check
positioning and
operation.
To adjust horizontally:
7. At the top, loosen
the screw in the
top pivot bracket
and move toward
or away from the
jamb until there
is 1/4" clearance.
Retighten. Repeat
the process for the
lower bracket.
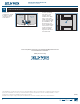
To adjust vertically:
8. There should be a
slight gap between
the lower pin and
the bracket. If there is no gap or the gap is too large and allows the
pin to come out of the bracket, loosen the single screw in the bracket
and adjust up or down until there is a small gap (shown above) and
the pin is engaged in the bracket. When the bracket is properly
adjusted, install the remaining two screws and tighten.
9. Loosen the screw on the snugger and close doors. Move the snugger
until it contacts the guide pin. Open doors and move the snugger an
additional 1/8" toward doors and tighten screw. Doors should slightly
“snap” shut, but reopen easily with a tug on the knob.
SKIP to Section 8, “COMPLETE INSTALLATION.”
Horizontal
adjustment
screw
A
B
C
D
E
F
G
H
I
Guide
Jamb
side
Upper
pivot pin
Lower
pivot pin
5/8"
5/8"
5/8"
Pivot door
Lead door
Bottom of
pivot door
Track
Center
3/4"
Head
Jamb
Lower
bracket
Track
pivot latch
unlocked
Track
pivot
Track
pivot
Track
pivot latch
locked
Horizontal
adjustment
screw
Lower
pin
Bracket
arm
Gap
1/4"