
Installation Guide


10
INSTALLATION INSTRUCTIONS
Unpack Grill
Unpack Grill
1. Remove all packaging materials and remove grill from the
shipping base.
2. Move grill close to desired outdoor location.
3. Open the grill hood.
4. Using an utility knife to cut yellow straps and packing tape to
open box from top and remove the boxes.
5. Remove the warming shelf and grill grates from inside the grill
and remove the package inside the firebox.
6. Remove foam block and wrap from inside the grill.
7. Replace the grill grates.
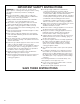
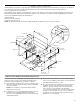
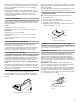
8. Place warming shelf on brackets as shown.
9. Dispose of/recycle all packaging material.
Install 20 lb LP Gas Fuel Tank Tray
The tank tray should be secured to a fixed location that can be
easily accessed and will allow the gas pressure regulator/hose
assembly to connect to the 20 lb LP gas fuel tank without kinking
or putting strain on the gas pressure regulator/hose assembly.
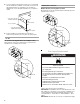
1. Place the tank tray in a location that can be secured using
4 screws (supplied) through the predrilled holes.
2. Use 4 screws to secure the tank tray. The typical location for
a 20 lb LP gas fuel tank is within the enclosure where the tank
ban be turned on and off easily.
Install Grill
Place grill into outdoor enclosure, but leave enough room in the
back to connect to the gas supply.
LP Gas Installation
1. Check that the LP gas pressure regulator/hose assembly is
positioned under the grill (as shown in the following
illustration) and is not pinched or kinked.
2. Use 4 screws and the 2-piece 90° brass clamp mounting
bracket provided to attach the 90° brass connector to the
back of the enclosure. The brass connector is located
between the flexible gas hose and the LP gas pressure/hose
assembly.
A. Warming shelf brackets
B. Warming shelf
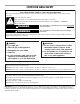
Excessive Weight Hazard
Use two or more people to move and install grill.
WARNING
Failure to do so can result in back or other injury.
A
B
A
A. Four ⁵⁄₃₂" x 10 mm truss head screws
A. 4 screws
B. 2 piece 90° brass clamp mounting bracket
A
B
A