
Installation guide
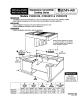
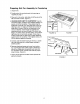


Preparing Unit For Assembly In Countertop
1, Unpack Unit.
2. Provide cutout for countertop and duct openings as
required per page 1.
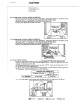
3. Place unit in the cutout, and slide unit all the way to the
left hand side of cutout. (Figure 1).
4. HOLDING DOWN UNIT TO COUNTERTOP: Use the
hold down straps, provided in the hardware package, to
secure unit to the countertop. These straps may be
positioned on the left, front, and back sides of the unit.
(See figure 1A). To install, pre-thread the bolt into the
strap about 2 inches. With the unit positioned in the
cutout as desired, reach through the cabinet door
opening and push up along the wall of the burner box
flange. If it doesn't hook, pull strap down, move it left or
right about an inch and push up again. Once strap is
hooked, thread bolt into strap until it meets resistance
against bottom of countertop. Then tighten slowly until
unit top bottoms against countertop.
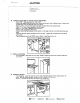
5. Connect outlet of blower housing to vent duct. Loosen
cap nuts inside plenum to rotate blower housing to
desired position.
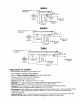
6. Remove attachment screw and cover from junction
box. Connect BX Cable power supply to knockout in
side of box. Make wire connections, push wires into
box. Re-attach cover. Consult local codes for proper
power hookup. (Figure 2).
7. Test to insure electronic surface control operates all
elements properly.
FIGURE 1A FIGURE !
JUNCTION BOX
\
FIGURE 2