
Installation guide


Cus[ome r _ePdc_
2_0EdwardsStreet, SE
Ceveian_.Tennessee373I I
Te!:a22-'72-3333
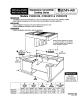
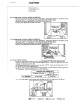
t9. ANTI-TIP BRACKET INSTALLATION
- With the unit installed in the final location, establish left side and back of the unit.
- Locate left bracket 5/8" (1.58 cm) in from the left of the unit.
- Locate the right bracket 27 718" (70.80 cm) to the right of the left bracket.
- Locate the rear of both brackets flush to the back of the unit if a backsplash is not used.
* Ira lighted backsptash is used, move back of brackets forward 1/8" (.3t8 cm). Ira non-lighted
backsp|ash is used, move back of brackets forward 1/4" (.635 cm).
- NOTE: I._g levelers must be screwed out I I/2 turns. If the floor will not accept the wood
screws supplied, alternate fasteners must be supplied by the installer.
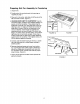
20.
mt_ot t.zQ_
_ii/iii/iiiiiiiiltli!/i/#il#'i//_ti7!&
AL_TE SCREW_t.E TFWCX_0
GRAINIS1NWRONGOII_.b'-I'IQN
z
0
£ 2-,",/,-ffo.8o_m) _!
_),. %" (1.5_1cm)
. , J ,_
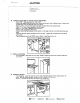
LEVEL RANGE
- Free-Standing: Adjust the leveler feet to level range with the countertop.
- Slide-in: Adjust the leveler feet to take some of the weight off of the countertop.
- Unit must be level for optimum baking _erformance.
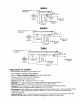
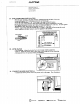
21. CONNECT BLOWER ELECTRICAL
- Connect the blower power cord to the power cord on the range. (See illustration).