
Installation guide


4
INSTALLATION INSTRUCTIONS
Install the Mounting Brackets
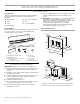
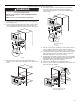
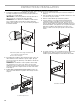
1. Determine where the mounting brackets will be installed and
mark 8 holes through each mounting bracket onto the side
cabinet.
IMPORTANT: The front of the mounting bracket must be
flush with the outside of the cabinet frame.
NOTE: To accommodate for flush installation with certain
custom cabinets, align the front of the mounting brackets
¹³⁄₁₆" (2.1 cm) back from the front of the cabinet.
2. With the mounting brackets held or taped in place, measure
the distance between the two brackets. (Do not measure
between the runners.) The distance should be 21¹¹⁄₁₆"
(55.1 cm).
NOTE: If the distance between the mounting brackets is
greater than 21¹¹⁄₁₆" (55.1 cm), bracket spacers will need to
be used. Two 2 mm bracket spacers and two 1 mm bracket
spacers are included. See Step 3.
3. If bracket spacers are needed: Position the necessary
spacer(s) behind the mounting brackets. Continue with
Step 4.
4. Using a 2 mm drill, drill the holes marked in Step 1.
5. Secure the mounting brackets to the side cabinets with eight
4.5 x 16 mmscrews in each bracket.
6. Remove the tape holding the brackets in place.
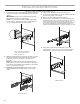
7. Pull the runners forward until they are fully extended and in
the locked position. Place level across the runners and check
levelness. Then place the level along the length of each
runner and check levelness from front to back. If the runners
are not level, uninstall the mounting brackets and raise or
lower the mounting brackets as necessary until they are level.
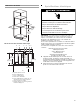
8. If the coffee system is being installed above a wooden
cabinet bottom, use two 4.5 x 16 mm screws to install the
metal trim piece at the front edge of the cabinet bottom.
A. Front of mounting bracket flush
with outside of cabinet frame
B. Mark 8 screw holes.
A. Bracket spacers
A
B
B
A
A
A. Metal trim piece
A