
Installation guide


5
Install the Coffee System
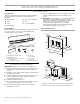
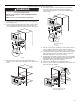
1. Pull the runners forward until they are fully extended and in
the locked position.
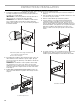
2. Using 2 or more people, position the coffee system onto the
runners, making sure that the 4 pins of the L-brackets fit
securely inside the holes on the bottom of the coffee system.
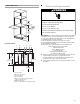
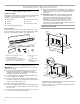
3. Place the level on top of the coffee system and check
levelness of the coffee system, first side to side; then front to
back.
4. If the coffee system is not level: Using 2 or more people,
remove the coffee system from the runners. Add the
necessary leveling spacers over the pins to help level the
coffee system.
5. Using 2 or more people, position the coffee system onto the
runners, making sure that the 4 pins of the L-brackets fit
securely inside the holes on the bottom of the coffee system.
6. Check that the coffee system is level. If it is not level, repeat
steps 4 and 5. If it is level, secure the coffee system to the
L-brackets with the four 4.2 x 9.5 mm screws.
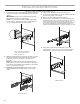
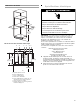
7. Position the power supply cord clip on the top of the cabinet,
approximately 14" (35.6 cm) from the front of the cabinet and
centered from left to right. With a pencil, mark the hole
through the clip on the top of the cabinet.
8. Using a 2 mm drill, drill the hole marked in Step 7.
9. Using one 4.5 x 16 mm screw, attach the power supply cord
clip to the top of the cabinet.
A. Pins
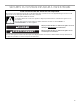
WARNING
Excessive Weight Hazard
Use two or more people to move and install the built-in
coffee system.
Failure to do so can result in back or other injury.
A
A. Leveling spacers
B. Pins
C. Screws
A. Power supply cord clip
B. Power supply cord
B
C
A
approx. 14"
(35.6 cm)
A
B