
Manual
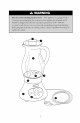
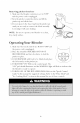

Parts and Features
1. Pitcher Lid Cap
This center portion of the pitcher lid mc_ybe remo_z'd, allot_gng ingredients to be added
during use. (Be sure to check size o_food load in the blender and the _peed setting prior to
removing cap.)
2. Pitcher Lid
Seal_ the top €the pitcher jar.
3. Pitcher Jar
The 72 ounce gla_s pitcher jar has a unique bldb shaped design that o/fi'rs outstanding
bJending pe_>rmance. The pitcher is beautiful enough to go directly.from the countertop
to the serving tabJe.
4. Pitcher Gasket
This seals the bottom ofthe. [_itcher ]ar to the blade base.
5. Blade Base
The _ider bottom c._f_thepitcher jar accommoddtes a larger blade.fi>r improved rollover,
increased.fluid movement and outstanding blending.
6. Base Ring
The base ring screws onto the bottom of the pitcher jar, holding the pitcher gasket and
blade base in place.
7. Blender Power Base
The po_er base _'atures a _00-w(_tt motor and innovative touch controls. The pitcher locks
onto the po_er base with a simple quarter turn.fi_r sqfe, no mess operation.
8. Control Panel
_hee_,_to _L_eto_,ch_'ontrols/eat_,re_,r_,n,_leoUi,'e,, t_°"erfi'l,q_eed_,_,_,,ella__,ni,'e
('ru_h mode and a pulse option. The controh are activated with the touch c?fa..finger"
9. Detachable Power Cord
The detachable power cord is interchangeable _ ith other ]enn-Air '_'_malt appliances.