JENN-AIR ELECTRIC WALL-OVEN JJW8527, JJW8530, JJW8627, JJW8630, JMW8527, JMW8530 USER GUIDE T ABLE OF CONTENTS Safety Instructions ................................................................... 1-2 Oven Cooking .......................................................................... 3-7 Care & Cleaning ..................................................................... 8-10 Before You Call for Service ................................................... 10 Warranty .............................
Installer: Please leave this manual with this appliance. Consumer: Please read and keep this manual for future reference. Keep sales receipt and/or cancelled check as proof of purchase. Model Number –– ␣ ––␣ ––␣ –– ␣ ––␣ –– –– ␣ ––␣ –– Serial Number –– ␣ ––␣ ––␣ –– ␣ ––␣ –– –– ␣ ––␣ –– I MPORTANT SAFETY INSTRUCTIONS The following instructions are based on safety considerations and must be strictly followed to eliminate the potential risks of fire, electric shock, or personal injury.
• A fan should be heard during the bake, broil and cleaning cycles. If you do not hear the fan, call an authorized servicer. • NEVER use aluminum foil to cover an oven rack or oven bottom. Misuse could result in risk of electric shock, fire, or damage to the appliance. Use foil only as directed in this guide. COOKING SAFETY • Never heat an unopened food container in the oven. Pressure build-up may cause container to burst resulting in serious personal injury or damage to the appliance.
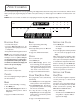
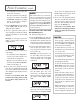
O VEN COOKING The control panel is designed for ease in programming. The display window shows time of day, timer and oven functions. Indicator words flash to prompt your programming steps. In double ovens (select models), “U” indicates upper oven is ON and “L” indicates lower oven is ON. NOTE: Lower oven controls on double ovens only. Styling and features may differ slightly depending on the model.
2. Press the appropriate number pads until the desired number of minutes or hours and minutes appear in the display. Example: To set Timer One for 5 minutes, press the Timer One pad and the number 5 pad. After five seconds, the display will show: OVEN CONTROL LOCKOUT The oven operation controls - Bake, Broil and Self-Clean - can be locked in the “OFF” position. The Timer and Clock controls can always be used regardless of the lockout.
O VEN COOKING, CONT. • The temperature in the display will increase in 5° increments until the oven reaches the preset temperature. Allow 7-11 minutes for the oven to preheat. • When the oven is preheated, the oven will chime and the ON and PREHEAT indicator words will go off. 4. At the end of cooking, turn the oven off by pressing the Cancel pad. Remove food from oven. The oven will continue operating until the Cancel pad is pressed.
which means that a lower broil temperature can be selected. To select a lower temperature, press the appropriate number pads for the temperature desired after “Hi” appears in the display. BROILING For best results, use a pan designed for broiling. For additional broiling tips, see “Cooking Made Simple” booklet. NOTES: • If more that five seconds elapse between pressing the Broil pad and number pad, the oven is not set and the display will return to the previous display.
O VEN COOKING, CONT. • The temperature can be set from 100° to 550° in 5° increments. • After five seconds the oven will begin to preheat. The indicator words ON and PREHEAT will appear in the display and 100° or the actual oven temperature, whichever is higher. 3. Press the Cook Time pad. The indicator words COOK TIME will flash and the display will show “0HR:00”. 4. Press the appropriate number pads to enter cooking hours and minutes. (Allowable range is 5 minutes to 11 hours and 55 minutes.
C ARE & CLEANING SELF-CLEAN OVEN The self-clean cycle uses above normal cooking temperatures to automatically clean the entire oven interior. While this occurs, a device in the oven vent helps consume normal amounts of smoke. The oven is vented through an opening under the control panel. NOTE: Both ovens cannot be self-cleaned at the same time in double wall oven models. It is normal for flare-ups, smoking or flaming to occur during cleaning if the oven is heavily soiled.
C ARE & CLEANING, CONT. When the clean time has been completed, the indicator words CLEAN and ON will go off. The indicator word LOCK and the cooling fan will remain on until the oven has cooled down and the door has been unlocked. TO CANCEL SELF-CLEAN: 1. Press the Cancel pad. The door will be locked while the LOCK indicator word remains in the display. Depending on the length of time the oven had been cleaning, it may take up to an hour for the oven to cool down.
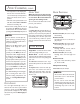
OVEN LIGHT brass base is recommended to prevent fusing of bulb into socket. as steel wool scouring pads or powdered cleansers as they may scratch the glass. Replace bulb cover and reconnect power to oven. Reset clock. 2. Do not hit the glass with pots, pans, furniture, toys, or other objects. TO REPLACE OVEN LIGHT: OVEN WINDOW 3. Do not close the oven door until the oven racks are in place. Use a dry potholder and very carefully unscrew bulb cover and bulb.
JO ENN-AIR WALL VEN WARRANTY Full One Year Warranty - Parts and Labor For one (1) year from the original retail purchase date, any part which fails in normal home use will be repaired or replaced free of charge. Limited Warranties - Parts Only Second Year - After the first year from the original purchase date, parts which fail in normal home use will be repaired or replaced free of charge for the part itself, with the owner paying all other costs, including labor, mileage and transportation.
FOUR ÉLECTRIQUE ENCASTRÉ JENN-AIR JJW8527, JJW8530, JJW8627, JJW8630, JMW8527, JMW8530 GUIDE DE L’UTILISATEUR T ABLE DES MATIÈRES Instructions de sécurité importantes ............................. 13-14 Cuisson au four ................................................................... 15-19 Entretien et nettoyage ....................................................... 20-21 Avant de contacter un réparateur........................................ 22 Garantie ............................................
Installateur: Remettre ce manuel au propriétaire. Consommateur: Lire le manuel; le conserver pour consultation ultérieure. Conserver la facture d’achat ou le chèque encaissé comme preuve de l’achat. Numéro de modèle I NSTRUCTIONS DE SÉCURITÉ IMPORTANTES Lire et suivre la totalité des explications avant d’utiliser la cuisinière pour éviter les risques d’incendie, d’électrocution, de blessures ou de dommages à l’appareil suite à son usage incorrect.
• • • • l’ouverture du conduit d’aération et les surfaces avoisinantes, ainsi que la porte et la fenêtre du four et les surfaces avoisinantes. DANGER : NE JAMAIS utiliser la porte comme escabeau ou comme siège car elle pourrait se trouver abîmée et provoquer des blessures graves. Ne pas toucher l’ampoule brûlante avec une poignée humide car elle pourrait se briser. Couper l’alimentation en courant à la cuisinière avant de remplacer l’ampoule.
CUISSON AU FOUR Le panneau de commande est conçu pour faciliter la programmation. L’affichage indique les fonctions d’horloge, de minuterie et de cuisson. Les indications voulues clignotent à l’affichage pour guider la programmation. Dans le cas de fours doubles (modèles sélectionnés), « U » indique que le four supérieur est allumé et « L » que le four inférieur est allumé. REMARQUE : Les commandes se trouvent au niveau du four inférieur dans le cas des fours doubles seulement.
• L’indication TIMER (minuterie) clignote à l’affichage ainsi que « #1 » ou « #2 » (numéro 1 ou 2) et « 0HR:00 ». 2. Appuyer sur les touches chiffrées correspondant au nombre d’heures et de minutes désirées, qui apparaissent à l’affichage. Exemple : Pour régler la minuterie n° 1 sur 5 minutes, appuyer sur Timer One (minuterie un) et sur la touche portant le chiffre 5.
CUISSON AU FOUR, • Une fois le four préchauffé, il produit des bips et les indications PREHEAT et ON disparaissent de l’affichage. 4. À la fin de la cuisson, éteindre le four en appuyant sur Cancel (annuler). Enlever la nourriture du four. Le four continue à chauffer jusqu’à ce que l’on appuie sur Cancel. REMARQUES: • S’il s’écoule plus de cinq secondes entre le moment où l’on appuie sur une touche de fonction et celui où l’on appuie sur une touche chiffrée, l’affichage retourne à l’affichage précédent.
et s’éteint avec la résistance du four.) 4. Préchauffer le four pendant cinq minutes, jusqu’à ce que la résistance soit rouge. Cuire les aliments en suivant les indications du tableau ci-dessous. La porte du four DOIT être laissée entrouverte à la position de cuisson au gril pendant toute la cuisson. 5. Appuyer sur Cancel pour éteindre le four une fois la nourriture cuite. CUISSON AU GRIL Pour des résultats optimums, utiliser un plat conçu pour la cuisson au gril.
CUISSON AU FOUR, Au bout de cinq secondes, l’affichage indique à nouveau l’heure. • La température augmente de 5° à la fois jusqu’à ce que le four atteigne la température programmée. • Une fois le four préchauffé, il produit des bips et les indications PREHEAT et ON disparaissent de l’affichage. 5. À la fin du temps de cuisson programmée, le four s’éteint automatiquement et produit quatre bips tandis que l’affichage indique « End » (fin). Appuyer sur Cancel (annuler).
E NTRETIEN ET NETTOYAGE *Les noms de marque sont des marques déposées des différents fabricants. mais il n’est pas totalement à l’épreuve de ceux-ci. Le fini en émail vitrifié peut se décolorer si les liquides acides qui ont débordé ne sont pas essuyés avant Le cycle d’autonettoyage utilise des températures un autonettoyage. supérieures à la normale pour assurer le nettoyage ÉGLAGE DES COMMANDES automatique de la totalité du four.
E NTRETIEN ET NETTOYAGE, SUITE REMARQUES: • ATTENTION : Il est normal que certaines parties des parois du four deviennent brûlantes pendant un cycle d’autonettoyage. Il faut par conséquent éviter de toucher la région du conduit d’aération ainsi que la porte et la fenêtre du four. • Si la porte du four n’est pas fermée, l’indication « door » (porte) clignote à l’affichage et le four émet des bips jusqu’à ce que la porte soit fermée et que l’on appuie à nouveau sur Clean.
A VANT DE CONTACTER UN RÉPARATEUR POUR LA PLUPART DES PROBLÈMES OBSERVÉS, LES ALIMENTS CUITS AU FOUR SONT BRÛLÉS SI LE VENTILATEUR DE REFROIDISSEMENT OU TROP GRILLÉS SUR LE DESSUS: CONTINUE À TOURNER UNE FOIS LE FOUR ÈSSAYER D’ABORD CE QUI SUIT: : ÉTEINT • Les aliments ont peut-être été mal placés dans le • Vérifier que les commandes du four sont correctement four. (Voir le livret « La Cuisine Simplifiée ».) réglées.
G ARANTIE DE LA FOUR ENCASTRÉ JENN-AIR Garantie complète d’une année – Pièces et maind’oeuvre Durant une période d’un (1) an à compter de la date de l’achat initial, toute pièce qui se révélerait défectueuse dans les conditions normales d’usage ménager sera réparée/ remplacée gratuitement.
HORNO MURAL ELÉCTRICO JENN-AIR JJW8527, JJW8530, JJW8627, JJW8630, JMW8527, JMW8530 GUÍA DEL USUARIO T ABLA DE MATERIAS Instrucciones Importantes sobre Seguridad ................. 25-26 Cocinando en el Horno .................................................... 27-31 Cuidado y Limpieza ............................................................ 32-33 Antes de Solicitar Servicio ..................................................... 34 Garantía ............................................................
I NSTRUCCIONES IMPORTANTES SOBRE SEGURIDAD Instalador: Por favor deje esta guía junto con el electrodoméstico. Consumidor: Por favor lea y conserve esta guía para referencia futura. Conserve el recibo de compra y/o el cheque cancelado como prueba de compra.
• Se puede oír el ruido de un ventilador durante el alimento y su contenedor. El alimento puede estar ciclo de horneado, asado a la parrilla y ciclos de contaminado. limpieza. Si usted no oye el ruido del ventilador, • No permita que el papel de aluminio toque el llame a un técnico autorizado. elemento calefactor. • NUNCA use papel de aluminio para cubrir las • Siempre apague todos los controles cuando haya parrillas del horno ni el panel inferior del horno. terminado de cocinar.
C OCINANDO EN EL HORNO El panel de control ha sido diseñado para su fácil programación. El indicador visual muestra la hora del día, el contador de tiempo y las funciones del horno. Las palabras en el indicador destellan para indicarle los pasos de la programación. En los hornos dobles (modelos selectos), la letra “U” indica que el horno superior está ENCENDIDO y “L” indica que el horno inferior está ENCENDIDO. NOTA: Los controles del horno inferior corresponden a los hornos dobles solamente.
• La palabra ‘TIMER’ destellará junto con #1 o #2 y además “0HR:00' aparecerá en el indicador. 2. Oprima las teclas numéricas correspondientes hasta que el número de minutos o de horas y minutos aparezca en el indicador visual. Ejemplo: Para programar el Timer 1 (Contador Uno) para 5 minutos, oprima la tecla ‘Timer One’ y la tecla numérica 5.
C OCINANDO EN EL 4. Al terminar de cocinar, apague el horno oprimiendo la tecla ‘Cancel’. Saque el alimento del horno. El horno continuará funcionando hasta que se oprima la tecla ‘Cancel’. NOTAS: • Si transcurren más de cinco segundos después de oprimir una tecla de función sin oprimir una tecla numérica, el indicador visual volverá al despliegue anterior. • Siempre que aparezca la palabra ‘ON’ en el indicador visual, significa que el horno se está calentando.
4. Precaliente durante cinco minutos hasta que el elemento del asador esté rojo. Cocine el alimento SAR A LA ARRILLA de acuerdo a la siguiente tabla para asar a la parrilla. Durante esta función la puerta del Para obtener mejores resultados, use una asadera horno DEBE dejarse abierta en la posición diseñada para asar a la parrilla. Para sugerencias tope de asar a la parrilla. adicionales sobre asar a la parrilla, vea el folleto “La 5. Oprima la tecla ‘Cancel’ para apagar el horno Cocina Fácil”.
C OCINANDO EN EL Después de cinco segundos, la hora correcta del día vuelve a desplegarse en el indicador. • La temperatura en el indicador aumentará en incrementos de 5° hasta que el horno llegue a la temperatura programada. • Cuando el horno se ha precalentado, se oirá la señal sonora del horno y las palabras ‘ON ‘ y ‘PREHEAT’ desaparecerán del indicador visual. 5.
C UIDADO Y LIMPIEZA HORNO AUTOLIMPIANTE El ciclo de autolimpieza usa temperaturas de cocción superiores a las normales para limpiar automáticamente todo el interior del horno. Durante la autolimpieza, un dispositivo en el respiradero del horno ayuda a consumir cantidades normales de humo. El horno es ventilado a través de una abertura situada debajo del panel de control. NOTA: Ambos hornos no pueden ser autolimpiados al mismo tiempo en los modelos de hornos murales dobles.
C UIDADO Y LIMPIEZA, CONT. NOTAS: • ATENCION: Es normal que algunas piezas del horno se calienten durante un ciclo de limpieza. Por lo tanto, durante un ciclo de limpieza evita tocar el área del respiradero del horno, la puerta y la ventana del horno. • Si se deja abierta la puerta del horno, la palabra ‘door’ destellará en el indicador visual y se escuchará una señal sonora hasta que la puerta sea cerrada y la tecla ‘Clean’ sea oprimida nuevamente.
A NTES DE SOLICITAR SERVICIO VERIFIQUE PRIMERO LO SIGUIENTE: • Revise si los controles del horno están debidamente ajustados. • Verifique si el enchufe está firmemente insertado en el tomacorriente. • Verifique o vuelva a reponer el disyuntor. Verifique o reemplace el fusible. • Verifique el suministro de energía eléctrica.
G M ARANTÍA DE LA URAL JENN-AIR HORNO Garantía Completa de Un Año – Piezas y Mano de Obra Durante un (1) año desde la fecha original de compra al por menor, se reparará o reemplazará gratuitamente cualquier pieza que falle durante uso normal en el hogar.