
Instruction Sheet


6
Convert from Propane Gas to Natural Gas
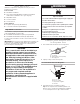
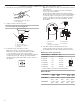
1. Turn manual shut-off valve to the closed position.
2. Unplug cooktop or disconnect power.
To Convert Gas Pressure Regulator
3. Determine the type of regulator you have:
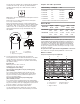
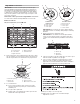
Style 1: The cap has a slot and “LP” printed on it.
Remove access cap by using a flat-blade screwdriver
or coin, turning the access cap counterclockwise.
The gas pressure regulator has 2 settings that are stamped
on either side of the cap. Turn the cap and reinstall into
regulator with the stamp “NAT” visible from the outside of
the regulator.
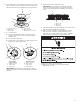
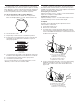
Style 2: The cap does not have a slot and requires a wrench
to be removed.
Remove the access cap by using a wrench, turning the
access cap counterclockwise.
Remove spring retainer from the cap by pushing against
the flat side of the spring retainer. Look at the spring retainer
to locate the “NAT” or “LP” position. Turn over the spring
retainer so the “NAT” is showing on the bottom. Snap the
spring retainer back into the cap. Reinstall the cap onto
the regulator.
4. If the burner grates are installed, remove them.
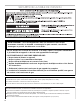
Use the following charts to match the correct gas orifice
spud with the burner location and model being converted.
Natural Gas Orifice Spud Chart
Burner Rating Stamp (A) Size
1,300 BTU* 53 0.53 mm
A
6,000 BTU 110 1.10 mm
9,050 BTU 132 1.32 mm
12,000 BTU 155 1.55 mm
15,000 BTU 170 1.70 mm
20,000 BTU 195 1.95 mm
A. Size stamp
* Simmer orifice for the dual stack (center) burner.
Burner Models
Model No.
Right
Front
Right
Rear
Center
Left
Front
Left
Rear
JGC3530GS
9,000
BTU
6,000
BTU
20,000
BTU
12,000
BTU
12,000
BTU
JGC3536GS
12,000
BTU
6,000
BTU
20,000
BTU
12,000
BTU
15,000
BTU
A
B
C
A. To cooktop
B. Shut-off valve (closed position)
C. Gas supply line
A
B
C
D
A. Access cap
B. Rear of cooktop
C. Gas pressure regulator
D. Gas flow
NAT
A
B
C
DE
A. Access cap
B. Gasket
C. Gas pressure regulator
D. NAT position
E. LP position