
Installation Instructions
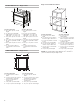
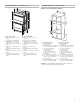
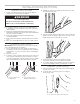
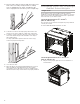
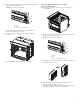
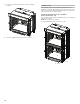
Table Of Contents
- BUILT-IN OVEN SAFETY
- Installation Requirements
- INSTALLATION INSTRUCTIONS
- Sécurité de la table de cuisson
- EXIGENCES D’INSTALLATION
- INSTRUCTIONS D’INSTALLATION
- Préparation du four encastré
- Dépose de la/des porte(s) du four
- Réinstallation de la/des porte(s) du four
- Positionnement des pieds du four pour des ouvertures d’encastrement de hauteur différente
- Raccordement électrique
- Installation du four
- Installation de l’ensemble de déflecteur du tiroir-réchaud (uniquement pour les fours installés au-dessus d’un tiroir-réchaud)
- Achever l’installation

9
2. Remove the foot from the right front spacer by removing the
#8-18 x 3/8" (9.5 mm) screw.
NOTE: Do not remove the spacer.
3. In the same manner, remove the feet on the right rear,
left front, and left rear of the oven.
4. Using 2 or more people, place the oven in its upright
position.
5. Go to the “Make Electrical Connection” section.
Cutout Height Is Between 28¹¹⁄
16
" and 29
7
⁄
16
"
(72.8 cm and 74.8 cm)
1. Using 2 or more people, place the oven on its back on a
covered surface.
2. Remove the foot from the right front spacer by removing the
#8-18 x 3/8" (9.5 mm) screw.
NOTE: Do not remove the spacer.
3. Rotate the foot 90°, so the short side of the foot is positioned
toward the top of the oven.
4. Reinstall the foot to the spacer using the #8-18 x 3/8"
(9.5mm) screw previously removed.
5. In the same manner, remove, rotate, and reinstall the feet on
the right rear, left front, and left rear of the oven.
A
B
C
A. Spacer
B. Foot
C. #8-18 x 3/8" (9.5 mm) screw
A
B
C
A. Spacer
B. Foot
C. #8-18 x 3/8" (9.5 mm) screw