
Installation Instructions


9
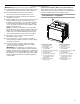
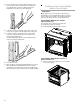
2. Remove the foot from the right front spacer
by removing the #8-18 x ³⁄₈" screw.
NOTE: Do not remove the spacer.
3. In the same manner, remove the feet on the right rear,
left front, and left rear of the oven.
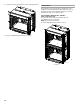
4. Using 2 or more people, place the oven in its upright position.
5. Go to the “Make Electrical Connection” section.
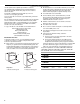
Cutout Height Is Between 28¹¹⁄₁₆" and 29⁷⁄₁₆"
(72.8 cm and 74.8 cm)
1. Using 2 or more people, place the oven on its back
on a covered surface.
2. Remove the foot from the right front spacer
by removing the #8-18 x ³⁄₈" screw.
NOTE: Do not remove the spacer.
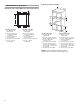
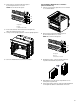
3. Rotate the foot 90°, so the short side of the foot
is positioned toward the top of the oven.
4. Reinstall the foot to the spacer using the #8-18 x ³⁄₈"
screw previously removed.
5. In the same manner, remove, rotate, and reinstall the feet
on the right rear, left front, and left rear of the oven.
A. Spacer
B. Foot
C. #8-18 x
³⁄₈
" screw
A
B
C
A. Spacer
B. Foot
C. #8-18 x
³⁄₈
" screw
A
B
C