
Flush Installation Guide

5
INSTALLATION INSTRUCTIONS
Prepare Built-In Oven
NOTES:
■ Use these Installation Instructions in conjunction with the
Installation Instructions provided with your built-in oven.
■ Refer and adhere to the “Electrical Requirements” section
and complete the instructions in the “Make Electrical
Connection” section of the Installation Instructions
provided with your built-in oven.
1. Decide on the nal location for the oven. Avoid drilling
or cutting into house wiring during installation.
2. To avoid oor damage, set the oven onto cardboard prior
to installation. Do not use handle or any portion of the front
frame for lifting.
3. Remove the shipping materials and tape from the oven.
Remember to keep the corner posts and other materials
that may be needed for installation.
4. Remove the hardware package from inside the bag
containing literature.
5. Move oven and cardboard close to the oven’s nal location.
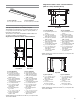
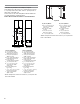
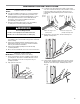
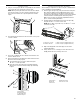
Remove Oven Door(s)
IMPORTANT: Use 2 hands to remove oven door(s).
1. Prior to removing the oven door, prepare a surface where
you will place it. This surface should be at and covered
with a soft blanket or use the corner posts from your
packaging material.
2. Fully open the oven door.
A. Oven door hinge lock in
locked position
B. Oven door hinge lock in
partially unlocked position
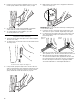
4. Gently start to close the door. The door will stop at a
partially closed position.
5. Using 2 hands, grasp the edges of the oven door. Close
the oven door slightly past the stop position to take the
weight off of the door hinges, and then pull the oven
door up.
WARNING
Excessive Weight Hazard
Use two or more people to move and install oven.
Failure to do so can result in back or other injury.
3. Locate the oven door hinge locks in both corners of the
oven door and rotate the hinge locks toward the oven door
to the unlocked position. If the door hinge lock is not
rotated fully (see illustration B), the door will not remove
properly.
Door
Hinges
Locked
position
Grip here
to rotate
Unlocked
position