
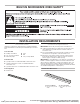
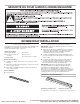
Flush Kit Installation Instructions


2
BUILT-IN MICROWAVE OVEN SAFETY
INSTALLATION REQUIREMENTS
Tools and Parts
Gather the required tools and parts before starting installation.
Read and follow the instructions provided with any tools listed
here.
Tools Needed
Parts Needed
■ (2) Spacer bars - included with built-in microwave oven
■ (4) Hex-head washer screws - included with built-in
microwave oven
■ (4) Pan-head screws - included with built-in microwave oven
Parts Supplied
■ Bottom vent
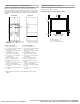
Location Requirements
IMPORTANT: Observe all governing codes and ordinances.
■ Cabinet opening dimensions that are shown must be used.
Given dimensions provide minimum clearance with the
microwave oven.
■ Recessed installation area must provide complete enclosure
around the recessed portion of the microwave oven.
■ Microwave oven support surface must be solid, level and
ush with the bottom of the cabinet cutout. Floor must be
able to support a weight of 108 lbs (49 kg).
IMPORTANT: To avoid damage to your cabinets, check with your
builder or cabinet supplier to make sure that the materials used
will not discolor, delaminate or sustain other damage. This oven
has been designed in accordance with the requirements of UL
and CSA International and complies with the maximum allowable
wood cabinet temperatures of 194°F (90°C).
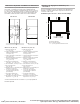
Bottom Vent Dimensions
■ Phillips screwdriver
■ 1/4" (6.3 mm) nut driver
■ Measuring tape
■ Level
■ Drill
■ 1/8" (3.1 mm) drill bit
A
27" (68.6 cm) Models
A. 26
3
⁄
4
" (67.9 cm) overall
width
30" (76.2 cm) Models
A. 29
3
⁄
4
" (75.6 cm) overall
width
06-May-2019 13:38:40 EDT | RELEASED
In some European factories the letter "W" of the part code mentioned herein will be automatically
replaced by the number "4000" (e.g. "W12345678" becomes "400012345678")