27" (68.6 CM) AND 30" (76.2 CM) BUILT-IN ELECTRIC SINGLE AND DOUBLE OVENS 27 PO (68.6 CM) ET 30 PO (76,2 CM) FOURS ÉLECTRIQUES SIMPLES ET DOUBLES, ENCASTRÉS Use & Care Guide For questions about features, operation/performance, parts, accessories, or service in the U.S.A., call: 1-800-JENNAIR (1-800-536-6247) or visit our website at www.jennair.com. In Canada, call: 1-800-JENNAIR (1-800-536-6247) or visit our website at www.jennair.ca.
TABLE OF CONTENTS TABLE DES MATIÈRES BUILT-IN OVEN SAFETY ................................................................3 PARTS AND FEATURES.................................................................4 FEATURE GUIDE.............................................................................5 Touch Panel...................................................................................6 Display...........................................................................................
BUILT-IN OVEN SAFETY Your safety and the safety of others are very important. We have provided many important safety messages in this manual and on your appliance. Always read and obey all safety messages. This is the safety alert symbol. This symbol alerts you to potential hazards that can kill or hurt you and others. All safety messages will follow the safety alert symbol and either the word “DANGER” or “WARNING.
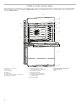
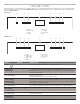
PARTS AND FEATURES This manual covers several models. Your model may have some or all of the items listed. Refer to this manual or the Frequently Asked Questions (FAQs) section of our website at www.jennair.com for more detailed instructions. In Canada, refer to the Customer Service Section at www.jennair.ca. A M L B K C J I H D G F E A. B. C. D. E. F. G. 4 Electronic oven control Oven vent Broil elements Gasket Bottom vent Lower oven (on double oven models) Hidden bake element H. I. J. K. L.
FEATURE GUIDE This manual covers several models. Your model may have some or all of the items listed. Refer to this manual or the Frequently Asked Questions (FAQs) section of our website at www.jennair.com for more detailed instructions. In Canada, refer to the Customer Service Section at www.jennair.ca. Single Oven: H B C D E F G A A. B. C. D. Power Kitchen timer Tools Display E. F. G. H. Self clean Oven light Oven cancel Start Double Oven: A B C A. B. C. D. E.
Touch Panel The touch panel houses the control menu and function controls. The touch pads are very sensitive and require only a light touch to activate. For more information about the individual controls, see their respective sections in this manual. Welcome Guide This appears on your display the first time the oven is powered up. The Welcome Guide allows you to set up your new oven. After every selection, a tone will sound. 1. Select your language. 2.
Drop-down Message Demonstration Delay Start Demonstration (Optional) MODE The next steps will convert your standard recipe for use with convection cooking. Convert Bake Rapid R id P Preheat h Convert Recipe For Convection Bake Roast 1. To set a delayed start and end time, touch DELAY. NOTE: The cooking start time always begins on the nearest quarter hour (0:00, 0:15, 0:30 and 0:45). The cooking time includes oven preheating time. Adjust the start and end times accordingly.
MODE TEMP. RANGE DEFAULT TEMP.
Button Lock Sabbath Mode The Button Lock shuts down the control panel keypads to avoid unintended use of the oven(s). The Button Lock will remain set after a power failure if it was set before the power failure occurs. When the control is locked, only the Power keypad will function. The Button Lock is preset unlocked but can be locked. The Sabbath Mode sets the oven(s) to remain on in a bake setting until turned off. A timed Sabbath Mode can also be set to keep the oven on for only part of the Sabbath.
Delayed Sabbath Bake: WARNING Food Poisoning Hazard Do not let food sit in oven more than one hour before or after cooking. Doing so can result in food poisoning or sickness. For double ovens, the upper and lower oven temperatures and cook timers can be set independently. If a cook timer is set, the countdown will not appear. The timer will appear frozen at the set time. To Activate: 1. Touch the Power keypad, and then touch TOOLS. 2. From the Mode menu, select “Sabbath” and touch NEXT. 3.
Position Racks and Bakeware IMPORTANT: To avoid permanent damage to the porcelain finish, do not place food or bakeware directly on the oven door or bottom. Racks Baking Cakes on 2 Racks For best results when baking cakes on 2 racks, use the Bake function and racks in positions 2 and 5. Place the cakes on the racks as shown. Keep at least 2 inches of space between the front of the racks and the front of the cakes. ■■ Position racks before turning on the oven.
To Remove Roll-Out Extension Rack: 1. Slide the rack in completely so that it is closed and engaged with the sliding shelf. 2. Using 2 hands, lift up on the front edge of the rack and push the sliding shelf to the back wall of the oven so that the front edge of the sliding shelf sits on the rack guides. The front edge of the rack and the sliding shelf should be higher than the back edge. Bakeware The bakeware material affects cooking results.
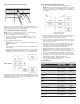
Oven Vents A B C D E F G Single and Double Oven A. Control panel B. Oven vent C. Single oven or upper double oven G. Bottom vent Baking and Roasting IMPORTANT: The convection fan and convection element may operate during the Bake function to enhance performance and heat distribution. The oven will take approximately 12 to 18 minutes to reach 350°F (177°C) with all oven racks inside the oven cavity. The preheat cycle rapidly increases the temperature inside the oven cavity.
Convection Convection Roast In a convection oven, the fan-circulated hot air distributes heat more evenly. This movement of hot air helps maintain a consistent temperature throughout the oven, cooking foods more evenly, while sealing in moisture. Most foods, using convect baking mode, can be cooked by lowering cooking temperatures 25°F (14°C). The cooking time can be shortened significantly when using Convect Roast, especially for large turkeys and roasts.
Temperature Probe The temperature probe accurately measures the internal temperature of meat, poultry and casseroles with liquid and should be used in determining the doneness of meat and poultry. The temperature probe should only be used with Bake, Convect Bake, or Convect Roast. Always unplug and remove the temperature probe from the oven when removing food. To Use: Before using, insert the probe into the food item.
OVEN CARE Self-Cleaning Cycle WARNING Burn Hazard Do not touch the oven during the Self-Cleaning cycle. Keep children away from oven during Self-Cleaning cycle. Failure to follow these instructions can result in burns. IMPORTANT: The health of some birds is extremely sensitive to the fumes given off during the Self-Cleaning cycle. Exposure to the fumes may result in death to certain birds. Always move birds to another closed and well-ventilated room. Self-clean the oven before it becomes heavily soiled.
Oven Door OVEN DOOR INTERIOR Cleaning Method: IMPORTANT: To avoid oven door glass breakage: ■■ Self-Cleaning cycle: ■■ Do not close the oven door if the racks are not fully inserted F or optimal door cleaning result, wipe away any deposits with a damp sponge before running cycle. into the oven cavity or when bakeware extends past the front edge of an oven rack. ■■ Do not set objects on the glass surface of the oven door. CONTROL PANEL ■■ Do not hit glass surfaces with bakeware or other objects.
TROUBLESHOOTING First try the solutions suggested here. If you need further assistance or more recommendations that may help you avoid a service call, refer to the warranty, or visit producthelp.jennair.com. In Canada, visit www.jennair.ca. Contact us by mail with any questions or concerns at the address below: In the U.S.A.
ASSISTANCE OR SERVICE Accessories If you need service Please refer to the warranty. If you need replacement parts If you need to order replacement parts, we recommend that you use only factory specified parts. These factory specified parts will fit right and work right because they are made with the same precision used to build every new JennAir® appliance. To locate factory specified parts in your area, call us or your nearest JennAir designated service center. In the U.S.A.
/™ ©2018 All rights reserved. Used under license in Canada. Tous droits réservés. Utilisé sous licence au Canada. ® W11235342A 10/18 Printed in U.S.A.