TABLE OF CONTENTS COMPACTOR SAFETY INSTALLING YOUR COMPACTOR Unpacking Your Compactor Location Requirements Electrical Requirements Under counter Installation. Air Freshener Installing a Custom panel. COMPACTOR US| How Your Compactor Work Loading the Compactor Starting Your Compactor. Stopping Your Compactor, Removing a Filled Bag installing a New Bag .. COMPACTOR CARE... Cleaning Your Compactor TROUBLESHOOTING .. RECYCLING WITH YOUR COMPACTOR .. ASSISTANCE OR SERVICE.
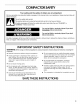
COMPACTOR SAFETY Your safety and the safety of others are very important. We have provided many important safety messages In this manual and on your appliance. Always read and obey all safety messages. This is the safety alert symbol. This symbol alerts you to potential hazards that can kill or hurt you and others. All satiety messages will follow the safely alert symbol and either the word "DANGER" or “WARNING.
IMPORTANT: installer: Leave Use and Care Guide with the homeowner. WARNING Excessive Weight Hazard Use two or mere people to move and install compactor. Failure to do so can result in back or other injury. INSTALLING YOUR COMPACTOR Homeowner: Keep Use and Care Guide for future reference and for local electrical inspector's use, if required. 4. Place the other two corner posts on the floor to the side of IMPORTANT: n 1. the compactor.
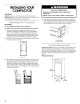
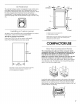
Cutout dimensions a {2.6 cm) fe @ 34Y" min. {87 omy 18" min. (45.7 omy) win, {38.7 om} Y 1. Grounded electrical outlet must be a minimize of Zin, (7.6 cm} away from surrounding cabinets or nearby walls as shown. It can be placed either to the left or the right side of the proctor. Clearance dimensions 1. Leave 6 in. (15.2 om} of clearance space to the Eight side of the compactor in order to remove the compactor bags. 2. Leave 23 in. (58.
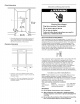
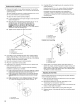
Under counter Installation 1. Measure the height of your cabinet opening. The top of the compactor should be at least from the top of the cabinet opening. The rear wheels are preset for a cabinet opening cm). See Position A in picture following. To adjust for other cabinet opening heights: Loosen self-tapping screw just enough to clear shed from hole in Position "A." Move the rear wheel and stud to Position needed for your cabinet opening measurement: Position B: 34V4 87.5 em) Position (87.
The solid air freshener system is designed to help control odors that might develop in the trash. An air freshener disc can be purchased in department stores (not sold with compactor). Place the disk-shaped solid air freshener into the air freshener compartment. The air freshener should last 4 to 6 weeks. It is used more rapidly when the temperature is high or the air is very dry.
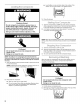
fhe Compaction Explosion Hazard De not compact any container, aerosol cans, or cloths which might contain insecticide, hair spray, engine starting fluid, paints, liquids, thinners, or any other poisonous or explosive products, Doing se can result in death, explosion, or fire, WARNING Cut Hazard Do not push items down into compactor with hands or feet. Doing so can result in cuts. m Load bottles or cans on their sides in the center of the drawer. Do not load bottles in an upright position. 3.
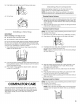
8. Push Side-Lock Latch down and tilt drawer side open. 4. Lift out bag. IMPORTANT: Before installing a new bag, be sure: ® The drawer side is securely locked = The container Is clean and free of debris. Dao nature any kind of bag other than those designed especially for use in your compactor. Order replacement compactor bags through your local dealer or by calling the toll-free number on the cover of In the “Assistance or Service” section. 1. Place folded bag into the drawer.
2. Lift the front of the drawer fo clear the stops. 3. Grasp the drawer on the sides and pull it out the rest of the way. Set the drawer down gently. 4. Vacuum the inside of the cabinet. Liquid spills or wet trash should be cleaned up by hand, or by using a vacuum designed to pick up liquids. 5. Wash the inside of the cabinet with a clean sponge or soft cloth and a mild detergent in warm water, Rinse and dry thoroughly with a soft cloth, 6.
Hams with this symbol tan be recycled or were made trim recycled materials. A compactor makes recycling and landfill reduction efforts more effective and efficient. compacting cycle is complete, remove the plastic bag as shown in “Removing a filled bag” and return it to storage until it is full enough to recycle. remember, compacting both recyclables and non recyclables means less solid waste and waste transportation costs and a better environment for all.
JENN-AIR® COMPACTOR WARRANTY FULL ONE-YEAR WARRANTY For one {1} year from the date of original retail purchase, any part which fails in normal home use will be repaired or replaced free of charge. LIMITED TWO-YEAR WARRANTY From the second year through the end of the third year following the date of original retail purchase, parts which fail in normal home use will be repaired or replaced free of charge for the part itself. with the owner paying all other costs, including labor, mileage and transportation.