
Manual


& CLEANING
burns,
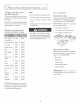
CONTROL _NOBS
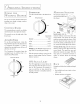
° The contrd knobs may be removed for
easier cleaning. Proof
° Before removing
the knobs for Low
cleaning, make
sure they are in _e_
the vertka[ position. @n
° Wash the knobs in soap and water but
do not soak.
• Dry and replace the knobs.
RACR
° Clean the rack with soap and water.
° After cleaning,rinse the rack with dean
water and dry with a dean cloth.
several hours with wet rowels. Apply
deaner with a damp sponge, rinse thor-
oughiy and dry. Always scrub hghdy in
the direction of the grain. After cleaning,
use a stainless steel polish such as Stain-
less Steel blagic®>>''.
WARMING DRAWER PAN
Most cleaning can be done to the pan with
the pan in place in the drawer. However,
the pan may be removed iffurther cleaning
is needed.
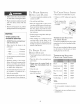
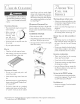
TO REHOVE THE PAN:
° Open the drawer fully.
• Usingthe finger grasphdds on the sideof
the drawer, lift the pan up and out.
• Use soapandwarm water to thoroughly
clean. Rinseand dry.
STAINLESS STEEL
° Do not use a steel wool pad; it will
scratch the surface.
Clean with hot soapywater. Rinse and
dry.
if food soil remains,try agenera[ kitchen
cleaner,suchasFantastik_,SimpleGreen®
or Formula 409®*.
For hard to dean soil use a standard
stainlesssteel deaner suchas Bon-Ami®
or CamedL Soils can also be soaked
,//) EPORE YOU
CALL
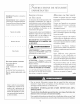
Warming drawer will not work.
• A fuseinyour home maybeblown or the
circuit breaker tripped. Replacethe fuse
or reset the circuit breaker.
° Check to see if the Warming Drawer is
pluggedin.
° Controls improperly set. Seethe Using
the warming drawer section, pgs.3-5.
Drawer does not slide smoothly or
drags,
* BaHbearings may be out of alignment.
Fully extend the drawer and push it ai[
the way in. See the Care and Cleaning
section.
• Drawer over-loadedor the Bad isunbal-
anced. Reduce weight to less than 50
pounds. Redistribute drawer contents.
Excessive condensation,
° There may be liquid in the warming
drawer pan. Remove liquid.
° Cover food with lid or aluminum foil.
Temperature setting is mo high. Reduce
the temperature setting.
incorrect bloisture Selector setting. Set
the Moisture Sdector to the open vent
setting to allow venting.
No heat in the PROOF setting.
• Roomtemperature maypreventthe ther-
mostat from tripping on. Turn the [<nob
to LOW then back to PROOF.
Food dries out
• Moisture isescaping.Cover food with lid
or aluminum foil
>'Brand namesfor cleaning products are registered trademarks of the respective manufacturers.
$* To order direct, caii i-800-JENNAIR.
6