JENN-AIR® 36" (91.4 CM) ISLAND CANOPY RANGE HOOD HOTTE DE CUISINIÈRE JENN-AIR® POUR ÎLOT DE 36" ET (91,4 CM) Installation Instructions and Use & Care Guide For questions about features, operation/performance, parts, accessories, or service in the U.S.A., call: 1-800-JENNAIR (1-800-536-6247) or visit our website at www.jennair.com. In Canada, call: 1-800-JENNAIR (1-800-536-6247), or visit our website at www.jennair.ca.
TABLE OF CONTENTS TABLE DES MATIÈRES RANGE HOOD SAFETY .................................................................2 INSTALLATION REQUIREMENTS ................................................4 Tools and Parts ............................................................................4 Location Requirements................................................................4 Venting Requirements..................................................................5 Electrical Requirements ...................
IMPORTANT SAFETY INSTRUCTIONS READ AND SAVE THESE INSTRUCTIONS 3
INSTALLATION REQUIREMENTS Tools and Parts Gather the required tools and parts before starting installation. Read and follow the instructions provided with any tools listed here. Tools needed ■ ■ ■ ■ ■ ■ ■ ■ ■ ■ ■ ■ ■ Level Drill with 1¼" (3.0 cm), ³⁄₈" (9.5 mm), ⁷⁄₆₄" (2.75 mm) and ¹⁄₈" (3.
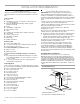
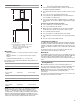
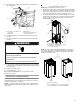
Installation Dimensions Venting Requirements B C A D ■ Vent system must terminate to the outside, except for nonvented (recirculating) installations. ■ Do not terminate the vent system in an attic or other enclosed area. ■ Do not use 4" (10.2 cm) laundry-type wall caps. ■ Use metal vent only. Rigid metal vent is recommended. Do not use plastic or metal foil vent. ■ The vent system must have a damper. If the roof or wall cap has a damper, do not use the damper supplied with the range hood.
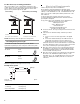
For Non-Vented (recirculating) Installations If it is not possible to vent cooking fumes and vapors to the outside, the hood can be used in the non-vented (recirculating) version, fitting a charcoal filter and the deflector. Fumes and vapors are recycled through the top grille. Roof venting Non-vented (recirculating) A A B B Electrical Requirements Observe all governing codes and ordinances.
INSTALLATION INSTRUCTIONS Prepare Location ■ It is recommended that the vent system be installed before the range hood is installed. ■ Before making cutouts, make sure there is proper clearance within the ceiling for exhaust vent. ■ Range hood is to be installed 24" (61.0 cm) min. for electric cooking surfaces, or 27" (68.6 cm) min. for gas cooking surfaces, to suggested maximum of 36" (91.2 cm) above the cooking surface.
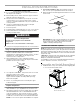
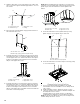
2. Position the 4 vertical supports (A) with notches at the bottom and attach to the range hood using 16 - 4.2 x 8 mm screws. 3. Attach the horizontal support (B) using 8 - 4.2 x 8 mm screws. Non-Vented (Recirculating) Installation 1. Attach the air deflector to the upper horizontal support using 4 mounting screws. B B A A A B A. Deflector B. Mounting screws A. Vertical supports B. Horizontal support 4. Attach a second set of vertical supports (A) and set the vertical height (B).
4. Run home power supply cable through strain relief and into the terminal box. A B C D Install Duct Covers NOTE: Remove the film from the duct covers. 1. Assemble the upper duct covers together, and then install the duct covers around the support frame. The larger hole in the flanges of the upper duct cover must be outside the smaller hole in the mating flange of the other upper duct cover. 2. Secure the upper duct covers together with two 3.5 x 6.5 mm screws at the top and two 2.
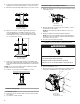
3. Slide the upper duct covers up the frame to the ceiling, and then secure to the upper horizontal support with 2 - 3.5 x 6.5 mm screws. NOTE: When assembling the rear lower duct cover to the front lower duct cover, the flange (both sides) must be placed over the plastic clip to secure the lower duct covers together at the bottom. B D A C A D B A. 3.5 x 6.5 mm screw B. Slotted holes (2) C. Upper duct covers D. Ceiling 4.
RANGE HOOD USE The range hood is designed to remove smoke, cooking vapors and odors from the cooktop area. For best results, start the hood before cooking and allow it to operate several minutes after the cooking is complete to clear all smoke and odors from the kitchen. The range hood controls are located on the front side of the canopy. A B C H D D Auto Sense Auto Sense allows the range hood fan to turn on automatically when it senses heat higher than its allowable temperature limit.
Timer Light The range hood can be set to turn Off automatically after 15 minutes. 1. Press and hold the desired fan speed button for 2 seconds. The fan will run on the chosen speed for 15 minutes, and the fan speed button light will flash continuously. After 15 minutes, the fan will turn Off automatically. 2. Press the desired fan speed button again while the fan timer is running to cancel the fan timer. NOTE: Changing the fan speed or turning Auto Sense On will also cancel the 15-minute timer.
4. Bend spring clips back into place to secure the charcoal filter to the metal filter. 5. Replace metal grease filter. See “Metal Grease Filter” in this section. 6. Turn the charcoal filter clockwise to lock it. 7. Repeat steps 1 and 2 on the other filter. Replacing an LED Lamp The LED lights are replaceable by a service technician only. See the Warranty for service contact information.
ASSISTANCE OR SERVICE If you need service In Canada Please refer to the warranty page in this manual. If you need replacement parts If you need to order replacement parts, we recommend that you use only factory specified parts. Factory specified parts will fit right and work right because they are made with the same precision used to build every new appliance.
® JENN-AIR MAJOR APPLIANCE LIMITED WARRANTY ATTACH YOUR RECEIPT HERE. PROOF OF PURCHASE IS REQUIRED TO OBTAIN WARRANTY SERVICE. Please have the following information available when you call the Customer eXperience Center: ■ Name, address and telephone number ■ Model number and serial number ■ A clear, detailed description of the problem ■ Proof of purchase including dealer or retailer name and address IF YOU NEED SERVICE: 1.
® W10674115D /™ ©2015 Jenn-Air. Used under license in Canada. All rights reserved. Utilisé sous licence au Canada. Tous droits réservés.