
Installation guide
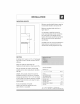
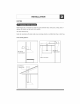

MOUNTINGHEIGHTS
96"
Minimum mounting height between range top
to hood bottom shouM be no tess than 24".
Maximum mounting height shourd be no
higher than 32".
rt is important to instarl the hood at the
proper mounting height. Hoodsmounted too
row couM result in heat damageand fire
hazard; while hoods mounted too high will be
hard to reach and will rooseperformance
and efficiency.
ff available,arso refer to range manufacturer's
height clearance requirements and recom-
mended hood mounting height above range.
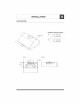
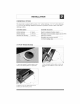
DUCTING
A minimum of 6" round or 3-1/4" x lO"rectangurar
duct must be used to maintain maximum air flow
efficiency.
Alwaysuserigidtypemetalductsonly,
Flexibleductscouldrestrictair flowby upto 50%.
Also use calculation (on right) to compute total
available duct run when using elbows, transitions
and caps.
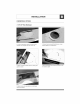
ALWAYS,when possible, reduce the number of
transitions and turns. If long duct run is required,
increase duct size from 6" to 7" or 8". If a reducer
is used, install a long reducer instead of a pancake
reducer. Reduceduct size as far away from open°
ing as possible.
If turns or transitions are required:
Install as far away from opening and as far
apart, between 2, as possible.
Duct RunCalculation:
Maxirnulnrun
6" or 3-1/4' x 10" duct
100 FT
Deduct:
each90 Elbowused 15 FT
each45 elbow used 9 FT
each6" to "Y14 x 10"
transition used 1 FT
each3/14 x 10" to 6"
transition used 5 FT
SideWall Capw/damper 30 FT
RoofCap 30 FT
e,g,- 1 roof cap, 2x90 elbows, t x 45 elbow used;
=30' + 30' + 9' =69' used, 31' available for stroiqht duct runs,