JENN-AIR_ COM PACTORS/COMPACTEURS TC507 iiiiiiiiiiiiiiiiiiiiiiiiiiii:i_i_ii_i iiiiiiiiiiiiiiiiiiiiiiiiiiii:i_i_iii_ii iiiiii iii ili liii iiil i!il !i!i ili ill i!ii i!iiiii! ii !i iiiii!iii ii!i ii ii!i !i! !il ii! !i! if!i! i!i!! !!!ii i!i !i! fill !iil !ii ii!il ill!i!il if! iii lliil !i!i! i!i ili iliii!i iii liii ¸iii i! ii¸ ;iill !i! i!ii! ii! iii li iliiii ll iil iii i¸ili i!i i¸ iliii!il i!i i!ii! ili ili!i iil iii!i i!i i_ili iili ii! ili!i i!i i!ili ili !iiil iii !ii!i i_iiii!i ii iil i!ili !ii!
TABLEOF CONENTS TABLEDESMATIERES COMPACTOR SAFETY .................................................................. INSTALLATION INSTRUCTIONS .................................................. 3 4 Unpacking .................................................................................... Location Requirements ................................................................ Electrical Requirements ............................................................... Undercounter Installation...............
COMPACTOR SAFETY Your safety and the safety of others are very important. We have provided many important safety messages in this manual and on your appliance. Always read and obey all safety messages. This is the safety alert symbol. This symbol alerts you to potential hazards that can kill or hurt you and others. All safety messages will follow the safety alert symbol and either the word "DANGER" or "WARNING.
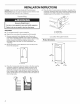
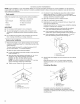
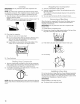
INSTALLATIONINSTRUCTIONS Installer: Leave Use and Care Guide with the homeowner. Homeowner: Keep Use and Care Guide for future reference and for local electrical inspector's use, if required. 4= Place the other 2 corner posts on the floor to the side of the compactor. Grasp the sides of the compactor cabinet and put compactor on its side on top of the corner posts. Remove the shipping base from the bottom of the compactor. Excessive Weight Hazard Use two or more people to move and install compactor.
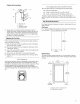
Cutout dimensions \ / 3" (7.6 cm) _1 i y Electrical _,1/4"rain. (87 cm) Plug into a grounded Do not remove 24" rain. (61 cm) ground Shock Hazard 3 prong outlet. prong. Do not use an adapter. (45,7 cm) Do not use an extension cord. 18"iin. 151/4" min. \ Failure to follow these instructions fire, or electrical shock. can result in death, (38.7 crn) Recommended Grounding Method A. Grounded electrical outlet must be a minimum of 3" (7.
NOTE: Proper installation is your responsibility. Make sure you have everything necessary for correct installation, It is the personal responsibility and obligation of the customer to contact a qualified installer to assure that electrical installation meets all national and local codes and ordinances. 2. Use pliers to lower leveling legs away from cabinet. Adjust legs so there will be a W' (3 mm) to W' (6.4 mm) space between the top of the compactor and the top of the cabinet opening.
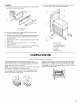
Cabinet-front mounting There are three options for changing the decorative panel: • Order an acrylic panel • Create a custom panel for use with a trim kit • Create a custom panel for installation without trim To order an acrylic panel or a trim kit, see the "Assistance or Service" section for information or call the toll-free number on the cover. Trim Kit Panel Dimensions A. Mounting B. Cabinet clip C. Retaining bracket D. Mounting screw 7.
6. Trimless Panel with Handle Reinstall the toe guard using the existing screws and 1/2"(13 mm) washer. Then, reinstall the foot pedal. Dimensions Use these dimensions drawings to create a custom panel for use without a trim kit. The panel should be 1/2"to %" (13 mm to 16 mm) thick. NOTE: A thicker panel may need rounded front corners and a cutout for access to the handle. 2313/16'' (60.5 mm) (38.1 ram) Installation 1. Remove the mounting screws attaching the foot pedal to the compactor.
Installation 1. 7. Remove the mounting screws attaching the foot pedal to the compactor. Remove foot pedal. Reinstall the toe guard using the existing screws and 1/2" (13 mm) washer. Then, reinstall the foot pedal. A. Mounting screws B. Foot pedal 2, Remove mounting screws attaching the toe guard to the compactor. Remove toe guard. 3. Remove the mounting screws attaching the decorative panel to the compactor. Remove decorative panel and discard mounting screws. 4.
IMPORTANT: Do not push items down into compactor hands or feet. with 1. Turn the Control Knob to OFF & LOCK. 2. Turn the Control Knob to RUN. This will raise the ram to its topmost position. The compactor will automatically advance to the end of the cycle and stop. 3. You can open the drawer after the compactor NOTE: You will not see compacting of trash the first few times you load the compactor. The compactor drawer should be about 1/2full before the compactor can begin to compress the load. 1.
• The container is clean and free of debris. 1. Place folded bag into the drawer. Open bag and pull top edges over the drawer top. 2. Lock bag in place by pulling the four prepunched holes over the bag retainer buttons. Holes will expand over the buttons without damaging the bag. 3. Press inside of bag against the drawer bottom, sides and corners for a smooth fit. COMPACTOR CARE Your new compactor is designed to give you many years of dependable service.
Vacuum the inside of the cabinet. Liquid spills or wet trash should be cleaned up by hand, or by using a vacuum designed to pick up liquids. 4. 5. Wash the inside of the cabinet with a clean sponge or soft cloth and a mild detergent in warm water. Rinse and dry thoroughly with a soft cloth. 6. To replace the drawer, grasp it by the sides and insert the rollers onto the tracks. 7. Lift the front of the drawer and push it in fully past the stops.
RECYCLINGWITHYOURCOMPACTOR Preparations of recyclable items. Most recycling programs provide specific guidelines on preparation. For example, aluminum cans and plastic containers need to be rinsed out, lids removed, but often labels can be left on. PETE LDPE HDPE PP V IMPORTANT: PS • Some items, such as glass, should not be compacted. • Most recycling programs will not accept crushed glass. • Check with your recycling program for specific guidelines on preparing recyclables.
ASSISTANCEOR SERVICE Before calling for assistance or service, please check "Troubleshooting." It may save you the cost of a service call. If you still need help, follow the instructions below. U.S. customers using TTY for deaf, hearing impaired or speech impaired, call: 1-800-688-2080 (Monday-Friday, 8:00 a.m.-8:00 p.m. Eastern Time). When calling, please know the purchase date and the complete model and serial number of your appliance. This information will help us to better respond to your request.
JENN-AIR MAJOR APPLIANCE WARRANTY ONE YEAR LIMITED WARRANTY For one year from the date of purchase, when this major appliance is operated and maintained according to instructions attached to or furnished with the product, Jenn-Air brand of Maytag Corporation or Maytag Limited (hereafter "Jenn-Air") will pay for factory specified replacement parts and repair labor to correct defects in materials or workmanship. Service must be provided by a Jenn-Air designated service company.
SECURITEDU COMPACTEUR Votre s_curit_ et celle des autres est tres importante. Nous donnons de nombreux messages de securite importants dans ce manuel et sur votre appareil menager. Assurez-vous toujours lire tousles messages de securite et de vous y conformer. de Ce symbole d'alerte de securite vous signale les dangers potentiels de deces et de blessures graves & vous et a d'autres. Voici le symbole d'alerte de securite.
INSTRUCTIONSD'INSTALLATION Installateur : Laissez le Guide d'utilisation proprietaire. et d'entretien au Propri_taire : Gardez le Guide d'utilisation et d'entretien pour reference ulterieure et pour I'usage de I'inspecteur local d'electricite, au besoin. 4, Placer les 2 autres cornieres de protection sur le plancher, pres du compacteur. Saisir les c6t_s de la caisse du compacteur et placer le compacteur sur le c6te, sur les cornieres de protection.
Dimensions de rencastrement \ 3" (7,6 cm) Risque de choc electrique Brancher sur une prise a 3 alveoles reli_e a la terre. 41/4'' rnin. (87 cm) Ne pas enlever la broche de liaison a la terre. Ne pas utiliser un adaptateur, Ne pas utiliser un cable de rallonge. Le non-respect de ces instructions peut causer un decea, un incendie ou un choc electrique. 15V4"rain. (3a,7 cm) M_thode A.
REMARQUE : L'installation appropriee est la responsabilite du proprietaire. S'assurer d'avoir tout le necessaire pour une installation convenable. C'est la responsabilite et I'obligation personnelle du client de contacter un installateur qualifie pour s'assurer que I'installation electrique repond aux codes et reglements nationaux et Iocaux. Outils n_cessaires : 2. Utiliser la pince pour abaisser les pieds de nivellement hors du cabinet.
Montage & I'avant de I'armoire /J II existe trois options pour changer le panneau d@coratif : • Commander un panneau acrylique • Creer un panneau personnalise a utiliser avec une trousse de garniture • Creer un panneau personnalise pour installation sans garniture Pour commander un panneau acrylique ou une trousse de garniture, voir la section "Assistance ou service" pour des renseignements ou composer sans frais le num@o de telephone sur la couverture. A. Agrafe de montage B. Armoire C.
6. Panneau sans garniture avec poign_e Reinstaller le garde-pieds en utilisant les vis existantes et une rondelle de 1/2"(13 mm). Ensuite, reinstaller la pedale. Dimensions Utiliser ces dessins de dimensions pour creer un panneau personnalise a utiliser sans trousse de garniture. Le panneau doit mesurer 1/2"a %" (13 mm a 16 mm) d'epaisseur. REMARQUE : Un panneau plus epais peut avoir besoin de coins avant arrondis et d'un decoupage pour acces a la poignee.
Installation 1. 7, Oter les vis de montage fixant la pedale au compacteur. Enlever la pedale. Reinstaller le garde-pieds en utilisant les vis existantes et une rondelle de 1/2"(13 mm). Ensuite, reinstaller la pedale. C A. Vis de montage B. P_dale 2, Oter les vis de montage fixant le garde-pieds au compacteur. Enlever le garde-pieds. 3. Oter les vis de montage fixant le panneau decoratif au compacteur. Enlever le panneau decoratif et jeter les vis de montage.
IMPORTANT : Ne pas enfoncer les articles dans le compacteur avec les pieds ou les mains. 1. Tourner le bouton de commande & OFF & LOCK (arr_t et verrouillage). REMARQUE : Vous ne verrez pas les dechets se faire presser les quelques premieres fois que vous chargez le compacteur. Le tiroir du compacteur doit _tre environ a moitie rempli avant que le compacteur puisse commencer a presser la charge. 2. Tourner le bouton de commande & RUN (fonctionnement).
• Le contenant est propre et exempt de debris. 1. Placer le sac plie dans le tiroir. Ouvrir le sac et replier le bord superieur du sac par-dessus le bord du tiroir. 2. Immobiliser le sac en engageant les 4 trous pre-perces sur les boutons de retenue du sac. Les trous s'agrandiront sur les boutons sans endommager le sac. 3. Pousser I'interieur du sac centre le fond du tiroir, les c6tes et les coins du tiroir, pour qu'il s'adapte biten.
3. Saisir les c6tes du tiroir et le tirer jusqu'& ce qu'il sorte completement. Le deposer delicatement, 7. Soulever le devant du tiroir et le pousser completement dela des butees. au- Nettoyage de la presse REMARQUE : Vous voudrez peut-_tre porter des gants protecteurs. II peut exister de petits debris de verre sur le recouvrement de la presse. 4. Passer I'aspirateur & I'interieur de la caisse.
RECYCLAGEAVEC VOTRECOMPACTEUR PETE HDPE Preparation des articles recyclables. La plupart des programmes de recyclage fournissent des directives specifiques sur la preparation. Par exemple, il faut rincer les canettes en aluminium et les contenants en plastique et enlever les couvercles, mais souvent les etiquettes peuvent demeurer a la surface. V IMPORTANT LDPE PP Certains articles, tel que le verre, ne devraient pas _tre mis au compacteur. • La plupart des programmes le verre concasse.
ASSISTANCEOU SERVICE Avant de faire un appel pour assistance ou service, veuillez verifier la section "Depannage". Cette verification peut vous faire economiser le co@ d'une visite de service. Si vous avez encore besoin d'aide, suivre les instructions ci-dessous. Les clients aux ¢.-U. utilisant le TTY pour les personnes sourdes, malentendantes ou mal parlantes, peuvent composer le 1-800-688-2080 (du lundi au vendredi, entre 8 h et 20 h HNE).
GARANTIEDESGROS APPAREILSMENAGERSJENN-AIR GARANTIE LIMITC:E DE UN AN Pendant un an a compter de la date d'achat, Iorsque ce gros appareil menager est utilise et entretenu conformement aux instructions jointes a ou fournies avec le produit, Jenn-Air, marque de Maytag Corporation ou Maytag Limited (ci-apres designees "Jenn-Air") paiera pour les pieces de rechange specifiees par I'usine et la main-d'oeuvre pour corriger les vices de materiaux ou de fabrication.