JENN-AIR® MICROWAVE OVEN Use & Care Guide For questions about features, operation/performance, parts, accessories, or service, call: 1-800-JENNAIR (1-800-536-6247) or visit our website at www.jennair.com. Table of Contents ..................................................
TABLE OF CONTENTS MICROWAVE OVEN SAFETY.....................................................................3 INSTALLATION INSTRUCTIONS ...............................................................5 Unpacking.................................................................................................5 Location Requirements.............................................................................5 Electrical Requirements ............................................................................
MICROWAVE OVEN SAFETY Your safety and the safety of others are very important. We have provided many important safety messages in this manual and on your appliance. Always read and obey all safety messages. This is the safety alert symbol. This symbol alerts you to potential hazards that can kill or hurt you and others. All safety messages will follow the safety alert symbol and either the word “DANGER” or “WARNING.
IMPORTANT SAFETY INSTRUCTIONS ■ Liquids, such as water, coffee, or tea are able to be overheated beyond the boiling point without appearing to be boiling. Visible bubbling or boiling when the container is removed from the microwave oven is not always present. THIS COULD RESULT IN VERY HOT LIQUIDS SUDDENLY BOILING OVER WHEN THE CONTAINER IS DISTURBED OR A SPOON OR OTHER UTENSIL IS INSERTED INTO THE LIQUID. To reduce the risk of injury to persons: – Do not overheat the liquid.
INSTALLATION INSTRUCTIONS Unpacking Electrical Requirements 1. Empty the microwave oven of any packing materials. 2. Clean the inside with a soft, damp cloth. 3. Check for damage, such as: ■ a door that is not lined up correctly ■ damage around the door, or ■ dents on the interior or exterior of the microwave oven. WARNING If there is any damage, do not operate the microwave oven until a designated service technician has checked it and made any needed repairs.
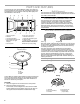
PARTS AND FEATURES This manual may cover several different models. The model you have purchased may have some or all of the features shown here. The appearance of your particular model may differ slightly from the illustrations in this manual. A B C D E F Grill Element The microwave oven uses a calrod thermal element for grilling. The microwave oven cavity and door will become hot. The use of oven mitts is recommended.
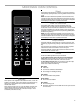
MICROWAVE OVEN CONTROL Start The START control begins any function. If non-sensor cooking is interrupted by opening the door, touching START will resume the cycle. NOTE: To avoid unintentional operation of the microwave oven, a cooking function cannot be started if the microwave oven door has been closed for about 5 minutes. The word “door” will appear in the display until the door is opened and closed.
Clock Language This is a standard 12-hour clock (1:00-12:59). The Clock cannot be erased. If the Clock is not set, “0:00” will remain in the display when the microwave oven is not in use. The default display language is English, but may be set to French. Two display messages are affected: “End” (English) or “Fin” (French), and “door” (English) or “PrtE” (“porte” - French). To Set Language to French: With the microwave oven door open, touch and hold number pad 1 for about 3 seconds, until a tone sounds.
Cooking Guidelines Covering Covering food helps retain moisture, shorten cook time and reduce spattering. Use the lid supplied with cookware. If a lid is not available, wax paper, paper towels or plastic wrap approved for microwave ovens may be used. Plastic wrap should be turned back at one corner to provide an opening to vent steam. Condensation on the door and cavity surfaces is normal during heavy cooking.
Microwave Cooking Power Many recipes for microwave cooking specify which cooking power to use by percent or name. For example, PL7=70%= Medium-High. To see the exact power level during a cooking cycle, touch POWER LEVEL. The display will briefly show the current power level, then will return to the cooking countdown. Use the following chart as a general guide for the suggested cooking power of specific foods.
Menu (sensor and non-sensor) The following menu items are preprogrammed for quick and easy cooking/reheating. For added convenience, the available/recommended amounts shown in the following chart are included on the Cooking Guide label (see “Parts and Features” for its location). MENU ITEM SERVING SIZE INSTRUCTIONS POPCORN (non-sensor) 3.3 oz (94 g) 3.0 oz (85 g) 1.75 oz (50 g) To avoid damage to the microwave oven, do not use regular paper bags or glassware.
■ Do not use light plastic containers, plastic wrap or paper products. All ovenproof cookware or metal utensils can be used with the Convect Bake function. (Round pizza pans are excellent cooking utensils for many convection-only items.) Metal utensils cannot be used with the Convect Roast function. ■ No special techniques are needed to adapt standard oven recipes to convection cooking, although some temperatures might need to be reduced, and some cooking times might need to be shortened.
To Use: To Use Without Preheat: NOTE: The default temperature is 325ºF (163ºC), and the default roast time is one hour. 1. Arrange food on convection rack, place rack with food in a pan, then place the pan with the rack and food on the turntable and close the door. or Place food in a pan, place the pan on the convection rack, then place the rack with the pan and food on the turntable and close the door.
Defrost ■ Unwrap foods and remove lids (for example, from fruit juice containers) before defrosting. ■ Shallow packages will defrost more quickly than deep blocks. ■ Separate food pieces as soon as possible during or at the end of the cycle for more even defrosting. ■ Use small pieces of aluminum foil to shield parts of food such as chicken wings, leg tips and fish tails. See “Aluminum Foil and Metal” first.
MICROWAVE OVEN CARE General Cleaning IMPORTANT: Before cleaning, make sure all controls are off and the microwave oven is cool. Always follow label instructions on cleaning products. Soap, water and a soft cloth or sponge are suggested unless otherwise noted.
TROUBLESHOOTING Try the solutions suggested here first in order to avoid the cost of an unnecessary service call. Nothing will operate ■ Has a household fuse blown, or has a circuit breaker tripped? Replace the fuse or reset the circuit breaker. If the problem continues, call an electrician. ■ Is the microwave oven wired properly? See Installation Instructions provided with your microwave oven.
ASSISTANCE OR SERVICE Before calling for assistance or service, please check “Troubleshooting.” It may save you the cost of a service call. If you still need help, follow the instructions below. When calling, please know the purchase date and the complete model and serial number of your appliance. This information will help us to better respond to your request. In the U.S.A.
JENN-AIR® COUNTERTOP MICROWAVE LIMITED WARRANTY ONE YEAR LIMITED WARRANTY For one year from the original date of purchase, when this microwave is installed, operated and maintained according to instructions attached to or furnished with the product, Jenn-Air brand of Whirlpool Corporation or Whirlpool Canada LP (hereafter “Jenn-Air”) will, at its sole option, either pay for factory specified parts and repair labor to correct defects in materials or workmanship or replace the product.
Keep this book and your sales slip together for future reference. You must provide proof of purchase or installation date for inwarranty service. Dealer name____________________________________________________ Write down the following information about your major appliance to better help you obtain assistance or service if you ever need it.
W10491278A SP PN W10491279A ® /™ ©2013. All rights reserved.