
Installation Guide
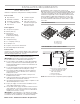
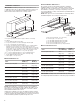
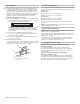
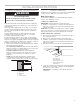
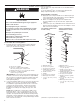
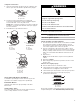

Table Of Contents

9
Complete Connection
1. Open the manual shut-off valve in the gas supply line. The
valve is open when the handle is parallel to the gas pipe.
2. Test all connections by brushing on an approved
noncorrosive leak-detection solution. If bubbles appear,
aleak is indicated. Correct any leak found.
NOTE: When a single shut-off valve is used for a multi-unit
installation, closing the valve will shut off the gas supply to
all connected units.
3. Install all burner caps and burner bases.
A
B
C
Single Burner
A. Cap
B. Spreader
C. Electrode
Double Burner
A. Cap
B. Spreader
C. Electrode
Single and Double Burner installation:
To install the spreader (B), insert the electrode (C) into the
spreader hole. Install the cap (A) on the spreader (B).
Dual Flame Burner:
Install the inner and outer caps (A and B) on the dual
ameburner.
Install surface grate:
The surface grate is positioned correctly when it sits level
onthecooktop and does not rock or wobble.
4. Plug into a grounded 3 prong outlet.
Complete Installation
Electronic Ignition System
Check Operation of Surface Burners
1. Push in and turn the surface burner control knobs to IGNITE.
The surface burner ame should light within 4 seconds.
The rst time a surface burner is lit, it may take longer than
4seconds to light because of air in the gas line.
2. Turn the control knob to HI and check for a blue-colored
ame. It should be clean and soft in character. No yellow tip,
blowing, or lifting of ame should occur. Occasional orange
ashes are normal and reect different elements in the air
orgas.
3. Repeat for LO.
NOTE: For the double burner, only the inner ring will have
aame.
4. Repeat for SIMMER.
5. After verifying the proper burner operation, turn the control
knobs to OFF.
If burners do not light properly:
■ Turn the surface burner control knob to OFF.
■ Check that the power supply cord is plugged in and the
circuit breaker has not tripped or the fuse blown.
■ Check that the gas shut-off valve is set to the open position.
■ Check that the burner bases and caps are properly
positioned on the burners.
Recheck the operation of the surface burners. If a burner does
not light at this point, call 1-800-JENN-AIR (1-800-536-6247).
B
A
A. Closed valve
B. Open valve
A
B
C
D
Dual Flame Burner
A. Inner cap
B. Outer cap
C. Spreader
D. Electrode
Electrical Shock Hazard
Plug into a grounded 3 prong outlet.
Do not remove ground prong.
Do not use an adapter.
Do not use an extension cord.
Failure to follow these instructions can result in death,
fire, or electrical shock.
WARNING
A. Correct
B. Incorrect