
Flush Installation Instructions


6
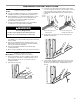
7. Set the oven door aside on the prepared covered work
surface with the oven door resting on its handle.
8. To continue with the oven installation, go to the
“Positioning Oven Feet” section.
6. Pull the oven door toward you and then remove. You may
need to gently shift door from side to side as you pull.
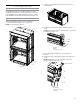
3. Using 2 hands, grasp the edges of the oven door. At a 45°
angle, insert the hinges at the same time and push the oven
door into the oven cavity slot to replace. You may need to
gently shift the door from side to side as you push.
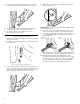
Replace Oven Door(s)
1. Using two hands, grasp side edges of door at the midpoint.
Face the oven cavity.
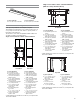
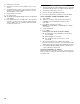
2. Locate the slots on each side of the oven front frame for the
door hinge locks.
A. Slot in the oven cavity for door hinge lock
A
4. Make sure the door hinge notch is engaged on the bottom
of the oven cavity slot.
IMPORTANT: Do not close the door at this step or damage may
occur to the door hinge.
5. Lower the oven door to the fully open position. If the oven
door does not open to a full 90°, repeat steps 1 through 3.
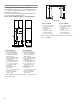
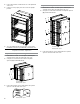
6. Locate the oven door hinge locks in the corners of the oven
door, and rotate the hinge locks toward the oven cavity to
the locked position.
7. After the door hinges have been locked, gently swing the
door upward to close. The door should not be forced closed.
8. When the hinges are properly installed and the door is
closed, there should be an even gap between the door and
the control panel. If one side of the oven door is lower than
the other, the hinge on that side is not properly installed.
See “Remove Oven Door” and “Replace Oven Door.”
Locked
position
Unlocked
position