
Flush Installation Instructions


9
Install Oven
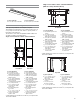
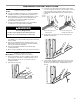
1. Using 2 or more people, lift the oven partially into the cabinet
cutout. Use the oven opening as an area to grip.
NOTE: When pushing the microwave oven into the cabinet,
open the microwave oven door and push against the seal
area on the front frame. Do not push against the outside
edges.
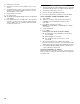
2. Push against the front frame of the microwave oven to push
oven into cabinet.
A. Oven Frame
B. Mounting spacer
C. Oven frame hole
D. Black trim piece
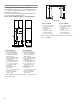
Install Deflector Kit Bracket
This assembly is required for use when a single or double built-in
oven is installed in a ush installation.
1. Flex the upper vent piece (C) away from the lower vent piece
(D) to slide the deector bracket (B) between them. Some
force may be required to ex the upper vent trim (C) away
from the lower vent trim (D). Some force may also be required
to ex the deector bracket (B) and slide it into position.
Make sure screw holes are properly aligned between the 2
pieces. See the following illustration.
2. Install the deector bracket (B) to the lower vent piece (D)
using two #8-18 x
1
⁄4
" screws on each side.
NOTE: On 27" (68.6 cm) models, only one #8-18 x
1
⁄4
" screw
is used on each side.
A. #8–18 x
¼
" screws
B. Deector bracket
C. Upper vent piece (supplied with oven)
D. Lower vent piece (supplied with oven)
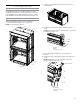
3. Align vent tab (B) with oven frame (A) as shown in the
following illustration.
4. Using one #8-18 x
3
⁄8" screw (E) on each side of the vent
tab (B), fasten the vent securely to the oven.
A. Oven frame
B. Vent tab
C. Oven vent
D. Deector bracket
E. #8–18 x
3
⁄8
" screw
A
C
D
B
E
D
B
A
C
B
D
C
A
C
D
B
B
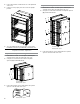
3. Push oven completely into the cabinet and center the oven
into the cabinet cutout.
4. Remove the tape from the black front trims and remove the
zip tie from the mounting spacer.
■ Securely fasten the oven to the cabinet using the
#8-14 x
3
⁄4" screws provided.
■ Insert the screws through holes in black trim aligning
with holes in oven frame and mounting spacer already
in place.