
Use and Care Manual


8
Read and understand all
assembly instructions before attempting
assembly. Failure to comply may cause serious
injury.
5.0 Setup and assembly
5.1 Shipping contents
Carton contents
1 Abrasive saw
1 Material stop assembly
1 Open-end wrench, 32/36mm
1 Hex wrench, 8mm
1 Operator’s manual
1 Product registration card
5.2 Tools required for assembly
8mm hex wrench (provided)
21 and 24mm (or adjustable) wrench
5.3 Unpacking and cleanup
1. Inspect contents for shipping damage. Report
damage, if any, to your distributor. Do not
discard shipping materials until saw is installed
and running properly.
2. Compare contents of shipping carton with the
contents list in this manual. Report shortages, if
any, to your distributor.
5.4 Location
Locate the machine on a solid, level floor, preferably
concrete. Area should have good overhead lighting
and ventilation, with enough room for loading and
offloading of stock and general maintenance.
Secure machine to floor using lag screws (not
provided) or similar means through the provided
holes in base.
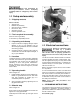
5.5 Operating handle
Refer to Figure 5-1.
1. Install operating handle (A) into threaded hole.
Rotate it a good distance into hole, and make
sure final orientation of handle grip is in
comfortable position for operator.
2. Secure operating handle by tightening hex nut
(B) against saw head.
5.6 Material stop
Refer to Figure 5-1.
Screw lower rod (D) into threaded hole in base and
tighten hex nut (C) against base.
Install stop block with knobs (E) and upper rod as
shown.
Figure 5-1 (AB-12 shown)
6.0 Electrical connections
Electrical connections must
be made by a qualified
electrician in compliance with all relevant codes.
This machine must be properly grounded to
help prevent electrical shock and possible fatal
injury.
The AB-12 and AB-14 Abrasive Saws are rated for
3-phase, 230/460-volt power, prewired 230V. They
are not supplied with a plug. You may either install
a proper 230V UL/CSA listed plug, or “hardwire” the
machine directly to a service panel. To convert to
460-volt, see sect. 6.3.
Before connecting to power source, be sure switch
is in off position.
It is recommended that the, when used with 230V
power, be connected to a dedicated 20 amp circuit
with circuit breaker or time-delay fuse marked “D”.
When used with 460V power, connect the AB-14 to
a dedicated 10 amp circuit with circuit breaker or
time-delay fuse marked “D”.
NOTE: Local codes take precedence over
recommendations.
6.1 GROUNDING INSTRUCTIONS
This machine must be grounded. In the event of a
malfunction or breakdown, grounding provides a
path of least resistance for electric current to reduce
the risk of electric shock.
If used with a plug: