
Use and Care Manual


9
Grounded, cord-connected tools intended for use on
a supply circuit having a nominal rating between
150-250 V inclusive:
This tool is intended for use on a three-phase circuit.
Make sure the tool is connected to an outlet having
the same configuration as the plug (not provided).
No adapter is available or should be used with this
tool. If the tool must be reconnected for use on a
different type of electric circuit, the reconnection
should be made by qualified service personnel; and
after reconnection, the tool should comply with all
local codes and ordinances.
If hardwired:
Permanently connected tools: This tool should be
connected to a grounded metal permanent wiring
system; or to a system having an equipment-
grounding conductor.
Improper connection of the
equipment-grounding conductor can result in a
risk of electric shock. Check with a qualified
electrician or service person if you are in doubt
as to whether the outlet is properly grounded.
The conductor with insulation having an outer
surface that is green with or without yellow stripes is
the equipment-grounding conductor. If repair or
replacement of the electric cord or plug is
necessary, do not connect the equipment-grounding
conductor to a live terminal.
After wiring, make sure that the blade rotates in the
proper direction. If it does not, reverse two of the 3-
phase wires on the supply input.
6.2 Extension cords
The use of extension cords is discouraged; try to
position machines near the power source. If an
extension cord is necessary, make sure it is in good
condition. When using an extension cord, be sure to
use one heavy enough to carry the current your
product will draw. An undersized cord will cause a
drop in line voltage resulting in loss of power and
overheating.
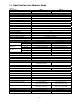
Table 2 shows correct size to use depending on
cord length and nameplate ampere rating. If in
doubt, use the next heavier gauge. The smaller the
gauge number, the heavier the cord.
Ampere
Rating
Volts
Total length of
cord in feet
More
Than
Not
More
Than
240 50 100 200 300
AWG
00 06 18 16 16 14
06 10 18 16 14 12
10 12 16 16 14 12
12 16 14 12
Not
Recommended
Table 2: Extension cord recommendations
6.3 Conversion to 460V
The Abrasive Saw is prewired for 230 volt. To
change incoming leads for 460 volt operation:
1. Open main motor junction box cover, and
change leads based on wiring diagram inside
cover. Reinstall cover.
2. Reconnect wire on transformer from 230V
terminal to 460V terminal.
3. If using an electrical plug, replace current plug
with a UL/CSA listed plug rated for 460 volt
operation.
7.0 Adjustments
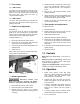
7.1 Miter adjustment
Refer to Figure 7-1.
The table has a rotational range of 90-degrees. To
adjust miter position, proceed as follows:
1. Move lock lever (F, Figure 7-1) toward the front
to release.
2. Push vise/table unit to desired angle, as shown
on scale. (On the AB-14 pull the stop knob out
to rotate vise unit. The knob will engage at +/-
45 and 90 degrees.)
3. Loosen handle (G) atop vise, and slide jaw as
needed to accommodate blade angle. Position
vise jaw as close as possible to blade.
Retighten handle securely.
4. When desired cutting angle is set, firmly move
lock lever rearward to secure setting.
Figure 7-1 (AB-12 shown)