
Use and Care Manual


8
Assembly
Stand Assembly
Tools required for assembly:
Two 1/2-inch wrenches (Note: A ratchet wrench
may speed assembly time.)
Referring to Figure 2:
1. Assemble the rear (D
1
) and right side (E
1
)
panels with three M8 x 20 hex cap screws
(A), six M8 flat washers (B
1
, B
2
) and three
M8 hex nuts (C). Tighten the hex nuts.
2. Assemble E
2
and D
2
in the same manner.
3. Position bottom plate (F) in stand.
4. Finish assembling E
2
to D
1
and E
1
to D
2
in
the same manner as above.
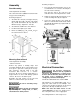
Figure 2
Mounting Saw to Stand
Tools required for assembly:
– 8mm hex wrench
Remove any plastic or holding straps from
around the bandsaw. Areas of the machine have
been given a protective coating at the factory.
This should be removed using a soft cloth
moistened with kerosene or a cleaner-
degreaser. Do not use gasoline, paint thinner, or
lacquer thinner as these will damage painted
surfaces. Do not use an abrasive pad.
Determine the final location for the saw and
allow for a sufficient work space around it.
The saw is extremely heavy.
Use a hoist to lift.
When moving the saw/stand
top assembly the cutting head, or “bow”,
should be in the down position.
Referring to Figure 3:
1. The saw (A) and stand top (B) come as an
assembled unit. Use a hoist to lift and place
the saw onto the stand (C).
Note that the front of the saw faces the
same direction as the flat panel of the stand.
2. Adjust the stand top (B) and stand (C) so the
corner mounting holes (D) are aligned.
3. Secure the stand top (B) to the stand (C)
with four each M8 hex socket head screws
(E) with M8 flat washers (F). Tighten with an
8mm hex wrench.
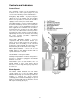
Figure 3
Electrical Connection
All electrical connections
must be done by a qualified
electrician. All adjustments or repairs must
be done with the machine disconnected from
the power source, unplugged. Failure to
comply may result in serious injury!
The Model J-9225 bandsaw is rated at 230V.
This machine is not supplied with a plug. Use a
plug and outlet rated at least 20amps. The
circuit for the machine should also be protected
by at least a 20 amp circuit breaker or fuse.
Make sure that the blade moves in the
correct direction. If it does not, simply reverse
two of the phase wires on the supply input.
The sawing machine is now ready for use.