
Use and Care Manual


9
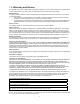
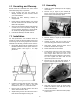
Figure 7
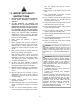
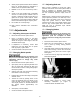
6. Loosen lock knob (A, Figure 8) and slide left
blade guide arm (B, Figure 8) to the right as far
as possible.
Figure 8
7. Remove old blade from both wheels and out of
each blade guide.
Even dull blades are sharp
to the skin. Use extra caution handling
bandsaw blades.
8. Install new blade making sure teeth are
pointed downward in the proper cutting
direction. If necessary, turn blade inside out.
9. Position blade on band wheels and tighten just
enough to hold blade on wheels. Make sure
back of blade rests lightly against the wheel
flange of both wheels. Twist blade slightly to
allow it to slip into guides.
10. Tension blade to approximately 25,000 lbs., as
indicated on the blade tension indicator found
on the tension wheel shaft housing.
11. Raise wire brush and tighten set screw to hold
brush in place.
12. Close all covers and guards and fasten
securely. Connect machine to power and run
freely for approximately two minutes.
13. Turn power off and recheck blade tension and
wire brush adjustment. If further adjustment is
necessary, disconnect saw from power source,
make adjustments, and reconnect to power.
12.5 Blade tracking adjustment
Blade tracking has been set at the factory and
should require no adjustment. If a tracking problem
occurs, adjust the machine as follows:
Tracking adjustment is done
with the wheel covers open to observe the
blade. Use extreme caution so as not to come
into contact with the blade.
Since tracking can only be adjusted while machine
is running, it is suggested that this adjustment be
accomplished by qualified personnel that are
familiar with this type of adjustment and the
dangers associated with it.
1. Disconnect machine from power source.
2. Raise saw arm to its highest position and close
cutting pressure control valve to hold saw arm
in place.
3. Locate tracking adjustment plate on the back
side of the driven blade wheel.
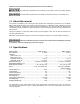
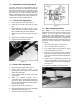
4. Loosen the three bolts (A, Figure 9) located on
the top of the tracking nuts.
5. Tracking adjustment is accomplished by either
loosening or tightening three adjusting nuts (B,
Figure 9).
6. Tracking is set properly when the back of the
blade lightly touches the wheel flange. Note:
Over-tracking (allowing blade back to rub hard
against wheel flange) will damage the blade
wheels and blade.
7. Tighten locking bolts (A, Figure 9) once proper
tracking is completed.
8. Connect machine to the power source.
Figure 9