
Use and Care Manual
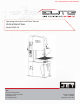
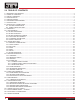
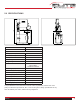
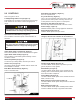
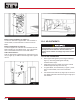
Table Of Contents
- Vertical Band Saw EVBS-26
- 1.0 WARRANTY AND SERVICE
- 2.0 TABLE OF CONTENTS
- 3.0 SAFETY WARNINGS
- 4.0 INTRODUCTION
- 5.0 SPECIFICATIONS
- 6.0 UNCRATING AND ASSEMBLY
- 7.0 INSTALLATION
- 8.0 ELECTRICAL CONNECTIONS
- 9.0 CONTROLS
- 10.0 ADJUSTMENTS
- 11.0 BLADE SELECTION
- 12.0 WELDER OPERATION
- 13.0 BAND SAW OPERATION
- 14.0 MAINTENANCE
- 15.0 TROUBLESHOOTING
- 16.0 SPEED AND PITCH CHART
- 17.0 REPLACEMENT PARTS —EVBS 26
- 18.0 ELECTRICAL CONNECTIONS — EVBS-26
- 19.0 WIRING DIAGRAM EVBS-26

8
Vertical Band Saw
6.0 UNCRATING AND ASSEMBLY
Note: Read and understand the entire manual before
attempting setup or operation.
1. Finish uncrating the saw and inspect for damage.
Should any have occurred, contact your local distribu-
tor.
2. Remove any preservatives with kerosene or diesel oil.
Do not use gasoline, paint thinner, or any cellulose-
based product, as these will damage painted
surfaces.
3. Remove two socket head cap screws from left side of
vertical column. Attach shear assembly (A, Figure 1) to
column by inserting screws.
4. Place rip fence onto table and tighten with locking
knob.
7.0 INSTALLATION
For best performance, the band saw should be located on
a solid and level foundation. Allow room for servicing and
for moving large stock around the band saw when decid-
ing a location for the machine.
1. Remove four (4) nuts and washers holding band saw
to shipping crate bottom.
2. Use the lifting ring to lift band saw into its permanent
location. For best performance, band saw should be
bolted to fl oor after a level position has been found.
3. Using a square, adjust table 90 degrees to blade, both
front to back and side to side. Loosen the hex cap
screws below the table to move it and tighten to
hold table in place. If necessary, adjust the pointers to
zero should they read different once table is perpen-
dicular to blade in both directions.
4. To level the machine, place a machinist’s level on the
table and observe in both directions.
5. Use metal shims under the appropriate hold down
screw. Tighten screw and recheck for level.
6. Adjust with additional shims, as required, until table is
level when all mounting screws (or nuts) are tight.
8.0 ELECTRICAL CONNECTIONS
The Vertical Band Saw is rated at 230/460V and comes
from the factory prewired 230V.
You may either connect a proper UL-listed plug suitable
for 230 volt operation, or “hard-wire” the machine directly
to your electrical panel provided there is a disconnect near
the machine for the user.
The band saw must be grounded. A qualifi ed electrician
can make the proper electrical connections and confi rm
the power on site is compatible with the saw.
Before connecting to power source, make sure switch is in
off position.
8.1 VOLTAGE CONVERSION
To switch to 460V operation:
1. Switch the jumper wires on the circuit board. Remove
control panel from saw body and change the jumper
wires according to the list in section 18.0, Electrical
Connections.
2. If a plug is to be used, install a proper UL-listed plug
suitable for 460V operation.
IMPORTANT: Consult the diagrams in section 19.0 for
any clarifi cation of these changes on 230V to 460V con-
version.
8.2 THREE-PHASE TEST RUN
After wiring the band saw, you should check that the wires
have been connected properly. Connect machine to power
source and turn it on for an instant to watch direction of
blade movement.
If blade runs upward instead of downward, disconnect
machine from power, and switch any two of the three
leads in the motor junction box (see section 19.0, Wiring
Diagram).
Fig. 1
A
!
All electrical connections must be done by a
qualifi ed electrician. All adjustments or repairs must
be done with machine disconnected from power
source. Failure to comply may cause serious injury.