
Manual

JKS9902JKS Body Lift Installation
Page 3
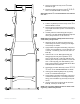
Remove the bolt from body mount 1 located
beneath the grill.
Remove the bolts from body mounts 2 3 4 5
and 6 on DRIVER SIDE of vehicle only.
Note: Body mount 5 is located between fuel tank and
rear axle.
3. INSERT BODY PUCKS
Position a hydraulic jack next to body mount
3 on
DRIVER SIDE of vehicle.
Place a sturdy wooden block between the hydrau-
lic jack pad and channel portion of vehicle body for
protection.
Carefully raise the vehicle body just enough to
insert the 1.25” Body Pucks (A) between body and
factory body mounts 2 3 4 5 and 6.
NOTE: Recessed bottom of Body Pucks must encap-
sulate factory body mounts.
With Body Pucks (A) inserted, slowly lower the
vehicle body onto mounts, ensuring correct align-
ment of body on chassis.
Apply medium strength thread locking compound
to three of the supplied 3/8” x 3-1/2” Bolts (B), one
of the 3/8” x 4” Bolts (C), and one of the 7/16” x 4”
Bolts (E).
Insert the 3/8” x 3-1/2” Bolts (B) with 3/8” Flat
Washers (D) into body mount positions
3 4
and 5. Insert the 3/8” x 4” Bolt (C) with 3/8” Flat
Washer (D) into body mount position 2. Insert the
7/16” x 4” Bolt (E) with 7/16” Flat Washer (F) into
body mount position6. Start threads but DO NOT
TIGHTEN bolts until instructed.
Repeat this procedure with body mounts 2 3 4
5 and 6 on the PASSENGER SIDE of vehicle.
Insert the last remaining Body Puck (A) at body
mount
1 located beneath the grill.
Apply medium strength thread locking compound
to the last remaining 7/16” x 4” Bolt (E) and insert
with a 7/16” Flat Washer (F) into body mount posi-
tion 1.
Using a torque wrench, tighten all 3/8” and 7/16”
Bolts (B, C and E) to 30-35 ft-lbs.
NOTE: Use care when tightening bolts to avoid crush-
ing factory rubber body mounts.