
User manual


1. Introduction
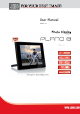
Congratulations on your purchase of the JOBO Photo Display PLANO 8! Before operating the unit,
please read this manual thoroughly and retain it for future reference. You can display your digital
photos directly from your memory card, no computer is needed! Simply insert a memory card into
the Photo Display PLANO 8 turn on the power, then all images will be shown automatically as a
slideshow.
1.1. Key features
Display: 8 inch (20,32 cm) color TFT
LCD
Resolution: 800 x 600 pixels
Contrast ratio: 400:1
Brightness: 230 cd/m²
Aspect ratio 4:3 (original & optimized
mode)
Card slots for SD, SDHC, MMC, MS, xD
USB Host & USB 2.0 High Speed
Supported file format: JPEG
Supported audio formats: MP3
Supported video formats: Motion JPEG
(AVI)
Full screen, thumbnail, 4-in-1 window
or slide show mode
Slide show with adjustable transition
effects and time intervals
Slide show with background music
Embedded photo enhancement
function
Rotate and zoom function
Clock and Calendar with slide show
mode
Energy saving function (Auto OFF)
Setup menu
Wall mount, foldable stand
Dimensions: 213 x 164 x 25 mm
Weight: 520 g
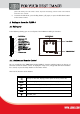
1.2. Package content
JOBO Photo Display PLANO 8 Media (PDP082)
AC Power Adapter (5V, 2A)
Remote control
This manual
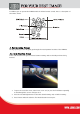
1.3. Getting Started
The JOBO Photo Display PLANO 8 is easy to set up. Just follow these steps:
1. Connect Photo Display PLANO 8 with the AC Power Adapter to a power supply.
2.
Insert a memory card into the memory card slot.
Note: The card will only fit in one direction; do
not force it. The card should fit snugly when properly inserted.
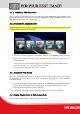
3. Pull out adjustable Stand to adjust the viewing angle.
4. Press the Power ON button on the back of the JOBO Photo Display PLANO 8 . The frame will
automatically start a slide show of the photos on the card.
5. To display photos individually, press the Exit button to open the Thumbnail Screen window.
Use the Up and Down arrows to choose a photo. Press the Play button (>/ll) on the top of
the JOBO Photo Display PLANO 8, or the Enter button on the remote control.
Note: Pull the