
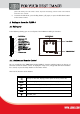
User manual
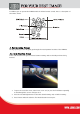


While the photo is in enlarged, use the Arrow buttons to move the photo so you can see the
portions that aren't currently visible.
4.3. Delete Photos
Use the Remote control to a photo from the built-in memory.
1. Press the Setup butt0n.Asetup menu opens.
2. Press the Up or Down arrow to select Delete Photo.
3. Press Enter. A confirmation message is displayed.
Caution: The photo will be deleted immediately; the deleted photos can’t be restored.
4. Press Exit to close the menu.
5. General Settings
5.1. Adjust the LCD Colour
Choose this option to adjust the Brightness, Contrast, Tint, and Colour of the display.
1. Press the Setup button. A setup menu opens.
2. Press the Up or Down arrow to select Adjust LCD Colour.
3. Press Enter. A second menu opens.
4. Use the Arrow buttons to select an option to adjust.
5. Use the Right and Left arrows to adjust the option. The display changes.
6. Use the Arrow buttons to select another option to adjust.
7. When the display looks the way you want it to, press Exit to close the menu.
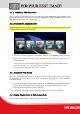
5.2. Settings Menu
You can control all of the viewing options in the Setup Menu using the buttons on the top of the
frame or the remote control. You can display the on-screen Setup Menu any time the Photo Display
when it is not displaying Photos, by pressing the Setup button.
1. To show the Setup menu during a photo, press the Exit button, then the Setup button.
2. When the Setup menu opens, use the Up and Down arrows to choose an option.
3. Press Enter to select the option. A second menu opens, listing the available settings. A
white square shows the current setting.
4. Use the Up and Down arrows to choose the desired setting.
5. Press Enter to select the setting. The second menu closes.
6. You can make as many changes as you wish in the same manner. When you are finished,
press the Exit button to close the Settings Menu and return to the Thumbnails screen.
7. The following table lists the display options in the Setup Menu, their options, and a
description of their actions.