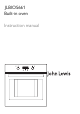
JLBIOS661 Built-in oven Instruction manual
Safety information It is most important that this instruction book should be retained with the appliance for future reference. Should the appliance be sold or transferred to another owner, or should you move house and leave the appliance, always ensure that the book is supplied with the appliance in order that the new owner can get to know the functioning of the appliance and the relevant warnings. These warnings have been provided in the interest of safety.
• The oven should be kept clean at all times. A build-up of fats or other foodstuffs could result in a fire, especially in the grill pan. • Never use steam or high pressure steam cleaners to clean the appliance. • Always allow the oven to cool down and switch off the electrical supply before carrying out any cleaning or maintenance work. • Do not use abrasive cleaners or sharp metal scrapers. These can scratch the glass in the oven door, which may result in the shattering of the glass.
Contents For the user For the installer Safety information 2 Electrical Connections 25 Description of the appliance 5 5 6 6 6 Building In 26 Technical data 27 General overview Oven accessories The Control Panel Controls Before using for the first time 7 Using the oven 8 The timer 8 Setting the clock 8 Cooking Duration function 9 End of cooking 10 Cooking duration and End of cooking time combined 10 Minute minder 10 Use, Tips and Tables The Safety Thermostat The Cooling Fan The Fan Oven Cooking
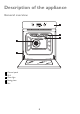
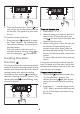
Description of the appliance General overview 1 2 3 5 4 1 2 3 4 5 Control panel Grill Oven light Rating plate Fan 5
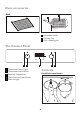
Oven accessories Shelf 2 1 3 1 Removable handle 2 Grill Pan Grid 3 Grill / Roasting pan The Control Panel 1 1 2 3 4 5 2 3 4 Thermostat Control Light Thermostat Control Knob Electronic Programmer Oven Function Control Knob Mains on Light 5 Controls Push-Pull control knobs 6
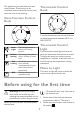
The appliance is provided with push-pull control knobs. These knobs can be completely sunken inside the control panel when the oven is not working. Thermostat Control Knob Oven Function Control Knob Turn the thermostat control knob clockwise to select temperatures between 50°C and MAX (250°C). Oven Light The oven light will be on without any cooking function. Defrost Setting This setting is intended to assist in thawing of frozen food.
3. Set the thermostat control knob to MAX. 4. Open a window for ventilation. 5. Allow the oven to run empty for approximately 45 minutes. This procedure should be repeated with the grill function for approximately 5-10 minutes. Before cooking for the first time, carefully wash the shelves and the baking tray. Warning! To open the oven door, always hold the handle in the centre. During this time, an unpleasant odour may be emitted. This is absolutely normal, and is caused by residues of manufacturing.
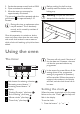
2. Then wait 5 seconds: the “Clock” pilot lamp will go out and the display will show the set time. The appliance is now ready for use. To set the duration time 1. Press button " + " or " - ". 2. After the setting is carried out, wait for 5 seconds: the "Cooking Duration" pilot lamp will come on and the display will revert to the time of day. 3. When cooking time is over, the oven will be switched off automatically and an acoustic alarm will be heard, while the pilot lamp will start flashing.
Turning the acoustic alarm off will reset the oven to manual, and if the oven function and the thermostat knobs are not set to zero the oven will start to heat again. End of cooking With this function, you can set the oven to switch off automatically when a programmed end of cooking time is over. Place food in the oven, select a cooking function and adjust the cooking temperature. Press button repeatedly to select the “End of cooking” function. The relevant pilot lamp will start flashing.
2. Press button " + "or " - " (maximum: 2 hours, 30 minutes). 3. After the setting is carried out, wait for 5 seconds: the “Minute minder” pilot lamp will come on. 4. At the end of the timed period, the pilot lamp will start flashing and an acoustic alarm will be heard. To switch off the acoustic alarm, press any button. To cancel the minute minder 1. Press button repeatedly to select the “Minute minder” function. The relevant pilot lamp will flash and the display will show the remaining time. 2.
Cookware Warning! Do not cover any part of the oven with aluminium foil while cooking, as this could cause a heat build-up which would affect the baking results and damage the oven enamel. Always place pans, heat-resisting pans and aluminium trays on the shelf which has been inserted in the shelf runners. • Use any oven proof cookware which will withstand temperatures of 250°C. • Baking trays, oven dishes, etc.
Fan oven cooking generally requires lower temperatures than conventional cooking. Follow the temperatures recommended in the cooking chart. Remember to reduce temperatures by about 20- 25°C for your own recipes which use conventional cooking. • Even Heating for Baking The fan oven has uniform heating on all shelf positions. This means that batches of the same food can be cooked in the oven at the same time. However, the top shelf may brown slightly quicker than the lower one. This is quite usual.
to adjust the temperature, if necessary. Remember to reduce temperatures by about 20-25°C for your own conventional recipes. • When roasting do use the trivet in the meat tin. Fat and meat juices will drain into the meat tin below and can be used to make gravy. The trivet also prevents splashes of fat from soiling the oven interior. • The meat tin should not be placed on a heated hotplate as this may cause the enamel to crack.
Type of dish Cooking Cooking time temp °C in minutes Notes Apple cake (Apple pie) 2 160 90-120 In cake mould Strudel 2 160 60-80 In baking tray Jam- tart 2 180 40-45 In cake mould Fruit cake 2 150 60-70 In cake mould Sponge cake 2 (1 and 3)1) 165 30-40 In cake mould Christmas cake 2 150 120-150 In cake mould Plum cake 2 160 50-60 In bread tin Small cake 2 (1 and 3)1) 160 20-35 In baking tray Biscuits 2 (1 and 3)1) 150 20-30 In baking tray Meringues 2 (1 and 3
Flans Type of dish Cooking temp °C Cooking time in minutes Notes Pasta flan 2 (1 and 3)1) 175 40-50 In mould Vegetable flan 2 (1 and 3)1) 175 45-60 In mould Quiches 1 190 35-45 In mould Lasagne 2 200 25-35 In mould Cannelloni 2 200 25-35 In mould 1) If you cook more than one dish at the same time, we recommend you place them on the levels quoted between brackets.
Fish Type of dish Cooking temp °C Cooking time in minutes Notes Trout/Sea bream 2 (1 and 3)1) 175 40-55 3-4 fishes Tuna fish/ Salmon 2 (1 and 3)) 175 35-60 4-6 fillets 1) If you cook more than one dish at the same time, we recommend you place them on the levels quoted between brackets. Hints and Tips • Most foods should be placed on the grid in the grill pan to allow maximum circulation of air to lift the food out of the fats and juices.
Grilling A general guide to cooking times is given below but these times may vary slightly depending on the thickness and quantity of food being cooked. Timings do not include preheating. The empty oven should always be pre-heated for 10 minutes. OI L TYPE OF DISH Quantity Grilling Cooking time in minutes Pieces Weig ht[g] Level temp.
• Only joints of meat and poultry up to 2 kg. (4 lb.) are suitable for defrosting in this way. • Frozen food should be placed in a single layer when ever possible and turned over half way through the defrosting process. Care and cleaning Before using any cleaning materials on your oven, check that they are suitable and that their use is recommended by the manufacturer. Cleaners that contain bleach should NOT be used as they may dull the surface finishes. Harsh abrasives should also be avoided.
thorough cleaning, using a proprietary oven cleaner. Cleaning the oven door The oven door has two panels of glass installed one behind the other. To make the cleaning easier remove the oven door and the internal panel of glass. Warning! The oven door can close if you try to remove the internal panel of glass when the door is still assembled. 3. Close the oven door to the first opening position (approx. 45°). Then pull forward and remove it from its seat.
Clean the glass panel with water and soap. Dry it carefully. Warning! Only clean the glass panel with water and a soap. Abrasive cleaning agents, stain removers and sharp objects (e.g. knives or scrapers) can cause damage to the glass. Inserting the door and the glass panel When the cleaning procedure is completed, insert the glass panel and the oven door. To do so, do the steps in reverse.
Replacing the Oven Light Warning! Before replacing the oven light disconnect the appliance from the electrical supply. If the oven bulb needs replacing, it must comply with the following specifications: • Electric power: 15 W/25 W, • Electric rate: 230 V (50 Hz), • Resistant to temperatures of 300°C, • Connection type: E14. These bulbs are available from your local Repair agent. 2. Then unhook the rails at the back. 2 To replace the faulty bulb: 1.
Something not working If the oven is not working correctly, please carry out the following checks, before contacting your local Service Force Centre. Important! If you call out an engineer to a fault listed below, or to repair a fault caused by incorrect use or installation, a charge will be made even if the appliance is under guarantee. SYMPTOM SOLUTION The oven does not come on. • Check that both a cooking function and temperature have been selected.
your household waste disposal service or the shop where you purchased the product. Packaging material The packaging materials are environmentally friendly and can be recycled. The plastic components are identified by markings, e.g. >PE<, >PS<, etc. Please dispose of the packaging materials in the appropriate container at the community waste disposal facilities. Old appliance Warning! Warning: So that the old appliance can no longer cause any danger, make it unusable before disposing of it.
Electrical Connections Before connecting to the mains supply ensure that the mains voltage corresponds to the voltage on the rating plate on the side of the oven door. The oven has an easily accessible terminal block which is marked as follows: Letter L - Live terminal Letter N - Neutral terminal - Earth terminal Warning! THIS OVEN MUST BE EARTHED Electrical Requirements Any permanent electrical installation must comply with the latest I.E.E. Regulations and local Electricity Board regulations.
For Europe use only Min. size Cable/ flex 1,5 mm² Cable/flex type Fuse H07 RN-F, H05 RN-F, H05 RR-F, H05 VV-F, H05 V2V2-F (T90), 13 A H05 BB-F Building In Warning! The oven must be installed by qualified and competent personnel to the relevant National Standards and according to the instructions supplied in "Electrical connections" and "Installation" chapters. 540 560 2 Please ensure that when the oven is installed it is easily accessible for the engineer in the event of a breakdown.
Securing The Oven To The Cabinet A 1. Fit the oven into the cabinet recess, 2. Open the oven door, 3. Secure the oven to the kitchen cabinet with the four distance holders "A" which fit the holes in the oven frame and then fit the four wood screws "B" . B Technical data • 2004/108 (Electromagnetical Compatibility Directive) and subsequent modifications.
Repairs - after sales service If your oven is not performing satisfactorily; consult the fault finding guides within this instruction book (Something not working). If a fault occurs which you can not resolve through following the advice and information contained within this instruction manual, the next step is to contact our extended warranty administrators on Spare parts This oven should be serviced by any authorised service engineer; and only genuine spare parts should be used.
John Lewis Partnership 171 Victoria Street London SW1E 5NN www. johnlewis.