JLBIUCF 01 built-in freezer Instruction manual 6 5 4 1 2 3
Important Safety Information It is most important that this instruction book should be retained with the appliance for future reference. Should the appliance be sold or transferred to another owner, or should you move house and leave the appliance, always ensure that the book is supplied with the appliance in order that the new owner can get to know the functioning of the appliance and the relevant warnings. These warnings have been provided in the interest of safety.
Environmental Information • When disposing of your appliance, use an authorised disposal site. • Remove the plug and ensure that any locks or catches are removed, to prevent young children being trapped inside. • The symbol on the product or on its packaging indicates that this product may not be treated as household waste. Instead it shall be handed over to the applicable collection point for the recycling of electrical and electronic equipment.
Contents For the Installer For the User Important Safety Information 2 Installation 6 Description of the appliance 5 Technical Specification 6 Control panel 13 Electrical Connection 6 Start your appliance 13 Positioning 6 Temperature control 13 Before using 14 Door Reversal 8 Freezing fresh food 14 Building In 9 Frozen food storage 14 Thawing 15 Making ice cubes 15 Normal operating sounds 15 Hints and Tips 16 Maintenance and Cleaning 17 Internal cleaning 17 When the
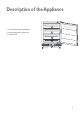
Description of the Appliance 1 1 Frozen food storage compartments 2 Freezing fresh food compartment 3 Control panel 1 2 2 6 5 4 1 2 3 3 5
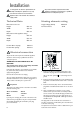
Installation It is dangerous to alter the specifications or attempt to modify this product in any way. Any electrical work required to install this appliance should be carried out by a qualified electrician or competent person. Care must be taken to ensure that the appliance does not stand on the electrical supply cable.
Important Warning IF YOU ARE DISCARDING AN OLD APPLIANCE THAT HAS A LOCK OR CATCH ON THE DOOR, YOU MUST ENSURE THAT IT IS MADE UNUSABLE TO PREVENT YOUNG CHILDREN BEING TRAPPED INSIDE. It must be possible to disconnect the appliance from the mains power supply; the plug must therefore be easily accessible after installation. Depending upon the position which you choose for your appliance, you may wish to reverse the way in which the door opens.
Door Reversal To reverse the opening direction of the door, proceed as shown in the figures: 6 6 4 1 7 8 5 2 1 6 3 2 6 Warning After completion of the door reversing operation, check that the door gasket adheres to the cabinet. If the ambient temperature is cold (i.e. in Winter), the gasket may not fit perfectly to the cabinet. In that case, wait for the natural fitting of the gasket or accelerate this process by heating up the part involved with a normal hairdryer on a low setting.
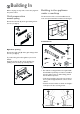
Building In Before carrying out any work, remove the plug from the power socket. Grid preparation Building in the appliance under a worktop The dimensions of the recessed installation area must correspond with those indicated in the figure. Left door opening: Remove the left side (A) of the grid cutting it from the rear (see figure). 60 0 A 5 min50 . 600 B DO013 Installation kit DO002/2 1xB 2xC Right door opening: Remove the right side (B) of the grid cutting it from the rear (see figure).
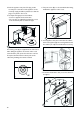
2. Push the appliance into place.The plug socket necessary for connection of the appliance to the electricity supply should be positioned, so that the plug is not placed in the recess. 3. To adjust the height proceed as follows: - Loosen or tighten the two front feet. - The rear feet are adjusted by turning the screw in the front kick plate to the left or right. 4. The joint cover (B) is to be assembled after having installed the appliance in the recess. b) 1 596 B 5 55 x ma + - - 4 + E 3 5.
F I 27 ,5 cm 55 27 ,5 cm cm 10 7 1 2 45° a b 3 C click 11 click c 8 1 Upper part of kitchen furniture panel Möbeltür Innenseite a I = = = 2 10 = c 9 12 b 11
Fitting the plinth m 8m I F K G 13 Important For the efficient operation of the appliance, it is important that the original ventilation grid is used. • For an opening height dimension A=820 mm and a plinth height dimension a=100 mm, the plinth may be fitted without adjustments.The same applies to an opening height dimension B=870 mm and a plinth height dimension b=150 mm.
The Control Panel 1 2 6 5 4 3 ➀ ➁ 1 2 3 Pilot light Thermostat control knob Fast-freezing indicator light ➂➃➄ 4 5 Push button for fast-freezing and for stopping the audible signal (warning light on) Warning light Start your appliance Warning light (red) Insert the plug into the wall socket.The appliance can be activated by turning the thermostat knob (2) beyond the «O» position.When the pilot light (1) is illuminated , this shows that the appliance is on.
Before using Frozen food storage Remove all securing tapes.Wash inside the appliance with lukewarm water and bicarbonate of soda (5 ml to 0.5 litre of water). When you first start the freezer or if the freezer has been out of use for some time, we advise you to run your appliance for at least two hours in the «fast freeze» mode before storing frozen food.
Thawing Making ice cubes Frozen food, prior to being used, can be thawed in the fridge or at room temperature depending on the time available. Small food items may even be cooked from frozen; in this case cooking will take longer. The appliance is provided with one or more trays for ice-cubes trays. Any frozen food which is allowed to thaw accidentally should either be eaten as soon as possible or thrown away.
Hints and Tips Food Storage • To obtain the best results from your appliance, neither hot foods nor liquids which may evaporate, should be placed in the larder compartment. • Keep the time between buying chilled food and placing it in your fridge as short as possible. • Do not push food together too much, try to allow air to circulate around each item. • Do not store food uncovered. • Remove suspect food from your refrigerator and clean, refer to ‘Maintenance and Cleaning’.
Maintenance and Cleaning Before any maintenance or cleaning work is carried out, DISCONNECT the appliance from the ELECTRICITY supply. Internal cleaning Clean the inside and accessories with warm water and bicarbonate of soda (5ml to 0.5 litre of water). Rinse and dry thoroughly. NEVER USE DETERGENTS, ABRASIVE POWDERS, HIGHLY PERFUMED CLEANING PRODUCTS OR WAX POLISHES,TO CLEAN THE INTERIOR AS THESE WILL DAMAGE THE SURFACE AND LEAVE A STRONG ODOUR.
Something not working Important: If you call out an engineer to a fault listed below, or to repair a fault caused by incorrect use or installation a charge will be made, even if the appliance is under guarantee. Before contacting your local Service Force Centre, check the following points: SYMPTOM ! No power to the appliance SOLUTION ♦ Check there is power at the socket. ♦ Check there is not a power cut by checking the household lights. ♦ Check the fuse has not blown.
Repairs - After Sales Service If your appliance is not performing satisfactorily; consult the fault finding guide within this instruction book (Something not working). In the event of a fault occurring which you cannot resolve yourself from advice given within this instruction manual your first step is to contact our extended warranty administrators on 0870 0107887 who will give you details for your local Service Force Repair Agent. When contacting the repair agent, please quote the model (Mod.
John Lewis Partnership 171 Victoria Street London SW1E 5NN www.johnlewis.