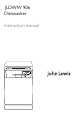
JLDWW 906 Dishwasher Instruction manual
Important safety information It is most important that this instruction book should be retained with the appliance for future reference. Should the appliance be sold or transferred to another owner, or should you move house and leave the appliance, always ensure that the book is supplied with the appliance in order that the new owner can get to know the functioning of the appliance and the relevant warnings. These warnings have been provided in the interest of safety.
• The water in your dishwasher is not for drinking. Detergent residues may still be present in your machine. • Ensure that the door of the dishwasher is always closed when it is not being loaded or unloaded. In this way you will avoid anybody tripping over the open door and hurting themselves. • Do not sit or stand on the open door. • Keep all detergents in a safe place out of children’s reach. • Keep children well away from the dishwasher when the door is open.
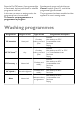
• 45°-70° Auto Wash Programme: This machine is fitted with a turbidity sensor which intelligently adjusts the temperature and rinsing cycles during the wash programme, depending on the degree of soiling on the dishes. This helps to reduce energy and water consumption on lightly soiled loads. • Half load: This option is useful and economical when baskets are not fully loaded. The symbol on the product or on its packaging indicates that this product may not be treated as household waste.
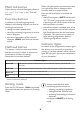
Contents For the user For the user Important safety information 2 Technical data 28 Description of the appliance 28 28 28 29 Installation 6 Control panel 7 Washing programmes 9 Unpacking Fitting under a counter Levelling Water connections When the dishwasher is first Water supply connections installed 11 The water softener Filling with dishwasher salt Filling with rinse aid Adjusting the rinse aid dosage 11 13 13 14 Daily use 15 Loading cutlery and dishes 15 The lower basket 16 The cutlery b
Description of the appliance 1. 2. 3. 4. 5. Upper basket Water hardness dial Salt container Detergent dispenser Rinse aid dispenser 6. 7. 8. 9. 10.
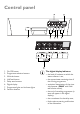
Control panel 1. 2. 3. 4. 5. 6. 7. 8.
When using this option we recommend that you reduce the dose of detergent that is normally used for a complete load. Press the half load button to activate the option: • the half load option is NOT available with ''45°-70° Auto'' programme; the half load indicator light will not illuminate when the half load button is pressed. • the half load option is available with all the other programmes; the half load indicator light illuminates when the half load button is pressed.
Simultaneously press and hold the two Cancel buttons (B and C), until all the programme lights illuminate. The programme has been cancelled and the appliance is now in setting mode. Press the On/Off button; if a programme light is illuminated, the last performed or selected programme is still set. In this case, to return to setting mode, the programme has to be cancelled.
Programme Degree of soil Programme description 1 cold rinse (to avoid food scraps from Partial load (to be sticking). completed later This programme does not require the in the day). use of detergent. Any. Rinse hold Type of load 1) During the Auto washing programme the level of soiling on the dishes is determined by how cloudy the water is.
When the dishwasher is first installed a detrimental or adverse effect on the operation of the appliance. The higher the content of these minerals and salts, the harder your water is. Water hardness is measured in equivalent scales, Clarke degrees, French degrees (°TH) and mmol/l (millimol per litre - international unit for the hardness of water). The softener should be adjusted according to the hardness of the water in your area.
Adjusting the water hardness setting Water hardness Clarke °TH mmol/l manually electronically <5 <7 < 0,7 1 level 1 Use of salt no 2. Simultaneously press and hold function buttons B and C, until the lights Glass, Rinse hold and Multi tab start flashing. 3. Press function button A, the lights of function buttons Rinse hold and Multi tab turn off while the light of function button Glass continues to flash. The current level shows on the digital display.
5. Replace the cap tightly turning it clockwise until it stops with a click. Filling with dishwasher salt Do not worry if water overflows from the unit when filling with salt, this is quite normal. Warning! Only use salt specifically designed for use in dishwashers. All other types of salt not specifically designed for use in a dishwasher, especially table salt, will damage the water softener. Only fill with salt just before starting one of the complete washing programmes.
3. Ensure that the lid is closed after every refill. Clean up any rinse aid spilt during filling with an absorbent cloth to avoid excess foaming during the next wash. Adjusting the rinse aid dosage According to the finish and drying results obtained, adjust the dose of rinse aid by means of the 6 position selector (position 1= minimum dosage, position 6= maximum dosage). 2. Add the rinse aid in the container. The maximum level for filling is indicated by "max". The dose is factory set in position 4.
Daily use • When loading the dishes and cutlery, please note: – Dishes and cutlery must not impede the rotation of the spray arms. – Load hollow items such as cups, glasses, pans, etc. with the opening downwards so that water cannot collect in the container or a deep base. – Dishes and items of cutlery must not lie inside one another or cover each other. – To avoid damage to glasses, they must not touch. – Lay small objects in the cutlery basket.
The lower basket The lower basket is designed to take saucepans, lids, plates, salad bowls, cutlery, etc. Serving dishes and large lids should be arranged around the edge of the basket, ensuring that the spray arms can turn freely. The cutlery basket Warning! Long bladed knives stored in an upright position are a potential hazard. Long and/or sharp items of cutlery such as carving knives must be positioned horizontally in the upper basket. Take care when loading or unloading sharp items such as knives.
1. Place the cutlery basket on a firm support (table, worktop) and unfold both handle parts. 2. After unfolding, fold back both handle parts. Glasses with long stems can be placed upside down in the cup racks. For taller items, the cup racks can be folded upwards. Before closing the door, ensure that the spray arms can rotate freely. The upper basket The upper basket is designed for plates (dessert plates, saucers, dinner plates of up to 24 cm in diameter), salad bowls, cups and glasses.
Maximum height of the dishes in: the upper basket the lower basket With upper basket raised 20 cm 31 cm With upper basket lowered 24 cm 27 cm To move to the higher position proceed as follows: 1. Pull out the basket until it stops. 2. Carefully lift both sides upwards until the mechanism is engaged and the basket is stable. Use of detergent Only use detergents specifically designed for use in dishwashers.
Detergent tablets Detergent tablets from different manufacturers dissolve at different rates. For this reason, some detergent tablets do not attain their full cleaning power during short washing programmes. Therefore, please use long washing programmes when using detergent tablets, to ensure the complete removal of detergent residuals. 20 = approximately 20 g of detergent 30 = approximately 30 g of detergent 3.
Multi tab function This appliance is equipped with the Multi tab function, that allows the use of combi detergent tablets. These products are detergents with a combined cleaning, rinsing and salt functions. They can also contain other different agents depending on which kind of tablets you choose ("3 in 1", "4 in 1", "5 in 1" etc...). Check whether these detergents are suitable for your water hardness. See the manufacturers instructions.
5. To memorise the operation, switch off the dishwasher by pressing the On/off button. If you decide to revert back to the use of individual detergents we advise that you: 1. Deactivate the Multi tab function. 2. Fill up the salt container and the rinse aid dispenser again. 3. Adjust the water hardness setting to the highest setting and perform 1 normal washing programme without loading any dishes. 4. Adjust the water hardness setting according to the hardness of the water in your area. 5.
• If a new washing programme is to be selected, check that there is detergent in the detergent dispenser. Setting and starting the programme with delay start Interrupt a washing programme in progress 1. After having selected the washing programme, press one of the delay start buttons until the flashing number of hours for the delay start appear in the digital display. The start of the selected washing programme can be delayed for between 1 and 19 hours. 2.
When the washing programme has finished, it is recommended that the dishwasher is unplugged and the water tap turned off. Unloading the dishwasher • Water may appear on the sides and the door of the dishwasher as the stainless steel will eventually become cooler than the dishes. • Hot dishes are sensitive to knocks. The dishes should therefore be allowed to cool down before removing from the appliance.
flat filter does not protrude above the base of the washing compartment. NEVER use the dishwasher without filters. Incorrect repositioning and fitting of the filters will produce poor washing results and will result in damage to the appliance. NEVER try to remove the spray arms. If residues of soil have clogged the holes in the spray arms, remove the debris with a cocktail stick. 4. Take hold of the coarse filter (A) by the handle with the hole and remove from the microfilter (B). 5.
1. Unplug it. 2. Turn the water tap off. 3. Remove the water inlet and discharge hoses. 4. Pull the machine out together with the hoses. Avoid over tilting the machine during transportation. Frost precautions Avoid placing the machine in a location where the temperature is below 0°C. If this is unavoidable, empty the machine, close the appliance door, disconnect the water inlet pipe and empty it. Moving the machine If you have to move the machine (moving house, etc...
Fault code and malfunction • appears in the digital display Anti-flood device is activated Possible cause and solution • Close the water tap and contact our extended warranty administrators, refer to Repairs-After Sales Service on the following pages. Malfunction Possible cause and solution The programme does not start • The dishwasher door has not been properly closed. Close the door. • The main plug is not plugged in. Insert the main plug. • The fuse has blown out in the household fuse box.
The wash results are not satisfactory Water drops have dried onto glasses and dishes • Increase rinse aid dosage. • The detergent may be the cause. Contact the detergent manufacturer’s consumer care line.
Technical data Dimensions Width Height Depth 45 cm 85 cm 61 cm Electrical connection - Voltage - Overall power - Fuse Information on the electrical connection is given on the rating plate on the inner edge of the dishwasher door. Water supply pressure Minimum Maximum 0,5 bar (0,05 MPa) 8 bar (0,8 MPa) Capacity 9 place settings Weight 38 kg Installation Fitting under a counter Warning! It is dangerous to alter the specifications or attempt to modify this product in any way.
Remove the machine’s worktop by unscrewing the two rear retaining screws (1), pull the worktop from the back of the machine (2) and slide out the front slots, lifting the worktop (3). Insert the machine after adjusting the levelling with the adjustable feet. When inserting the machine, ensure that the water inlet and drain hoses are not kinked or squashed. During all operations that involve accessibility to internal components the dishwasher has to be unplugged.
• The electrical cable for the safety valve is in the double-walled water inlet hose. Do not immerse the water inlet hose or the safety valve in water. • If water inlet hose or the safety valve is damaged, remove the mains plug immediately. • A water inlet hose with safety valve must only be replaced by a local repair agent. The water pressure must be within the limits given in the "Technical data". Your local Water Authority will advise you on the average mains pressure in your area.
When connecting the drain hose to an under sink trap spigot, the entire plastic membrane (A) must be removed. Failure to remove all the membrane will result in food particles building up over time eventually blocking the dishwasher drain hose spigot. The drain hose can face either to the right or left of the dishwasher. Ensure the hose is not bent or squashed as this could prevent or slow down the discharge of water.
Electrical connection Warning! Safety standards require the appliance to be earthed. Prior to using the appliance for the first time, ensure that the rated voltage and type of supply on the rating plate match that of the supply where the appliance is to be installed. The fuse rating is also to be found on the rating plate. Always plug the mains plug into a correctly installed shockproof socket. Multi-way plugs, connectors and extension cables must not be used.
4. The purchase date (found on your receipt). 5. The model and serial number of the appliance (found on the rating plate). So that you always have these numbers at hand, we recommend that you make a note of them here: Mod. : . . . . . . . . . . . . . . . . . . . . . . . . . . . . . . . . . . PNC : . . . . . . . . . . . . . . . . . . . . . . . . . . . . . . . . . . S.No. : . . . . . . . . . . . . . . . . . . . . . . . . . . . . . . . . . .
John Lewis Partnership 171 Victoria Street London SW1E 5NN www. johnlewis.