JLLFW1602 Fridge Instruction manual
Safety information It is most important that this instruction book should be retained with the appliance for future reference. Should the appliance be sold or transferred to another owner, or should you move house and leave the appliance, always ensure that the book is supplied with the appliance in order that the new owner can get to know the functioning of the appliance and the relevant warnings. These warnings have been provided in the interest of safety.
• The appliance is intended for keeping foodstuff and/or beverages in a normal household as explained in this instruction booklet. • Do not use a mechanical device or any artificial means to speed up the thawing process. • Do not use other electrical appliances (such as ice cream makers) inside of refrigerating appliances, unless they are approved for this purpose by the manufacturer. • Do not damage the refrigerant circuit.
• Please refer to the correct positioning and location instructions that can be found in the Installation section of this user guide. • The appliance must not be located close to radiators or cookers. • Make sure that the mains plug is accessible after the installation of the appliance. • Appliance's manufacturers storage recommendations should be strictly adhered to. Refer to relevant instructions.
Contents For the user For the installer Safety information 2 Control Panel 6 6 6 6 6 7 7 7 7 7 Display Switching on Switching off Temperature regulation Functions Menu Eco Mode Function Shopping Function Child Lock Function Holiday Function "H" First use Technical Information 15 Installation Location Levelling Positioning Electrical Connection Rear spacers Door reversibility 8 8 Cleaning the interior Daily use 8 8 8 9 9 9 Use of the fridge compartment Movable shelves Vegetable Drawer Bottle rac
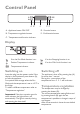
Control Panel A B C D E A - Appliance button ON/OFF D - Function button B - Temperature regulation button E - Confirmation button C - Temperature and function indicator Display If on the Eco Mode function is on If on the Shopping function is on Positive Temperature indicator If on the Child Lock function is on Temperature indicator Switching on Switching off Insert the plug into the power outlet. If the display is not illuminated, press button (A), to start the appliance.
Functions Menu The Shopping function shuts off automatically after approximately 6 hours. It is possible to de-activate the function at any time by pressing key (D) until the corresponding icon will flash and then key (E). By activating the key D the functions menu is operating. Each function could be confirmed by pressing button E. If there is no confirmation after some seconds the display will go out from the menu and return in normal condition.
First use Cleaning the interior Important! Do not use detergents or abrasive powders, as these will damage the finish. Before using the appliance for the first time, wash the interior and all internal accessories with lukewarm water and some neutral soap so as to remove the typical smell of a brandnew product, then dry thoroughly.
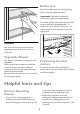
Bottle rack Place the bottles (with the opening facing front) in the pre-positioned shelf. Important! If the shelf is positioned horizontally, place only closed bottles. This bottle holder shelf can be tilted in order to store previously opened bottles. To obtain this result, pull the shelf up so it can rotate upwards and be placed on the next higher level.
• position food so that air can circulate freely around it • The thermic dilatation might cause a sudden cracking noise. This is not a fault with the appliance and is a completely normal operating sound. Hints for refrigeration Useful hints: Meat (all types) : wrap in polythene bags and place on the glass shelf above the vegetable drawer. For safety, store in this way only one or two days at the most. Cooked foods, cold dishes, etc..: these should be covered and may be placed on any shelf.
Important! Do not pull, move or damage any pipes and/or cables inside the cabinet. Never use detergents, abrasive powders, highly perfumed cleaning products or wax polishes to clean the interior as this will damage the surface and leave a strong odour. Clean the condenser (black grill) and the compressor at the back of the appliance with a brush or a vacuum cleaner. This operation will improve the performance of the appliance and save electricity consumption.
What to do if… During operation of the appliance some smaller but annoying trouble can often occur, which does not require calling a technician out. In the following chart information is given about them to avoid unnecessary charges on service. Important! The appliance operates discontinuously, so the stopping of compressor does not mean being no current. That is why you must not touch the electrical parts of the appliance before breaking the circuit.
Problem Possible cause Solution Water flows into the refrigerator. The water outlet is clogged. Clean the water outlet. Food prevent that water flows into the water collector. Make sure that food do not touch the rear plate. Water flows on the ground. The melting water outlet does not flow in the evaporative tray above the compressor. Attach the melting water outlet to the evaporative tray. There is too much frost and ice. Food are not wrapped properly. Wrap the food better.
As much as the advice does not lead to result, call the nearest brand-mark service. Replacing the lamp 1. Disconnect the mains plug from the mains socket. 2. Press on the rear hook and at the same time slide the lamp cover in the direction of the arrow. 3. Replace the lamp with one of the same power and specifically designed for household appliances. (the maximum power is shown on the light lamp cover) 4. Install the lamp cover by sliding it into its original position. 5.
Technical Information Dimension Height 1600 mm Width 600 mm Depth 650 mm Voltage 230-240 V V Frequency 50 Hz The technical information are situated in the rating plate on the internal left side of the appliance and in the energy label. Installation Read the "Safety Information" carefully for your safety and correct operation of the appliance before installing the appliance.
Levelling Climate class When placing the appliance ensure that it stands level. This can be achieved by two adjustable feet at the bottom in front. Ambient temperature N +16°C to + 32°C ST +16°C to + 38°C T +16°C to + 43°C Electrical Connection Caution! Any electrical work required to install this appliance should be carried out by a qualified electrician or competent person. Warning! This appliance must be earthed.
As the colours of the wires in the mains lead of this appliance may not correspond with the coloured markings identifying the terminals in your plug, proceed as follows: 1. Connect the wire coloured green and yellow to the terminal marked either with the letter “E“ or by the earth symbol or coloured green and yellow. 2. Connect the wire coloured blue to the terminal either marked with the letter “N“ or coloured black. 3.
accessory bag the two plugs and cover the holes left open after having removed the handle. f A A 3. 4. 5. e Remove the door. Unscrew the pin (f) of the bottom hinge and install it on the opposite side. Unscrew the pin of the upper hinge and install it on the opposite side. 9. 6. 7. 8. Make sure that the front board of the door is parallel to the front board of the top. 10. Reposition, level the appliance, wait for at least four hours and then connect it to the power socket.
S.No. : . . . . . . . . . . . . . . . . . . . . . . . . . . . . . . .... Your appliance is covered by a 3 year parts and labour guarantee (see separate details given at point of sale). Please retain your purchase receipt safely for the service engineer to verify the purchase details. Before calling out an engineer, please ensure you have read the details under the heading ''What to do if''. When you contact your local repair agent you will need to give the following details: 1.
John Lewis Partnership 171 Victoria Street London SW1E 5NN www. johnlewis.