Stock code : 2028.
Contents Foreword Installation guide Product settings 1.1 Warnings 01 1.2 Precautions 01 2.1 Un-boxing 02 2.2 Package contents 02 2.3 Product placement and environment 02 2.4 Product Movement 03 3.1 Product Introduction 04 3.2 Power On 04 3.3 Connect to WIFI 05 3.4 Installation and replacement of ink cartridge 06 3.5 Ink cartridge maintenance 09 3.6 Placement and orientation 09 3.7 Start a print job 10 3.8 Cancel print job 10 3.9 Clean drip tray 11 Product specifications 4.
FOREWORD This manual mainly guides the basic operating procedures and precautions the users when using the product to avoid problems such as product circuit abnormality, electric shock, wire fire, operator injury and damage caused by improper use of the product.
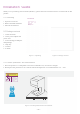
Installation Guide Thank you for purchasing Latte Art Printer(Product), please follow the instructions below to install and use this product. 2.1 Unboxing Precaution 1. Open the carton box 2. Remove the buffer materials 3. Take out the machine Avoid injury lifting tools appropriate lift the product out of box. use and 2.2 Package contents 1. A Latte Art Printer 2. A set of power adapter and power cord 3. An ink cartridge (An independent package) 4. A drip tray 5. A coaster 6. A clean kit Figure 2.
2.4 Product Movement If you want to move the product, please put the product back to the carton box and use the packaging materials to seal the product tightly to avoid damage to the product when moving. Please refer to the following steps for product movement: 1. Open the front cover and open the‘Latte Art Printer' APP 2. Refer Chapter 3.4.2 to remove the ink cartridge Information’->‘Check the printer’->’ Pinter Maintenance’ ->‘package material fixed’-> and click 3.
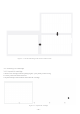
Product settings 3.1 Product Introduction Front cover LED indicator 9 Start button Lift tray and coaster Power switch DC power socket USB port Drip tray Cartridge stabilizer Figure 3.1 Product parts name 3.2 Power On To use this product , first insert the round plug of the power adapter into the DC power socket of the product, insert the other end of the power cord into the AC socket (110V~240V) , and press the power switch to start the product. Figure 3.
3.3 Connecting WIFI (with network ) 3.3.1 After the user turns on the device, if the device is not connected to the Internet, the system will actively remind you to enter the networking page for networking, as shown in Figure 3-3-1, click "Go to Internet" to jump to the device wifi connection page for networking. Figure 3.3.1 Connect to WiFi 3.3.2 Switch device usage mode There are two usage modes for the Latte Art Printer: cloud networking mode and offline mode.
Figure 3-3-3 Cloud networking mode switch to offline mode 3.4 Installing ink cartridge 3.4.1 Unpack ink cartridge 1. Remove ink cartridge from the packaging box, open plastic protective bag 2. Lift the protection buckle outward 3. Rip the blue tape at the bottom side of the ink cartridge ① ② ③ Figure 3.4.
3.4.2 Move ink cartridge stabilizer outward (Prepare for ink cartridge installation) Please use APP to move ink cartridge stabilizer 1. Use APP -> Click‘Information’->‘Check the printer’ ->‘Printer maintenance’->‘Replace the inkjet cartridge’ 2. On this page, click on the“Move ink cartridge”and the stabilizer will move toward front cover. Please wait stabilizer is fully stopped before open front cover. Figure 3.4.2 Mobile stabilizer 3.4.
3.4.4 Resume Ink cartridge stabilizer 1. Continue with 3.4.2, at‘Move the ink Cartridge’page 2. Click‘Recover the ink cartridge’and the ink cartridge stabilizer will return to standby position. Figure 3.4.4 Resume the ink cartridge stabilizer 3.4.5 Ink cartridge print test When installing a new ink cartridge at the first time or if the print result is unclear, please use the following steps to execute print test function on the APP. 1.
3.5 Ink cartridge maintenance 1. If the ink cartridge is planning not use for a long time, it is recommended to remove the ink cartridge from the printer and place it in a clean sealed bag or box to avoid contamination. 2. To keep good print quality, it is recommended to wipe the ink cartridge gently with a paper towel (either wet or dry) before the ink cartridge is inserted back to ink cartridge stabilizer or print results are unclear. 3.
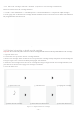
(In the picture below: the white inside the Mug is milk foam, and the brown color represents coffee liquid) ① ③ ② Milk foam is too high milk foam is just right Coffee milk foam is too low milk foa Figure 3.6.2 Height of milk foam , cream or foam 3.7 Start a print job 1. Click the "Printer" button in the left menu bar, as shown in Figure 3-7-1, and select a method of transferring images to generate a print order 2.
Figure 3-7-3 Corresponding order to print Figure 3-7-4 Start to print 3.8 Cancel print Job To cancel the print job after receiving the print job, please refer to the following two methods. Method 1: As shown in Figure 3-7-4, click the "Cancel Printing" button on the print page, after confirming, you can cancel the printing of the entire order.
3.9 Cleaning drip tray Please clean the drip tray every day. This procedure will use APP to operate. Important: If you do not clean the drip tray, it will breed bacteria and damage the product. Purpose: Drip tray is used to load the service drops prior print. ->‘Printer maintenance’->‘ Clean the ink cartridge tray’ 1. Using APP -> Click‘Shop management’ 2. On this page, click“Move ink cartridge”and the stabilizer will move toward front cover. 3.
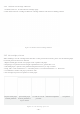
Power supply Electrical specifications Power adapter Input voltage: 100 ~ 240 Vac ,50~ 60 Hz Power requirement Output voltage: 24 Vdc, 2500 mA Adapter consumption Acoustic emission specifications Physical dimensions 60W Sound pressure ≤67dBA Width 258mm Depth 306mm Height 463mm Weight 12kg Caramel ink Ink Cartridge Storage environment Operating environment Storage temperature : -25°C~ 60°C Operating temperature : 5°C~35°C 6 months after manufacture date.
Jolimark Latte Art Printer firmware upgrade Online upgrade: If the firmware has a new version upgrade, after opening the APP, the system will give an upgrade reminder, and the user can enter the upgrade page for online upgrade. The detailed steps are as follows: 1. To receive the upgrade notification, click "Upgrade Now" to enter the device version page, as shown in the below figure 5-1; 2. Click the "Upgrade" button to enter the upgrade process; 3.
Q3. The printed image is not clear! - Make sure the milk foam or cream is proper prepared. - Different densities of milk foam or cream can affect print quality. - Please refer to section 3.4.5 and section 3.5. Q4. I accidentally knocked over coffee mug - Please turn off the power and unplug the power cord immediately. - Please wipe this product with a clean and dry cloth (rag). - If there is liquid contact with the power button or power outlet, please wipe it carefully.
Product Safety Instructions 1. Please read all manual. 2. This product can only be used with original ink cartridge and accessories. Do not use any unauthorized accessories or supplies. 3. Children should not use this product. 4. Please use 110V~240V as the power input voltage. 5. Do not use the power adapter on other products. 6.
FCC Compliance Statement This equipment has been tested and found to comply with the limits for a Class B digital device, pursuant to Part 15 of the FCC Rules. These limits are designed to provide reasonable protection against harmful interference in a residential installation. This equipment generates, uses, and can radiate radio frequency energy and, if not installed and used in accordance with the instructions, may cause harmful interference to radio communications.
EU Declaration of Conformity Languages English Français Čeština Polski Română Русский Magyar Türkçe Українська Slovenčina Deutsch Español Italiano Nederlands Português Norsk Svenska Dansk suomen kieli Statement This equipment is in compliance with the essential requirements and other relevant provisions of Directive 2014/53/EU, 2014/35/EU. Cet équipement est conforme aux exigences essentielles et autres dispositions de la directive 2014/53/EU, 2014/35/EU.
This equipment complies with EU radiation exposure limits set forth for an uncontrolled environment. This equipment should be installed and operated with minimum distance 20cm between the radiator & your body.
Certificate Official public number Shenzhen Jolimark-Kamo Mobile Payment Co., LTD. Email : kamopos@jolimark.